> ## Documentation Index
> Fetch the complete documentation index at: https://kb.hosting.com/llms.txt
> Use this file to discover all available pages before exploring further.
# Backing up your data using Dropmysite
> Learn to back up your data effortlessly with Dropmysite's cPanel plugin for managing database, website, and email backups.
This article describes how to use the Dropmysite cPanel plugin to manage the following items:
* Website backups.
* Database backups.
* E-mail backups.
## Do I need to configure any backups?
Dropmysite configures some types of backups automatically. This often means that you do not need to follow any additional steps to configure backups for your account:
* **Website backups:** Dropmysite automatically configures a website backup for your account. No additional configuration is required, but you can create customized site backups if you want.
> 📘 Note
>
> Addon domains are created inside the *public\_html* folder, so they are automatically included in the default site backup.
* **Database backups:** Dropmysite automatically configures backups for any MySQL and PostgreSQL databases that you create through cPanel. However, if you install an application through Softaculous, or if you auto-install an application with your initial hosting order, you must manually configure a database backup as described below in the **Adding a database backup** section.
* **E-mail backups:** When you purchase Dropmysite with your initial hosting order, Dropmysite automatically configures an e-mail backup for your account. No additional configuration is required. However, if you add Dropmysite to your account at a later date, you must manually configure an e-mail backup as described below in the **Adding an email backup** section.
> 📘 Note
>
> You only need to add one e-mail backup, which backs up all e-mail accounts for your primary domain and any addon domains.
## Website backups
Dropmysite automatically configures a backup (named *Website Backup* ) of your entire home directory, so normally you do not need to create a manual website backup. You can create manual backups of specific directories and subdirectories if you want, however.
For example, you may want to create a manual backup for a subdomain or addon domain. If you had a subdomain named *mysubdomain.example.com*, you could create a backup specifically for the *\~/public\_html/mysubdomain* directory (and exclude the *\~/public\_html/mysubdomain* directory in your main site backup).
### Managing existing website backups
To manage an existing website backup, follow these steps:
1. Log in to cPanel.
> 📘 Note
>
> If you do not know how to log in to your cPanel account, please see [this article](/docs/accessing-cpanel).
2. On the **Tools** page, in the **Software** section, click **Dropmysite**:\\

The Dropmysite dashboard appears:\\
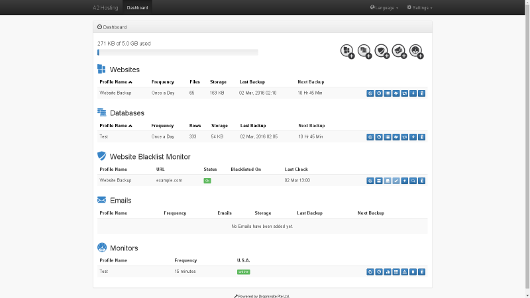
3. Under **Websites**, locate the backup you want to manage, and then select one of the following options:
* To edit the connection, click the **Edit Connection** ( ) icon.
* To edit the schedule, click the **Edit Schedule** (
) icon.
* To edit the schedule, click the **Edit Schedule** ( ) icon.
* To view the backup history, click the **Backup History** (
) icon.
* To view the backup history, click the **Backup History** ( ) icon.
* To download website backup files, click the **Download Files** (
) icon.
* To download website backup files, click the **Download Files** ( ) icon.
* To restore the website backup, click the **Restore Files** (
) icon.
* To restore the website backup, click the **Restore Files** ( ) icon.
* To do an immediate website backup, click the **Backup Now** (
) icon.
* To do an immediate website backup, click the **Backup Now** ( ) icon.
* To delete the website backup profile, click the **Delete** (
) icon.
* To delete the website backup profile, click the **Delete** ( ) icon.
### Adding a website backup manually
To create a website backup manually, follow these steps:
1. Log in to cPanel.
> 📘 Note
>
> If you do not know how to log in to your cPanel account, please see [this article](/docs/accessing-cpanel).
2. On the **Tools** page, in the **Software** section, click **Dropmysite**:\\

The Dropmysite dashboard appears:\\

3. Click the **Add Website**
) icon.
### Adding a website backup manually
To create a website backup manually, follow these steps:
1. Log in to cPanel.
> 📘 Note
>
> If you do not know how to log in to your cPanel account, please see [this article](/docs/accessing-cpanel).
2. On the **Tools** page, in the **Software** section, click **Dropmysite**:\\

The Dropmysite dashboard appears:\\

3. Click the **Add Website**  icon.
4. On the **Connection Details** page, specify the site settings:
* In the **Protocol** list box, select **SFTP - SSH File Transfer Protocol**.
* You can use password authentication, but hosting.com **strongly** recommends you use public key authentication instead. To do this, select the **Public key authentication** check box.
> 📘 Note
>
> When you enable public key authentication, no further configuration is required on your part. Dropmysite handles all of the configuration details. 👍 Tip
>
> Public key authentication has the following advantages over regular password authentication:
>
> * You do not have to provide your hosting.com account password directly to Dropmysite.
> * You can change your account password without having to update any Dropmysite settings. If you use password authentication and then change your account password, however, you **must** update the Dropmysite settings with your new password. Otherwise, Dropmysite will be unable to access your account.
* In the **Directory Path** text box, you can optionally specify a path in your home directory.
> 📘 Note
>
> By default, Dropmysite backs up all of the files and subdirectories in your home directory. To back up only a subset of these files, specify the directory path. For example, to back up just the publicly visible files on your website, type `public_html` .
* In the **Port** text box, type `7822`.
* In the **Host name** text box, type the name of the hosting.com server for your account.
> 📘 Note
>
> For information about how to determine your account's server name, please see [this article](/docs/determining-your-accounts-server-name).
* In the **User name** text box, type your hosting.com account username.
* If you are using password authentication, in the **Password** text box, type your hosting.com account password. If you are using public key authentication, leave the **Password** text box empty.
5. Click **Next**. Dropmysite tests the connection using the values you provided.
6. When the connection test is successful, the **Schedule Backup** page appears:
* In the **Directories** section, select the subdirectories you want to include in the backup.
* In the **Exclusions** section, you can select which files or directories are not included in the backup. To add an exclusion, type the filename or directory, and then press Enter.
* In the **Retention** list box, select how many backups of the site you want to keep at one time.
* In the **Frequency** list box, select how often you want Dropmysite to back up the website.
* In the **Start time** list box, select when you want Dropmysite to do the website backup.
* In the **Time zone** list box, select the time zone for your geographic location.
7. Click **Next**.
8. On the **Save Profile** page, in the **Profile name** text box, type a name for the website backup. The name can be anything you want.
> 👍 Tip
>
> To do an immediate backup, select the **Start a backup now** check box.
9. Click **Save**. The website backup is now configured and active.
## Database backups
Dropmysite can back up MySQL and PostgreSQL databases. You can specify the backup intervals, backup retention length, and more.
**Important**
* Although the Dropmysite user interface displays options for Microsoft SQL and MongoDB backups, they do not work on shared hosting accounts. This is because shared hosting servers do not support Microsoft SQL or MongoDB.
* Dropmysite automatically creates a database user in your account with the format *username\_random-string*, where ***username*** represents your account username, and ***random-string*** is a sequence of randomly-generated characters. Dropmysite uses this database user to back up your databases.
### Managing database backups
To manage your database backups, follow these steps:
1. Log in to cPanel.
> 📘 Note
>
> If you do not know how to log in to your cPanel account, please see [this article](/docs/accessing-cpanel).
2. On the **Tools** page, in the **Software** section, click **Dropmysite**:\\

The Dropmysite dashboard appears:\\

3. Under **Databases**, locate the backup you want to manage, and then select one of the following options:
* To edit the connection, click the **Edit Connection** () icon.
* To edit the schedule, click the **Edit Schedule** () icon.
* To view the backup history, click the **Backup History** () icon.
* To download the database backup file, click the **Download Files** () icon.
* To restore the database backup, click the **Restore Database** () icon.
* To do an immediate database backup, click the **Backup Now** () icon.
* To delete the database backup profile, click the **Delete** () icon.
### Adding a database backup
**Important**
If this is the first MySQL database backup you are configuring for Dropmysite, you must allow remote MySQL access for the *backup.dropmysite.com* domain. For information about how to do this, please see [this article](/docs/remote-mysql-access). You do not need to do this for any subsequent MySQL backups that you configure.
To create a Dropmysite database backup, follow these steps:
1. Log in to cPanel.
> 📘 Note
>
> If you do not know how to log in to your cPanel account, please see [this article](/docs/accessing-cpanel).
2. On the **Tools** page, in the **Software** section, click **Dropmysite**:\\

The Dropmysite dashboard appears:\\

3. Click the **Add Database**
icon.
4. On the **Connection Details** page, specify the site settings:
* In the **Protocol** list box, select **SFTP - SSH File Transfer Protocol**.
* You can use password authentication, but hosting.com **strongly** recommends you use public key authentication instead. To do this, select the **Public key authentication** check box.
> 📘 Note
>
> When you enable public key authentication, no further configuration is required on your part. Dropmysite handles all of the configuration details. 👍 Tip
>
> Public key authentication has the following advantages over regular password authentication:
>
> * You do not have to provide your hosting.com account password directly to Dropmysite.
> * You can change your account password without having to update any Dropmysite settings. If you use password authentication and then change your account password, however, you **must** update the Dropmysite settings with your new password. Otherwise, Dropmysite will be unable to access your account.
* In the **Directory Path** text box, you can optionally specify a path in your home directory.
> 📘 Note
>
> By default, Dropmysite backs up all of the files and subdirectories in your home directory. To back up only a subset of these files, specify the directory path. For example, to back up just the publicly visible files on your website, type `public_html` .
* In the **Port** text box, type `7822`.
* In the **Host name** text box, type the name of the hosting.com server for your account.
> 📘 Note
>
> For information about how to determine your account's server name, please see [this article](/docs/determining-your-accounts-server-name).
* In the **User name** text box, type your hosting.com account username.
* If you are using password authentication, in the **Password** text box, type your hosting.com account password. If you are using public key authentication, leave the **Password** text box empty.
5. Click **Next**. Dropmysite tests the connection using the values you provided.
6. When the connection test is successful, the **Schedule Backup** page appears:
* In the **Directories** section, select the subdirectories you want to include in the backup.
* In the **Exclusions** section, you can select which files or directories are not included in the backup. To add an exclusion, type the filename or directory, and then press Enter.
* In the **Retention** list box, select how many backups of the site you want to keep at one time.
* In the **Frequency** list box, select how often you want Dropmysite to back up the website.
* In the **Start time** list box, select when you want Dropmysite to do the website backup.
* In the **Time zone** list box, select the time zone for your geographic location.
7. Click **Next**.
8. On the **Save Profile** page, in the **Profile name** text box, type a name for the website backup. The name can be anything you want.
> 👍 Tip
>
> To do an immediate backup, select the **Start a backup now** check box.
9. Click **Save**. The website backup is now configured and active.
## Database backups
Dropmysite can back up MySQL and PostgreSQL databases. You can specify the backup intervals, backup retention length, and more.
**Important**
* Although the Dropmysite user interface displays options for Microsoft SQL and MongoDB backups, they do not work on shared hosting accounts. This is because shared hosting servers do not support Microsoft SQL or MongoDB.
* Dropmysite automatically creates a database user in your account with the format *username\_random-string*, where ***username*** represents your account username, and ***random-string*** is a sequence of randomly-generated characters. Dropmysite uses this database user to back up your databases.
### Managing database backups
To manage your database backups, follow these steps:
1. Log in to cPanel.
> 📘 Note
>
> If you do not know how to log in to your cPanel account, please see [this article](/docs/accessing-cpanel).
2. On the **Tools** page, in the **Software** section, click **Dropmysite**:\\

The Dropmysite dashboard appears:\\

3. Under **Databases**, locate the backup you want to manage, and then select one of the following options:
* To edit the connection, click the **Edit Connection** () icon.
* To edit the schedule, click the **Edit Schedule** () icon.
* To view the backup history, click the **Backup History** () icon.
* To download the database backup file, click the **Download Files** () icon.
* To restore the database backup, click the **Restore Database** () icon.
* To do an immediate database backup, click the **Backup Now** () icon.
* To delete the database backup profile, click the **Delete** () icon.
### Adding a database backup
**Important**
If this is the first MySQL database backup you are configuring for Dropmysite, you must allow remote MySQL access for the *backup.dropmysite.com* domain. For information about how to do this, please see [this article](/docs/remote-mysql-access). You do not need to do this for any subsequent MySQL backups that you configure.
To create a Dropmysite database backup, follow these steps:
1. Log in to cPanel.
> 📘 Note
>
> If you do not know how to log in to your cPanel account, please see [this article](/docs/accessing-cpanel).
2. On the **Tools** page, in the **Software** section, click **Dropmysite**:\\

The Dropmysite dashboard appears:\\

3. Click the **Add Database**  icon.
4. On the **Connection Details** page, specify the database settings:
* In the **Database type** list box, select **MySQL**.
* Confirm that the **Port** text box is set to **3306**.
* In the **Host name** text box, type the name of the hosting.com server for your account.
> 📘 Note
>
> For information about how to determine your account's server name, please see [this article](/docs/determining-your-accounts-server-name).
* In the **Database name** text box, type the name of the database you want to back up.
* In the **User name** text box, type the name of the MySQL database user for the database.
* In the **Password** text box, type the password for the MySQL database user.
5. Click **NEXT**. Dropmysite tests the database connection using the values you provided.
6. When the database connection test is successful, the **Schedule Backup** page appears:
* In the **Retention** list box, select how many backups of the database you want to keep at one time.
* In the **Frequency** list box, select how often you want Dropmysite to back up the database.
* In the **Start time** list box, select when you want Dropmysite to do the database backup.
* In the **Time zone** list box, select the time zone for your geographic location.
7. Click **Next**.
8. On the **Save Profile** page, in the **Profile name** text box, type a name for the database backup. The name can be anything you want.
> 👍 Tip
>
> To do an immediate backup, select the **Start a backup now** check box.
9. Click **Save**. The database backup is now configured and active.
## E-mail backups
Dropmysite can back up the files from your domain's e-mail accounts. You can specify the backup intervals, retain backups for a specified length of time, and more.
### Adding an e-mail backup
To create an e-mail backup, follow these steps:
1. Log in to cPanel.
> 📘 Note
>
> If you do not know how to log in to your cPanel account, please see [this article](/docs/accessing-cpanel).
2. On the **Tools** page, in the **Software** section, click **Dropmysite**:\\

The Dropmysite dashboard appears:\\

3. Click the **Add Email**
icon.
4. On the **Connection Details** page, specify the database settings:
* In the **Database type** list box, select **MySQL**.
* Confirm that the **Port** text box is set to **3306**.
* In the **Host name** text box, type the name of the hosting.com server for your account.
> 📘 Note
>
> For information about how to determine your account's server name, please see [this article](/docs/determining-your-accounts-server-name).
* In the **Database name** text box, type the name of the database you want to back up.
* In the **User name** text box, type the name of the MySQL database user for the database.
* In the **Password** text box, type the password for the MySQL database user.
5. Click **NEXT**. Dropmysite tests the database connection using the values you provided.
6. When the database connection test is successful, the **Schedule Backup** page appears:
* In the **Retention** list box, select how many backups of the database you want to keep at one time.
* In the **Frequency** list box, select how often you want Dropmysite to back up the database.
* In the **Start time** list box, select when you want Dropmysite to do the database backup.
* In the **Time zone** list box, select the time zone for your geographic location.
7. Click **Next**.
8. On the **Save Profile** page, in the **Profile name** text box, type a name for the database backup. The name can be anything you want.
> 👍 Tip
>
> To do an immediate backup, select the **Start a backup now** check box.
9. Click **Save**. The database backup is now configured and active.
## E-mail backups
Dropmysite can back up the files from your domain's e-mail accounts. You can specify the backup intervals, retain backups for a specified length of time, and more.
### Adding an e-mail backup
To create an e-mail backup, follow these steps:
1. Log in to cPanel.
> 📘 Note
>
> If you do not know how to log in to your cPanel account, please see [this article](/docs/accessing-cpanel).
2. On the **Tools** page, in the **Software** section, click **Dropmysite**:\\

The Dropmysite dashboard appears:\\

3. Click the **Add Email**  icon.
4. On the **Connection Details** page, specify the site settings:
* In the **Protocol** list box, select **SFTP - SSH File Transfer Protocol**.
* You can use password authentication, but hosting.com **strongly** recommends you use public key authentication instead. To do this, select the **Public key authentication** check box.
> 📘 Note
>
> When you enable public key authentication, no further configuration is required on your part. Dropmysite handles all of the configuration details. 👍 Tip
>
> Public key authentication has the following advantages over regular password authentication:
>
> * You do not have to provide your hosting.com account password directly to Dropmysite.
> * You can change your account password without having to update any Dropmysite settings. If you use password authentication and then change your account password, however, you **must** update the Dropmysite settings with your new password. Otherwise, Dropmysite will be unable to access your account.
* In the **Port** text box, type `7822`.
* In the **Host name** text box, type the name of the hosting.com server for your account.
> 📘 Note
>
> For information about how to determine your account's server name, please see [this article](/docs/determining-your-accounts-server-name).
* In the **User name** text box, type your hosting.com account username.
* If you are using password authentication, in the **Password** text box, type your hosting.com account password. If you are using public key authentication, leave the **Password** text box empty.
5. Click **Next**. Dropmysite tests the connection using the values you provided.
6. When the connection test is successful, the **Schedule Backup** page appears:
* In the **Directories** section, clear the check box for the **/** directory, and then select the check box for the **mail** directory.
* In the **Retention** list box, select how many backups of the site you want to keep at one time.
* In the **Frequency** list box, select how often you want Dropmysite to do the e-mail backup.
* In the **Start time** list box, select when you want Dropmysite to do the e-mail backup.
* In the **Time zone** list box, select the time zone for your geographic location.
7. Click **Next**.
8. On the **Save Profile** page, in the **Profile name** text box, type a name for the e-mail backup. The name can be anything you want.
> 👍 Tip
>
> To do an immediate backup, select the **Start a backup now** check box.
9. Click **Save**. The e-mail backup is now configured and active.
### Managing e-mail backups
To manage your e-mail backups, follow these steps:
1. Log in to cPanel.
> 📘 Note
>
> If you do not know how to log in to your cPanel account, please see [this article](/docs/accessing-cpanel).
2. On the **Tools** page, in the **Software** section, click **Dropmysite**:\\

The Dropmysite dashboard appears:\\

3. Under **Emails**, locate the backup you want to manage, and then select one of the following options:
* To edit the connection, click the **Edit Connection** () icon.
* To edit the schedule, click the **Edit Schedule** () icon.
* To view the backup history, click the **Backup History** () icon.
* To download e-mail backup files, click the **Download Emails** () icon.
* To restore the e-mail backup, click the **Restore Emails** () icon.
* To do an immediate e-mail backup, click the **Backup Now** () icon.
* To delete the e-mail backup profile, click the **Delete** () icon.
## More information
For more information about Dropmysite, please visit [https://www.dropmysite.com](https://www.dropmysite.com).
## Related articles
* [Restoring data with Dropmysite](/docs/restoring-data-with-dropmysite)
* [Maximizing Dropmysite backup storage space](/docs/maximizing-dropmysite-backup-storage-space)
* [Blacklist monitoring with Dropmysite](/docs/blacklist-monitoring-with-dropmysite)
icon.
4. On the **Connection Details** page, specify the site settings:
* In the **Protocol** list box, select **SFTP - SSH File Transfer Protocol**.
* You can use password authentication, but hosting.com **strongly** recommends you use public key authentication instead. To do this, select the **Public key authentication** check box.
> 📘 Note
>
> When you enable public key authentication, no further configuration is required on your part. Dropmysite handles all of the configuration details. 👍 Tip
>
> Public key authentication has the following advantages over regular password authentication:
>
> * You do not have to provide your hosting.com account password directly to Dropmysite.
> * You can change your account password without having to update any Dropmysite settings. If you use password authentication and then change your account password, however, you **must** update the Dropmysite settings with your new password. Otherwise, Dropmysite will be unable to access your account.
* In the **Port** text box, type `7822`.
* In the **Host name** text box, type the name of the hosting.com server for your account.
> 📘 Note
>
> For information about how to determine your account's server name, please see [this article](/docs/determining-your-accounts-server-name).
* In the **User name** text box, type your hosting.com account username.
* If you are using password authentication, in the **Password** text box, type your hosting.com account password. If you are using public key authentication, leave the **Password** text box empty.
5. Click **Next**. Dropmysite tests the connection using the values you provided.
6. When the connection test is successful, the **Schedule Backup** page appears:
* In the **Directories** section, clear the check box for the **/** directory, and then select the check box for the **mail** directory.
* In the **Retention** list box, select how many backups of the site you want to keep at one time.
* In the **Frequency** list box, select how often you want Dropmysite to do the e-mail backup.
* In the **Start time** list box, select when you want Dropmysite to do the e-mail backup.
* In the **Time zone** list box, select the time zone for your geographic location.
7. Click **Next**.
8. On the **Save Profile** page, in the **Profile name** text box, type a name for the e-mail backup. The name can be anything you want.
> 👍 Tip
>
> To do an immediate backup, select the **Start a backup now** check box.
9. Click **Save**. The e-mail backup is now configured and active.
### Managing e-mail backups
To manage your e-mail backups, follow these steps:
1. Log in to cPanel.
> 📘 Note
>
> If you do not know how to log in to your cPanel account, please see [this article](/docs/accessing-cpanel).
2. On the **Tools** page, in the **Software** section, click **Dropmysite**:\\

The Dropmysite dashboard appears:\\

3. Under **Emails**, locate the backup you want to manage, and then select one of the following options:
* To edit the connection, click the **Edit Connection** () icon.
* To edit the schedule, click the **Edit Schedule** () icon.
* To view the backup history, click the **Backup History** () icon.
* To download e-mail backup files, click the **Download Emails** () icon.
* To restore the e-mail backup, click the **Restore Emails** () icon.
* To do an immediate e-mail backup, click the **Backup Now** () icon.
* To delete the e-mail backup profile, click the **Delete** () icon.
## More information
For more information about Dropmysite, please visit [https://www.dropmysite.com](https://www.dropmysite.com).
## Related articles
* [Restoring data with Dropmysite](/docs/restoring-data-with-dropmysite)
* [Maximizing Dropmysite backup storage space](/docs/maximizing-dropmysite-backup-storage-space)
* [Blacklist monitoring with Dropmysite](/docs/blacklist-monitoring-with-dropmysite)