> ## Documentation Index
> Fetch the complete documentation index at: https://kb.hosting.com/llms.txt
> Use this file to discover all available pages before exploring further.
# Clearing the LiteSpeed cache
> Clear LiteSpeed cache via plugin or manually in cPanel/Plesk to ensure site updates appear immediately after changes.
LiteSpeed cache accelerates your site by caching visited pages for re-use. When making changes to your site, the cache continues to serve the older version until it is cleared. This article shows how to clear the LiteSpeed cache so changes are visible immediately.
## Clearing the LiteSpeed cache with a plugin
The best way to clear the LiteSpeed cache is by using a plugin for your installed application. LiteSpeed plugins are available for various popular applications and you can [see the full list here](https://www.litespeedtech.com/products/cache-plugins). Using a plugin allows you to clear the cache from the administration panel of your application. The LiteSpeed cache plugin also provides advanced cache-management tools and optimization features so you can get the most out of your Turbo account.
Here is an example of clearing the LiteSpeed cache using the WordPress plugin. If you do not have the plugin installed, please see [this article](/docs/installing-and-configuring-the-litespeed-cache-for-wordpress-plugin).
1. On the leftside menu of WordPress, hover over the **LiteSpeed** menu item until the flyout menu appears and then click **Manage**.\\
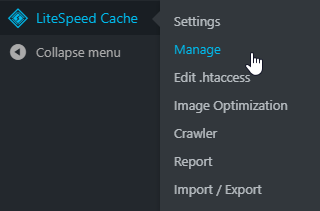 2. On the **Manage** page, click the **Purge All** button.\\
 Other choices on the **Manage** page can be used to clear specific portions of the cache.
## Clearing the LiteSpeed cache manually in cPanel
You can also clear the LiteSpeed cache by deleting the cache files stored in your account. To clear the cache manually, follow these steps:
1. Log in to cPanel.
> 📘 Note
>
> If you do not know how to log in to your cPanel account, please see [this article](/docs/accessing-cpanel).
2. On the **Tools** page, in the **Files** section, click **File Manager**:\\
Other choices on the **Manage** page can be used to clear specific portions of the cache.
## Clearing the LiteSpeed cache manually in cPanel
You can also clear the LiteSpeed cache by deleting the cache files stored in your account. To clear the cache manually, follow these steps:
1. Log in to cPanel.
> 📘 Note
>
> If you do not know how to log in to your cPanel account, please see [this article](/docs/accessing-cpanel).
2. On the **Tools** page, in the **Files** section, click **File Manager**:\\
 3. In the left column of File Manager, click the **lscache** folder:\\
 4. In the toolbar above the right column of File Manager, click **Select All:**\\
 5. In the top toolbar of File Manager, click **Delete**:\\
 A confirmation dialog box appears.
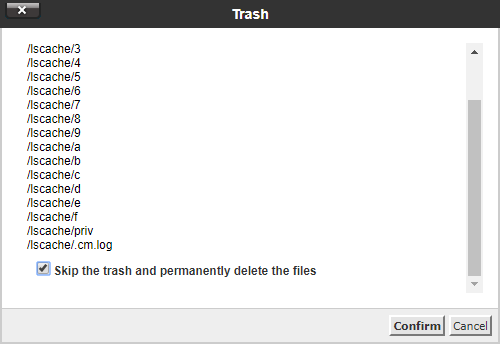
6. In the confirmation dialog box, select the **Skip the trash and permanently delete the files** checkbox, and then click **Confirm**:\\
A confirmation dialog box appears.
6. In the confirmation dialog box, select the **Skip the trash and permanently delete the files** checkbox, and then click **Confirm**:\\
 ## Clearing the LiteSpeed cache manually in Plesk
You can clear the LiteSpeed cache in Plesk by deleting the cache files stored in your account. To clear the cache manually, follow these steps:
1. Log in to Plesk.
> 📘 Note
>
> If you do not know how to log in to your Plesk account, please see [this article](/docs/logging-in-and-out-of-plesk).
2. Click **File Manager**:\\
## Clearing the LiteSpeed cache manually in Plesk
You can clear the LiteSpeed cache in Plesk by deleting the cache files stored in your account. To clear the cache manually, follow these steps:
1. Log in to Plesk.
> 📘 Note
>
> If you do not know how to log in to your Plesk account, please see [this article](/docs/logging-in-and-out-of-plesk).
2. Click **File Manager**:\\
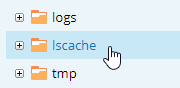
 3. In the left column of File Manager, click the **lscache** folder:\\
 4. In the headings at the top of the right column of file manager, click the checkbox to select all the files and folders in the lscache directory.
 5. In the File Manager toolbar, click **Remove**:\\
 A confirmation dialog box appears.
6. In the confirmation dialog box, click **Yes** to confirm the deletion.
## Related articles
* [Installing and configuring the LiteSpeed Cache for WordPress plugin](/docs/installing-and-configuring-the-litespeed-cache-for-wordpress-plugin)
* [Getting started with the Plesk File Manager](/docs/getting-started-with-the-plesk-file-manager)
* [cPanel File Manager](/docs/cpanel-file-manager)
* [LiteSpeed Web Cache Manager](/docs/litespeed-web-cache-manager)
A confirmation dialog box appears.
6. In the confirmation dialog box, click **Yes** to confirm the deletion.
## Related articles
* [Installing and configuring the LiteSpeed Cache for WordPress plugin](/docs/installing-and-configuring-the-litespeed-cache-for-wordpress-plugin)
* [Getting started with the Plesk File Manager](/docs/getting-started-with-the-plesk-file-manager)
* [cPanel File Manager](/docs/cpanel-file-manager)
* [LiteSpeed Web Cache Manager](/docs/litespeed-web-cache-manager)