> ## Documentation Index
> Fetch the complete documentation index at: https://kb.hosting.com/llms.txt
> Use this file to discover all available pages before exploring further.
# Using cPanel to configure a domain for Google Workspace
> Learn to configure your domain for Google Workspace using cPanel's DNS Zone Editor.
This article describes how to use the DNS Zone Editor in cPanel to configure a domain to work with [Google Workspace](https://workspace.google.com).
Google Workspace was previously named G Suite and Google Apps.
📘 Note
Previously, the Remote MX Wizard in cPanel enabled you to configure a domain's DNS settings for Google Workspace. However, this plugin is no longer maintained, and is not approved by cPanel. Instead, follow the procedures below to configure a domain to use Google Workspace.
## About Google Workspace
[Google Workspace](https://workspace.google.com) is a service that enables you to run web applications using your own domain name. Google Workspace includes web applications for handling e-mail, documents, contacts, calendars, and more in a convenient and centralized web-based environment.
## Configuring a domain to use Google Workspace
To use Google Workspace with your domain, you must first sign up for an account, and then configure some DNS settings in cPanel.
### Step 1: Signing up for a Google Workspace account
To use Google Workspace with your domain, you must sign up for an account. To do this, follow these steps:
1. Visit [https://workspace.google.com](https://workspace.google.com), click **Get started**, and then follow the instructions to create a new Google Workspace account.
> 📘 Note
>
> When you create the Google Workspace account, make sure you specify the correct domain for your hosting.com account.
2. After you sign up for an account, you receive an e-mail with instructions about how to complete account setup. Click the link in the e-mail to access the Google Workspace admin console.
3. From the Google Workspace admin console, verify your domain. There are several ways you can do this. For complete information about domain verification, please see Google's official documentation at [https://support.google.com/a/topic/9196?hl=en\&ref\_topic=3540977](https://support.google.com/a/topic/9196?hl=en\&ref_topic=3540977).
> 🚧 Important
>
> You cannot activate any Google Workspace services for your domain until you complete verification.
4. After you have verified your domain with Google Workspace, you are ready to configure DNS settings for your domain in cPanel.
### Step 2: Configuring DNS settings for the domain
To configure DNS settings so the domain can use Google Workspace, follow these steps:
1. Log in to cPanel.
> 📘 Note
>
> If you do not know how to log in to your cPanel account, please see [this article](/docs/accessing-cpanel).
2. On the **Tools** page, in the **Domains** section, click **Zone Editor**:\

3. Locate your domain, and then click **Manage**.
4. In the **Type** column, locate any existing **MX** records, and then delete them by clicking **Delete**.
> 🚧 Important
>
> You are changing the domain's DNS mail exchanger (MX) records to use Google's mail servers. After this occurs, you **cannot** use cPanel to manage your domain's e-mail accounts. Instead, you must manage the domain's e-mail accounts through Google Workspace. It is a good idea to store the existing DNS settings someplace safe so you can restore them later if necessary.
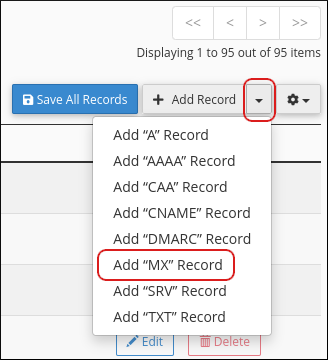
5. At the top right of the **Zone Records** table, next to **Add Record**, click the small triangle, and then click **Add "MX" Record**:\
6. In the **Valid zone name** text box, type your domain name (for example, *example.com* ).
7. Confirm the **TTL** text box is set to **14400**, and the **Type** list box is set to **MX**.
8. In the **Priority** text box, type `1`.
9. In the **Destination** text box, type*one* of the following:
* If you signed up for Google Workspace **before** April 2023, type `aspmx.l.google.com`.
* If you signed up for Google Workspace **after** April 2023, type `smtp.google.com`.
> 📘 Note
>
> For more information about why there are different MX records based on your signup date, please visit [https://support.google.com/a/answer/174125](https://support.google.com/a/answer/174125).
10. Click **Save Record**.
11. If you signed up for Google Workspace **after** April 2023, go to step 12. Otherwise, if you signed up for Google Workspace **before** April 2023, repeat steps 5 to 10, using the following priority and destination values:
| Priority | Destination |
| -------- | ----------------------- |
| 5 | alt1.aspmx.l.google.com |
| 5 | alt2.aspmx.l.google.com |
| 10 | alt3.aspmx.l.google.com |
| 10 | alt4.aspmx.l.google.com |
12. In the **Type** column, locate any existing **TXT** records that start with *v=spf* and then delete them by clicking **Delete**.
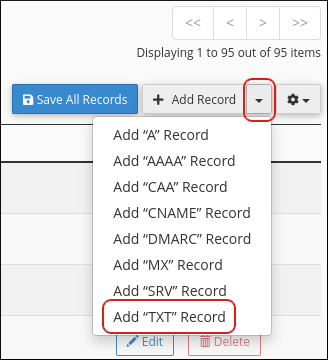
13. At the top right of the **Zone Records** table, next to **Add Record**, click the small triangle, and then click **Add "TXT" Record**:\
14. In the **Valid zone name** text box, type your domain name (for example, *example.com* ).
15. Confirm the **TTL** text box is set to **14400**, and the **Type** list box is set to **TXT**.
16. In the **Text** text box, type `v=spf1 include:_spf.google.com ~all`.
17. Click **Save Record**.
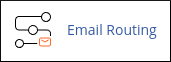
18. On the **Tools** page, in the **Email** section, click **Email Routing**:\
19. In the **Domain** list box, select the domain you want to configure.
20. Under **Configure Email Routing**, select **Remote Mail Exchanger**.
21. Click **Change**. cPanel updates your e-mail routing settings. After the new DNS records fully propagate for your domain (typically 24 hours), you are ready to use Google Workspace.
To remove a domain from Google Workspace, you must delete the DNS records that you created in the previous procedure, and then restore the following DNS records:
* The previous **MX** records for the domain.
* The previous SPF **TXT** record for the domain.
Additionally, you must reset Email Routing in cPanel back to **Local Mail Exchanger**.
**Important**
When you change the domain's DNS mail exchanger (MX) and SPF records back to their previous settings, your e-mail is no longer managed by Google's mail servers. Instead, you **must** use cPanel to manage your domain's e-mail accounts.
## More information
For more information about Google Workspace, please visit [https://workspace.google.com](https://workspace.google.com).
## Related articles
* [Using the cPanel Zone Editor](/docs/using-the-cpanel-zone-editor)
* [Registering a domain](/docs/registering-a-domain)
* [Renewing a domain](/docs/renewing-a-domain)
* [Setting the name servers for a domain](/docs/setting-the-name-servers-dns-for-a-domain)
* [Subdomains](/docs/subdomains)
* [Transferring a domain to hosting.com](/docs/transferring-a-domain-to-hosting-com)
* [Using the cPanel Domains tool](/docs/cpanel-domains-tool)