> ## Documentation Index
> Fetch the complete documentation index at: https://kb.hosting.com/llms.txt
> Use this file to discover all available pages before exploring further.
# Configuring a WordPress multisite network
> Discover how to set up a WordPress multisite network for easier site management.
This article describes how to create and configure a [WordPress](https://hosting.com/hosting/platforms/wordpress-hosting) multisite network. Multisite networks enable you to manage multiple WordPress from one convenient interface.
For example, you may have a main site, a blog, and an online store. Instead of creating three separate WordPress installations for these sites, you can create and manage them from a single location using a multisite network. In a WordPress multisite network, themes and plugins are installed just once, and you can activate them independently for each site. Multisite networks can also help improve overall security, because you only have to maintain and update one site.
## Creating and configuring a multisite network
The following procedure assumes that you have at least one WordPress installation already configured and running. To create and configure a multisite network, follow these steps:
1. In the directory where you installed WordPress, use your preferred text editor to open the *wp-config.php* file.
2. Just above the **/ *"That's all, stop editing! Happy publishing.*/** line near the end of the file, paste the following text:
```text theme={null}
define('WP_ALLOW_MULTISITE', true);
```
3. Save your changes to the *wp-config.php* file.
4. Log in to WordPress as the administrator.
5. Before you can enable multisite, you must temporarily deactivate all of the site's plugins. On the left sidebar, click **Plugins**, and then click **Installed Plugins**:\ 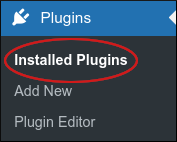 6. To select all of the plugins, select the checkbox next to the **Plugin** heading.
7. In the **Bulk actions** list box select **Deactivate**, and then click **Apply**.
8. On the left sidebar, click **Tools**, and then click **Network Setup**:\
6. To select all of the plugins, select the checkbox next to the **Plugin** heading.
7. In the **Bulk actions** list box select **Deactivate**, and then click **Apply**.
8. On the left sidebar, click **Tools**, and then click **Network Setup**:\ 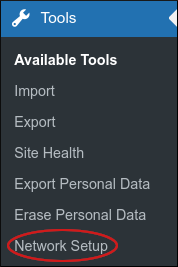 The **Create a Network of WordPress Sites** page appears:\\
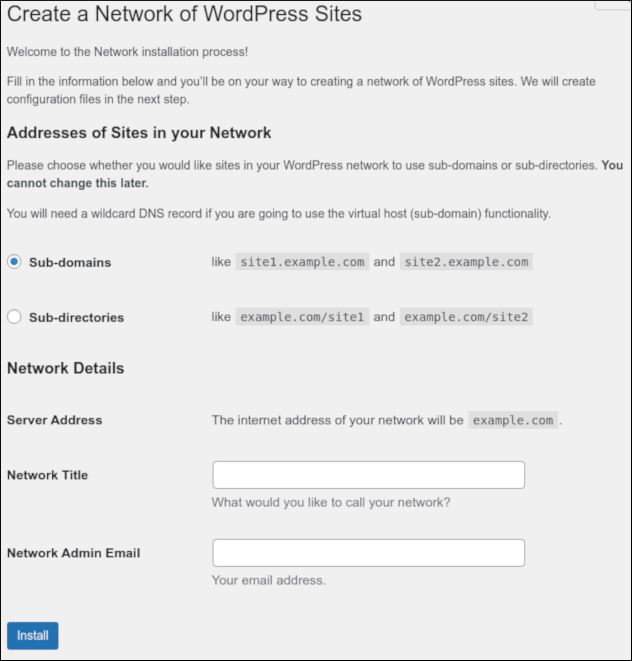
9. Under **Addresses of Sites in your Network**, select **Sub-domains** or **Sub-directories**.
You can only choose one, and you cannot change this setting later. For a subdomain network, all of your sites must have their own subdomain (for example, *site1.example.com* and *site2.example.com* ). For a subdirectory network, all of your sites must have their own directory beneath the primary domain (for example, *example.com/site1* and *example.com/site2* ).
10. In the **Network Title** text box, type a name for the WordPress network.
11. In the **Network Admin Email** text box, type a valid e-mail address for the WordPress network administrator.
12. Click **Install**. WordPress generates custom code for your installation to enable the network.
13. You are now ready to enable the network, but before you do this, you should create a backup of the following files:
* *wp-config.php*
* *.htaccess*
14. To enable the network, copy the custom code blocks into the *wp-config.php* and *.htaccess* files.
**Important**
* The code block for the *wp-config.php* file must go **above** the **/ *"That's all, stop editing! Happy publishing.*/** line near the end of the file.
* Replace any existing text in the *.htaccess* file with the new code block.
15. Save your changes to the *wp-config.php* and *.htaccess* files.
16. Log out and then log in again as the WordPress administrator. The new **My Sites** menu option appears in the top menu bar:\
The **Create a Network of WordPress Sites** page appears:\\

9. Under **Addresses of Sites in your Network**, select **Sub-domains** or **Sub-directories**.
You can only choose one, and you cannot change this setting later. For a subdomain network, all of your sites must have their own subdomain (for example, *site1.example.com* and *site2.example.com* ). For a subdirectory network, all of your sites must have their own directory beneath the primary domain (for example, *example.com/site1* and *example.com/site2* ).
10. In the **Network Title** text box, type a name for the WordPress network.
11. In the **Network Admin Email** text box, type a valid e-mail address for the WordPress network administrator.
12. Click **Install**. WordPress generates custom code for your installation to enable the network.
13. You are now ready to enable the network, but before you do this, you should create a backup of the following files:
* *wp-config.php*
* *.htaccess*
14. To enable the network, copy the custom code blocks into the *wp-config.php* and *.htaccess* files.
**Important**
* The code block for the *wp-config.php* file must go **above** the **/ *"That's all, stop editing! Happy publishing.*/** line near the end of the file.
* Replace any existing text in the *.htaccess* file with the new code block.
15. Save your changes to the *wp-config.php* and *.htaccess* files.
16. Log out and then log in again as the WordPress administrator. The new **My Sites** menu option appears in the top menu bar:\  All of your sites in the network appear in this menu, as well as the **Network Admin** menu. The **Network Admin** menu contains the following options:
* **Dashboard:** This option provides an overview of the network.
* **Sites:** This option shows each site in your network and enables you to manage them.
* **Users:** This option enables you to manage users for the network.
* **Themes:** This option enables you to manage themes for the network.
* **Plugins:** This option enables you to manage plugins for the network.
> 🚧 Important
>
> Remember that you disabled all of the plugins in step 7 above during network creation. Make sure you re-enable the plugins that you want to use on the network.
* **Settings:** This option enables you to change general settings for the network.
For detailed information about all of these options, please visit [https://developer.wordpress.org/advanced-administration/multisite/admin/](https://developer.wordpress.org/advanced-administration/multisite/admin/).
👍 Tip
To disable the multisite network at any time, follow these steps:
* Use your preferred text editor to open the *wp-config.php* file, and then remove the text you added in steps 2 and 14.
* Restore the backed up copy of the *.htaccess* file that you created in step 13.
## Disabling a multisite network
To revert a WordPress multisite installation back to a single site, follow these steps:
1. In the directory where you installed WordPress, use your preferred text editor to open the *wp-config.php* file.
2. Locate the multisite section in the *wp-config.php* file:
```text theme={null}
/* Multisite */
define( 'WP_ALLOW_MULTISITE', true );
define( 'MULTISITE', true );
define( 'SUBDOMAIN_INSTALL', false );
define( 'DOMAIN_CURRENT_SITE', 'example.com' );
define( 'PATH_CURRENT_SITE', '/example/' );
define( 'SITE_ID_CURRENT_SITE', 1 );
define( 'BLOG_ID_CURRENT_SITE', 1 );
```
3. Change the first two lines in the multisite section to **false**:
```text theme={null}
define( 'WP_ALLOW_MULTISITE', false );
define( 'MULTISITE', false );
```
4. Comment out or delete the remaining lines in the multisite section:
```text theme={null}
/*
define( 'SUBDOMAIN_INSTALL', false );
define( 'DOMAIN_CURRENT_SITE', 'example.com' );
define( 'PATH_CURRENT_SITE', '/example/' );
define( 'SITE_ID_CURRENT_SITE', 1 );
define( 'BLOG_ID_CURRENT_SITE', 1 );
*/
```
5. Save your changes to the *wp-config.php* file. WordPress multisite is now disabled.
## More information
* For more information about how to create a multisite network in WordPress, please visit [https://developer.wordpress.org/advanced-administration/multisite/create-network/](https://developer.wordpress.org/advanced-administration/multisite/create-network/).
* For more information about network administration in WordPress, please visit [https://developer.wordpress.org/advanced-administration/multisite/admin/](https://developer.wordpress.org/advanced-administration/multisite/admin/).
## Related articles
* [Backing up WordPress](/docs/backing-up-your-wordpress-site)
* [Installing WordPress on a subdomain](/docs/installing-wordpress-on-a-subdomain)
* [Updating WordPress](/docs/updating-wordpress)
* [WordPress security](/docs/wordpress-security)
All of your sites in the network appear in this menu, as well as the **Network Admin** menu. The **Network Admin** menu contains the following options:
* **Dashboard:** This option provides an overview of the network.
* **Sites:** This option shows each site in your network and enables you to manage them.
* **Users:** This option enables you to manage users for the network.
* **Themes:** This option enables you to manage themes for the network.
* **Plugins:** This option enables you to manage plugins for the network.
> 🚧 Important
>
> Remember that you disabled all of the plugins in step 7 above during network creation. Make sure you re-enable the plugins that you want to use on the network.
* **Settings:** This option enables you to change general settings for the network.
For detailed information about all of these options, please visit [https://developer.wordpress.org/advanced-administration/multisite/admin/](https://developer.wordpress.org/advanced-administration/multisite/admin/).
👍 Tip
To disable the multisite network at any time, follow these steps:
* Use your preferred text editor to open the *wp-config.php* file, and then remove the text you added in steps 2 and 14.
* Restore the backed up copy of the *.htaccess* file that you created in step 13.
## Disabling a multisite network
To revert a WordPress multisite installation back to a single site, follow these steps:
1. In the directory where you installed WordPress, use your preferred text editor to open the *wp-config.php* file.
2. Locate the multisite section in the *wp-config.php* file:
```text theme={null}
/* Multisite */
define( 'WP_ALLOW_MULTISITE', true );
define( 'MULTISITE', true );
define( 'SUBDOMAIN_INSTALL', false );
define( 'DOMAIN_CURRENT_SITE', 'example.com' );
define( 'PATH_CURRENT_SITE', '/example/' );
define( 'SITE_ID_CURRENT_SITE', 1 );
define( 'BLOG_ID_CURRENT_SITE', 1 );
```
3. Change the first two lines in the multisite section to **false**:
```text theme={null}
define( 'WP_ALLOW_MULTISITE', false );
define( 'MULTISITE', false );
```
4. Comment out or delete the remaining lines in the multisite section:
```text theme={null}
/*
define( 'SUBDOMAIN_INSTALL', false );
define( 'DOMAIN_CURRENT_SITE', 'example.com' );
define( 'PATH_CURRENT_SITE', '/example/' );
define( 'SITE_ID_CURRENT_SITE', 1 );
define( 'BLOG_ID_CURRENT_SITE', 1 );
*/
```
5. Save your changes to the *wp-config.php* file. WordPress multisite is now disabled.
## More information
* For more information about how to create a multisite network in WordPress, please visit [https://developer.wordpress.org/advanced-administration/multisite/create-network/](https://developer.wordpress.org/advanced-administration/multisite/create-network/).
* For more information about network administration in WordPress, please visit [https://developer.wordpress.org/advanced-administration/multisite/admin/](https://developer.wordpress.org/advanced-administration/multisite/admin/).
## Related articles
* [Backing up WordPress](/docs/backing-up-your-wordpress-site)
* [Installing WordPress on a subdomain](/docs/installing-wordpress-on-a-subdomain)
* [Updating WordPress](/docs/updating-wordpress)
* [WordPress security](/docs/wordpress-security)