> ## Documentation Index
> Fetch the complete documentation index at: https://kb.hosting.com/llms.txt
> Use this file to discover all available pages before exploring further.
# Installing a self-signed SSL certificate in Plesk
> You can use Plesk to generate and install a self-signed SSL certificate for testing or development purposes. Learn how in this article.
This article describes how to generate and install a self-signed SSL certificate in Plesk.
Plesk is no longer included with new hosting.com plans, but it is still available on legacy Managed WordPress accounts. You can install Plesk manually on unmanaged VPS and Dedicated servers.
🚧 Important
Hosting.com servers support Server Name Indication (SNI), which means SSL certificates do not *require* a dedicated IP address to work correctly. For more information about SNI support at hosting.com, please see [this article](/docs/ssl-certificates-and-server-name-indication-sni-support).
## Installing a self-signed certificate
You can install a self-signed SSL certificate on your hosting.com account for testing and development purposes.
**️ Warning**
Users receive warning messages in their browser when they try to access a web site secured by a self-signed certificate. This is because a trusted Certificate Authority has not signed the certificate. Let's Encrypt certificates are readily available for Plesk accounts and are a trusted Certificate Authority in most browsers. For more information about Let's Encrypt certificates, please see [this article](/docs/generating-and-renewing-lets-encrypt-ssl-certificates-in-plesk).
To create and install a self-signed SSL certificate using Plesk, follow these steps:
1. Log in to Plesk.
> 📘 Note
>
> If you do not know how to log in to your Plesk account, please see [this article](/docs/logging-in-and-out-of-plesk).
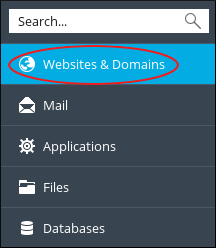
2. In the left sidebar, click **Websites & Domains**:\
3. Click **SSL/TLS Certificates**:\

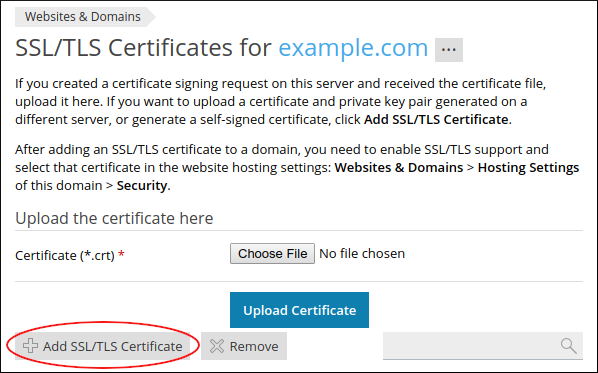
4. On the **SSL/TLS Certificates** page, click **Add SSL/TLS Certificate**:\
5. On the **Add SSL/TLS Certificate** page, in the **Certificate name** text box, type a name for the certificate.
The name can be anything you want. Plesk only uses the name to differentiate between multiple certificates.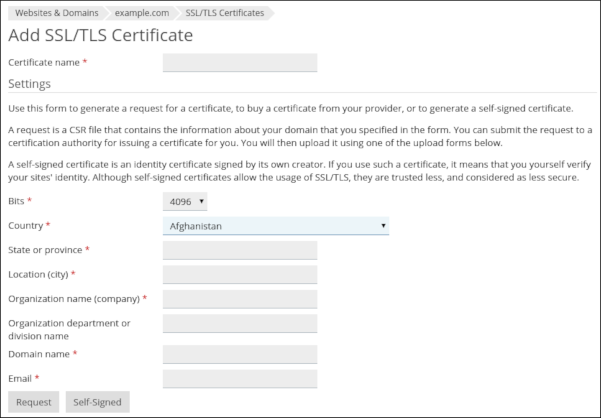
6. In the **Bits** list box, select **4096**.
7. In the **Country**, **State or province**, **Location (city)**, and **Organization name (company)** text boxes, type
8. In the **Domain name** text box, type the domain that you want to secure with the self-signed certificate, such as *test.example.com*.
You can also generate a wildcard certificate. To do this, start the domain name with an asterisk (\*). For example, to protect *example.com* and all of its subdomains, type **\*.example.com** .
9. In the **Email** text box, type your e-mail address.
10. Click **Self-Signed**. Plesk generates the self-signed certificate, but you still need to install it.
11. In the left sidebar, click **Websites & Domains**:\

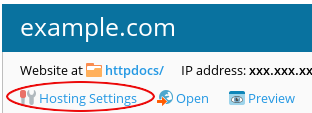
12. Click **Hosting Settings**:\
13. Under **Security**, confirm the **SSL/TLS support** check box is selected:\
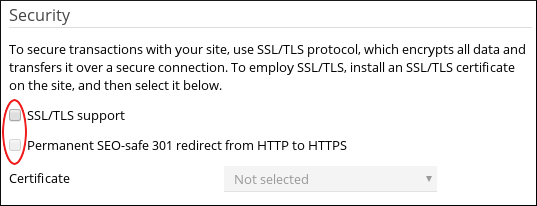
14. To permanently redirect all insecure ( *http\://* ) requests to secure ( *https\://* ) requests, select the **Permanent SEO-safe 301 redirect from HTTP to HTTPS** check box.
15. In the **Certificate** list box, select the name of the certificate you specified in step 5.
16. Click **OK**. You can now securely access the specified domain by using the *https\://* prefix in a web browser, but you will receive a warning message about the self-signed certificate.
## Related articles
* [Introduction to SSL](/docs/introduction-to-ssl)