> ## Documentation Index
> Fetch the complete documentation index at: https://kb.hosting.com/llms.txt
> Use this file to discover all available pages before exploring further.
# Installing and configuring Django on Linux shared hosting
> Learn how to install and configure Django on a Linux shared hosting account. This Python-based framework enables you to quickly and easily create websites.
[Django](https://www.djangoproject.com/) is a Python-based framework that enables you to quickly and easily create powerful websites. This article demonstrates how to install and configure Django on a Linux shared hosting account that uses cPanel.
After completing the following procedures, you will have a functioning Django site on your account that:
* Loads a static homepage for the domain.
* Loads the Django administration interface.
* Uses a SQLite database.
**Important**
Although we have tested and run this Django configuration on shared hosting accounts, it is not supported. You can use this configuration as a starting point for your own Django projects, but we cannot help you troubleshoot or debug any custom configurations.
## Step 1: Create a Python application in cPanel
The first step is to create a Python application within cPanel that will host the Django project. To do this, follow these steps:
1. Log in to cPanel.
> 📘 Note
>
> If you do not know how to log in to your cPanel account, please see [this article](/docs/accessing-cpanel).
2. On the **Tools** page, in the **Software** section, click **Setup Python App**:\\
 3. Click **CREATE APPLICATION**:\\
 The application form appears:\\
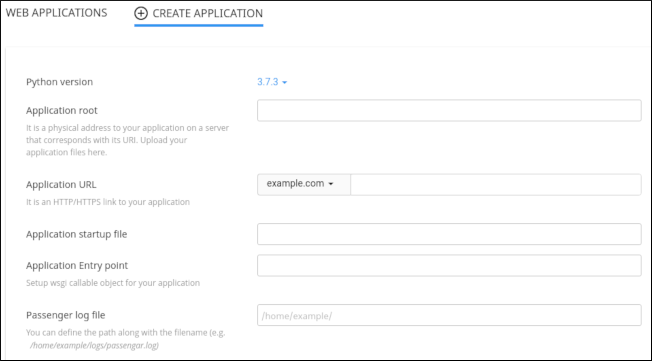 4. In the **Python version** list box, select **3.8.1**.
5. In the **Application root** text box, type `myapp`.
6. In the **Application URL** list box, select the domain. Leave the rest of the URL blank.
7. Leave the **Application startup file** text box and **Application Entry point** text box blank.
> 📘 Note
>
> When these text boxes are blank, cPanel automatically creates a *passenger\_wsgi.py* startup file and default **application** object for you.
8. In the **Passenger log file** text box, you can optionally specify a log file for the application.
9. In the top right corner of the page, click **CREATE**:\\
4. In the **Python version** list box, select **3.8.1**.
5. In the **Application root** text box, type `myapp`.
6. In the **Application URL** list box, select the domain. Leave the rest of the URL blank.
7. Leave the **Application startup file** text box and **Application Entry point** text box blank.
> 📘 Note
>
> When these text boxes are blank, cPanel automatically creates a *passenger\_wsgi.py* startup file and default **application** object for you.
8. In the **Passenger log file** text box, you can optionally specify a log file for the application.
9. In the top right corner of the page, click **CREATE**:\\
 cPanel creates the application and sets up the Python environment.
10. At the top of the page, next to **Enter to the virtual environment. To enter to virtual environment, run the command**, copy the command. You will need this information in the following procedure.
## Step 2: Configure the Django project
After you create the Python application in cPanel, you are ready to do the following tasks at the command line:
* Install Django.
* Create and configure the Django project.
* Configure Passenger to work with the Django project.
To do this, follow these steps:
1. Log in to your account [using SSH](/docs/using-ssh-secure-shell).
2. Activate the virtual environment, using the command you noted in step 10 above. For example:
```bash theme={null}
source /home/username/virtualenv/myapp/3.8/bin/activate && cd /home/username/myapp
```
> 🚧 Important
>
> The command prompt now starts with **(myapp:3.8)** to indicate that you are working in the *myapp* virtual environment with Python 3.8. All of the following commands in this article assume that you are working in the Python virtual environment. If you log out of your SSH session (or deactivate the virtual environment by using the **deactivate** command), make sure you reactivate the virtual environment before following any of the steps below.
3. To install Django, type the following commands:
```bash theme={null}
cd ~
pip install django==2.1.8
```
> 👍 Tip
>
> To verify the version of Django that is installed, type the following command:
>
> ```bash theme={null}
> django-admin --version
> ```
4. To create a Django project, type the following command:
```bash theme={null}
django-admin startproject myapp ~/myapp
```
5. To create directories for the static project files, type the following commands:
```bash theme={null}
mkdir -p ~/myapp/templates/static_pages
mkdir ~/myapp/static_files
mkdir ~/myapp/static_media
```
6. Use a text editor to open the *\~/myapp/myapp/settings.py* file, and then make the following changes:
* Locate the **ALLOWED\_HOSTS** line, and then modify it as follows. Replace ***example.com*** with your own domain name:
```python theme={null}
ALLOWED_HOSTS = ['example.com']
```
* Locate the **TEMPLATES** block, and then modify it as follows:
```python theme={null}
TEMPLATES = [
{
'BACKEND': 'django.template.backends.django.DjangoTemplates',
'DIRS': [os.path.join(BASE_DIR,'templates')],
'APP_DIRS': True,
'OPTIONS': {
'context_processors': [
'django.template.context_processors.debug',
'django.template.context_processors.request',
'django.contrib.auth.context_processors.auth',
'django.contrib.messages.context_processors.messages',
],
},
},
]
```
* Locate the **STATIC\_URL** line, and then add the following lines beneath it:
```python theme={null}
STATIC_URL = '/static/'
STATIC_ROOT = os.path.join(BASE_DIR, 'static_files')
MEDIA_URL = '/media/'
MEDIA_ROOT = os.path.join(BASE_DIR, "static_media")
```
7. Use a text editor to open the *\~/myapp/myapp/urls.py* file. Delete all of the existing text, and then copy the following text into the file:
```python theme={null}
from django.contrib import admin
from django.urls import path, include
from django.conf import settings
from django.conf.urls.static import static
from django.conf.urls import url
from django.views.generic.base import TemplateView
urlpatterns = [
path('admin/', admin.site.urls),
url(r'^$', TemplateView.as_view(template_name='static_pages/index.html'), name='home'),
] + static(settings.MEDIA_URL, document_root=settings.MEDIA_ROOT)
urlpatterns += static(settings.STATIC_URL, document_root=settings.STATIC_ROOT)
```
8. Use a text editor to open the *\~/myapp/passenger\_wsgi.py* file. Delete all of the existing text, and then copy the following text into the file:
```python theme={null}
import os
import sys
import django.core.handlers.wsgi
from django.core.wsgi import get_wsgi_application
# Set up paths and environment variables
sys.path.append(os.getcwd())
os.environ['DJANGO_SETTINGS_MODULE'] = 'myapp.settings'
# Set script name for the PATH_INFO fix below
SCRIPT_NAME = os.getcwd()
class PassengerPathInfoFix(object):
"""
Sets PATH_INFO from REQUEST_URI because Passenger doesn't provide it.
"""
def __init__(self, app):
self.app = app
def __call__(self, environ, start_response):
from urllib.parse import unquote
environ['SCRIPT_NAME'] = SCRIPT_NAME
request_uri = unquote(environ['REQUEST_URI'])
script_name = unquote(environ.get('SCRIPT_NAME', ''))
offset = request_uri.startswith(script_name) and len(environ['SCRIPT_NAME']) or 0
environ['PATH_INFO'] = request_uri[offset:].split('?', 1)[0]
return self.app(environ, start_response)
# Set the application
application = get_wsgi_application()
application = PassengerPathInfoFix(application)
```
9. Use a text editor to create a basic *index.html* file in the *\~/myapp/templates/static\_pages* directory. The file can be as simple as a text file that says **Hello world**.
10. Type the following command:
```bash theme={null}
python ~/myapp/manage.py migrate
```
11. Set up the superuser account:
* Type the following command:
```bash theme={null}
python ~/myapp/manage.py createsuperuser
```
* At the **Username** prompt, type the administrator username, and then press Enter.
* At the **Email address** prompt, type the administrator e-mail address, and then press Enter.
* At the **Password** prompt, type the administrator password, and then press Enter.
12. Type the following command to collect the static files:
```bash theme={null}
python ~/myapp/manage.py collectstatic
```
> 📘 Note
>
> If you are asked if you want to overwrite existing files, type **yes** and then press Enter.
13. In cPanel, restart the Python application:
* Log in to cPanel.
> 📘 Note
>
> If you do not know how to log in to your cPanel account, please see [this article](/docs/accessing-cpanel).
* In the **SOFTWARE** section of the cPanel home screen, click **Setup Python App**.
* Under **WEB APPLICATIONS**, locate the *myapp* application, and then click the **Restart** icon.
14. Test the Django site:
* Use your browser to go to [*http://www.example.com*](http://www.example.com), where ***example.com*** represents your domain name. The *index.html* file should load.
* Use your browser to go to [*http://www.example.com/admin*](http://www.example.com/admin), where ***example.com*** represents your domain name. You should see the Django administration login page. To log in, use the superuser credentials that you created earlier.
> 👍 Tip
>
> If the web site does not appear in your browser, try running the *passenger\_wsgi.py* file manually. To do this, type the following command:
>
> ```bash theme={null}
> python ~/myapp/passenger_wsgi.py
> ```
>
> There should not be any text output to the console when you run this file. If there are any errors, check the syntax in the configuration files.
## More information
Now that you have a Django-enabled web site up and running, you can start the real work of developing your own applications. The following resources can help:
* To view the official Django documentation, please visit [http://docs.djangoproject.com](https://docs.djangoproject.com).
* For information about Django extensions, please visit [https://github.com/django-extensions/django-extensions](https://github.com/django-extensions/django-extensions).
* The *south* library is popular for completing database migrations. For more information about *south*, please visit [https://pypi.python.org/pypi/South](https://pypi.python.org/pypi/South).
* The *fabric* library can help streamline application deployment. For more information about *fabric*, please visit [http://docs.fabfile.org](http://docs.fabfile.org).
## Related articles
* [Using virtualenv and pip](/docs/using-virtualenv-and-pip)
* [Installing and configuring Django on unmanaged servers](/docs/installing-and-configuring-django-on-unmanaged-servers)
cPanel creates the application and sets up the Python environment.
10. At the top of the page, next to **Enter to the virtual environment. To enter to virtual environment, run the command**, copy the command. You will need this information in the following procedure.
## Step 2: Configure the Django project
After you create the Python application in cPanel, you are ready to do the following tasks at the command line:
* Install Django.
* Create and configure the Django project.
* Configure Passenger to work with the Django project.
To do this, follow these steps:
1. Log in to your account [using SSH](/docs/using-ssh-secure-shell).
2. Activate the virtual environment, using the command you noted in step 10 above. For example:
```bash theme={null}
source /home/username/virtualenv/myapp/3.8/bin/activate && cd /home/username/myapp
```
> 🚧 Important
>
> The command prompt now starts with **(myapp:3.8)** to indicate that you are working in the *myapp* virtual environment with Python 3.8. All of the following commands in this article assume that you are working in the Python virtual environment. If you log out of your SSH session (or deactivate the virtual environment by using the **deactivate** command), make sure you reactivate the virtual environment before following any of the steps below.
3. To install Django, type the following commands:
```bash theme={null}
cd ~
pip install django==2.1.8
```
> 👍 Tip
>
> To verify the version of Django that is installed, type the following command:
>
> ```bash theme={null}
> django-admin --version
> ```
4. To create a Django project, type the following command:
```bash theme={null}
django-admin startproject myapp ~/myapp
```
5. To create directories for the static project files, type the following commands:
```bash theme={null}
mkdir -p ~/myapp/templates/static_pages
mkdir ~/myapp/static_files
mkdir ~/myapp/static_media
```
6. Use a text editor to open the *\~/myapp/myapp/settings.py* file, and then make the following changes:
* Locate the **ALLOWED\_HOSTS** line, and then modify it as follows. Replace ***example.com*** with your own domain name:
```python theme={null}
ALLOWED_HOSTS = ['example.com']
```
* Locate the **TEMPLATES** block, and then modify it as follows:
```python theme={null}
TEMPLATES = [
{
'BACKEND': 'django.template.backends.django.DjangoTemplates',
'DIRS': [os.path.join(BASE_DIR,'templates')],
'APP_DIRS': True,
'OPTIONS': {
'context_processors': [
'django.template.context_processors.debug',
'django.template.context_processors.request',
'django.contrib.auth.context_processors.auth',
'django.contrib.messages.context_processors.messages',
],
},
},
]
```
* Locate the **STATIC\_URL** line, and then add the following lines beneath it:
```python theme={null}
STATIC_URL = '/static/'
STATIC_ROOT = os.path.join(BASE_DIR, 'static_files')
MEDIA_URL = '/media/'
MEDIA_ROOT = os.path.join(BASE_DIR, "static_media")
```
7. Use a text editor to open the *\~/myapp/myapp/urls.py* file. Delete all of the existing text, and then copy the following text into the file:
```python theme={null}
from django.contrib import admin
from django.urls import path, include
from django.conf import settings
from django.conf.urls.static import static
from django.conf.urls import url
from django.views.generic.base import TemplateView
urlpatterns = [
path('admin/', admin.site.urls),
url(r'^$', TemplateView.as_view(template_name='static_pages/index.html'), name='home'),
] + static(settings.MEDIA_URL, document_root=settings.MEDIA_ROOT)
urlpatterns += static(settings.STATIC_URL, document_root=settings.STATIC_ROOT)
```
8. Use a text editor to open the *\~/myapp/passenger\_wsgi.py* file. Delete all of the existing text, and then copy the following text into the file:
```python theme={null}
import os
import sys
import django.core.handlers.wsgi
from django.core.wsgi import get_wsgi_application
# Set up paths and environment variables
sys.path.append(os.getcwd())
os.environ['DJANGO_SETTINGS_MODULE'] = 'myapp.settings'
# Set script name for the PATH_INFO fix below
SCRIPT_NAME = os.getcwd()
class PassengerPathInfoFix(object):
"""
Sets PATH_INFO from REQUEST_URI because Passenger doesn't provide it.
"""
def __init__(self, app):
self.app = app
def __call__(self, environ, start_response):
from urllib.parse import unquote
environ['SCRIPT_NAME'] = SCRIPT_NAME
request_uri = unquote(environ['REQUEST_URI'])
script_name = unquote(environ.get('SCRIPT_NAME', ''))
offset = request_uri.startswith(script_name) and len(environ['SCRIPT_NAME']) or 0
environ['PATH_INFO'] = request_uri[offset:].split('?', 1)[0]
return self.app(environ, start_response)
# Set the application
application = get_wsgi_application()
application = PassengerPathInfoFix(application)
```
9. Use a text editor to create a basic *index.html* file in the *\~/myapp/templates/static\_pages* directory. The file can be as simple as a text file that says **Hello world**.
10. Type the following command:
```bash theme={null}
python ~/myapp/manage.py migrate
```
11. Set up the superuser account:
* Type the following command:
```bash theme={null}
python ~/myapp/manage.py createsuperuser
```
* At the **Username** prompt, type the administrator username, and then press Enter.
* At the **Email address** prompt, type the administrator e-mail address, and then press Enter.
* At the **Password** prompt, type the administrator password, and then press Enter.
12. Type the following command to collect the static files:
```bash theme={null}
python ~/myapp/manage.py collectstatic
```
> 📘 Note
>
> If you are asked if you want to overwrite existing files, type **yes** and then press Enter.
13. In cPanel, restart the Python application:
* Log in to cPanel.
> 📘 Note
>
> If you do not know how to log in to your cPanel account, please see [this article](/docs/accessing-cpanel).
* In the **SOFTWARE** section of the cPanel home screen, click **Setup Python App**.
* Under **WEB APPLICATIONS**, locate the *myapp* application, and then click the **Restart** icon.
14. Test the Django site:
* Use your browser to go to [*http://www.example.com*](http://www.example.com), where ***example.com*** represents your domain name. The *index.html* file should load.
* Use your browser to go to [*http://www.example.com/admin*](http://www.example.com/admin), where ***example.com*** represents your domain name. You should see the Django administration login page. To log in, use the superuser credentials that you created earlier.
> 👍 Tip
>
> If the web site does not appear in your browser, try running the *passenger\_wsgi.py* file manually. To do this, type the following command:
>
> ```bash theme={null}
> python ~/myapp/passenger_wsgi.py
> ```
>
> There should not be any text output to the console when you run this file. If there are any errors, check the syntax in the configuration files.
## More information
Now that you have a Django-enabled web site up and running, you can start the real work of developing your own applications. The following resources can help:
* To view the official Django documentation, please visit [http://docs.djangoproject.com](https://docs.djangoproject.com).
* For information about Django extensions, please visit [https://github.com/django-extensions/django-extensions](https://github.com/django-extensions/django-extensions).
* The *south* library is popular for completing database migrations. For more information about *south*, please visit [https://pypi.python.org/pypi/South](https://pypi.python.org/pypi/South).
* The *fabric* library can help streamline application deployment. For more information about *fabric*, please visit [http://docs.fabfile.org](http://docs.fabfile.org).
## Related articles
* [Using virtualenv and pip](/docs/using-virtualenv-and-pip)
* [Installing and configuring Django on unmanaged servers](/docs/installing-and-configuring-django-on-unmanaged-servers)