> ## Documentation Index
> Fetch the complete documentation index at: https://kb.hosting.com/llms.txt
> Use this file to discover all available pages before exploring further.
# Using the LiteSpeed Web Cache Manager
> Learn how to boost site speed with LiteSpeed Web Cache Manager - enable, disable, or flush cache and adjust log settings directly in cPanel.
This article describes how to use the LiteSpeed Web Cache Manager to manage LiteSpeed caching for your account. LiteSpeed is a built-in caching engine that can significantly increase a site's performance.
**Important**
For Turbo Managed VPS and Turbo Managed Dedicated servers, we can install the LiteSpeed Web Cache Manager for you upon request.
## Managing the cache
To manage the LiteSpeed Cache, follow these steps:
1. Log in to cPanel.
> 📘 Note
>
> If you do not know how to log in to your cPanel account, please see [this article](/docs/accessing-cpanel).
2. In the **ADVANCED** section of the cPanel home screen, click **LiteSpeed Web Cache Manager**:\

3. Under **LiteSpeed Cache Management**, click the application you want to manage. For example, click **WordPress Cache**.
4. Click **Scan** to locate all installations of the selected application. LiteSpeed Web Cache Manager lists the discovered applications:\
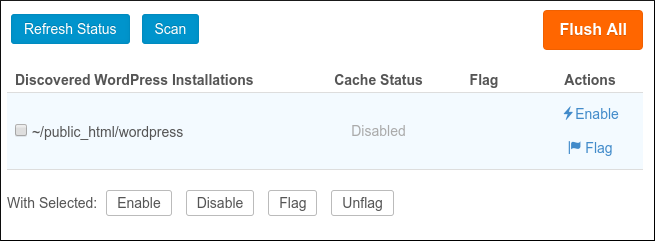
5. Select one of the following options:
* To enable LiteSpeed Cache for the application, under **Actions**, click **Enable**.
* To disable LiteSpeed Cache for the application, under **Actions**, click **Disable**.
* To flush the LiteSpeed Cache for all of your applications at the same time, click **Flush All**.
> 👍 Tip
>
> For an alternate method of flushing the entire cache, see the following section.
* To flag an installation, under **Actions**, click **Flag**.
> 📘 Note
>
> When you flag an application, it is unaffected by all future mass enable or disable operations.
* To unflag an installation, under **Actions**, click **Unflag**.
* To do a mass operation on multiple applications at once, select the check boxes for the applications, and then next to **With Selected:** click the operation you want to do.
## Flushing the cache
To flush the LiteSpeed Cache for all of your applications at the same time, follow these steps:
1. Log in to cPanel.
> 📘 Note
>
> If you do not know how to log in to your cPanel account, please see [this article](/docs/accessing-cpanel).
2. In the **ADVANCED** section of the cPanel home screen, click **LiteSpeed Web Cache Manager**:\

3. Under **Flush LSCache**, click **Flush All**.
4. Click **OK** to confirm. LiteSpeed Web Cache Manager flushes the cache.
## Setting the log level
You can change the log level for LiteSpeed Web Cache Manager. To do this, follow these steps:
1. Log in to cPanel.
> 📘 Note
>
> If you do not know how to log in to your cPanel account, please see [this article](/docs/accessing-cpanel).
2. In the **ADVANCED** section of the cPanel home screen, click **LiteSpeed Web Cache Manager**:\

3. Scroll to the bottom of the page, and then click **Settings**.
4. In the **Log File Level** list box, select the logging level that you want.
5. Click **Save**.
LiteSpeed Web Cache Manager stores log data in the */home/username/lscmData/ls\_webcachemgr.log* file, where ***username*** represents your account username.
## More information
For more information about LiteSpeed Web Cache Manager, please visit [https://www.litespeedtech.com/support/wiki/doku.php/litespeed\_wiki:cpanel:cpanel-plugin](https://www.litespeedtech.com/support/wiki/doku.php/litespeed_wiki:cpanel:cpanel-plugin).
## Related articles
* [Clearing the LiteSpeed cache](/docs/clearing-the-litespeed-cache)
* [Installing and configuring the LiteSpeed Cache for WordPress plugin](/docs/installing-and-configuring-the-litespeed-cache-for-wordpress-plugin)