> ## Documentation Index
> Fetch the complete documentation index at: https://kb.hosting.com/llms.txt
> Use this file to discover all available pages before exploring further.
# Migrating a Next.js application to the Node.js Selector in cPanel
> Learn to build a Next.js app and migrate it to cPanel's Node.js Selector, using React and Node.js.
This article demonstrates how to migrate a Next.js application to the Node.js Selector in cPanel. [Next.js](https://nextjs.org/) is a web development framework based on [React](/docs/react) and [Node.js](/docs/create-application-with-nodejs-selector).
**Important**
You may need to modify some of the following steps to match your particular Next.js application configuration. Such modifications are beyond the scope of our support.
## Preparing a Next.js project for migration
The following procedure demonstrates how to create a basic Next.js project and prepare it for migration.
If you already have an existing Next.js project, go to step **5** .
To create a Next.js project and prepare it for migration, follow these steps:
1. Make sure you have installed Node.js and npm. If you have not already done so, see the Node.js documentation for information about how to do this on your operating system.
2. Open a terminal (command prompt) window, and then type the following command:
```bash theme={null}
npx create-next-app@latest
```
3. A series of questions appears. For the first question **What is your project named?**, type `nextapp`.
4. Accept the default values for all of the remaining questions. Node creates the Next.js project.
5. In your preferred text editor, create a file named *server.js* in the application root ( *nextapp* ) directory.
6. Copy the following text and then paste it into the *server.js* file:
```javascript theme={null}
const { createServer } = require('http')
const { parse } = require('url')
const next = require('next')
const dev = process.env.NODE_ENV !== 'production'
const hostname = 'localhost'
const port = 3000
const app = next({ dev, hostname, port })
const handle = app.getRequestHandler()
app.prepare().then(() => {
createServer(async (req, res) => {
try {
// Be sure to pass 'true' as the second argument to 'url.parse'.
// This tells it to parse the query portion of the URL.
const parsedUrl = parse(req.url, true)
const { pathname, query } = parsedUrl
if (pathname === '/a') {
await app.render(req, res, '/a', query)
} else if (pathname === '/b') {
await app.render(req, res, '/b', query)
} else {
await handle(req, res, parsedUrl)
}
} catch (err) {
console.error('Error occurred handling', req.url, err)
res.statusCode = 500
res.end('internal server error')
}
})
.once('error', (err) => {
console.error(err)
process.exit(1)
})
.listen(port, () => {
console.log('Ready on http://${hostname}:${port}')
})
})
```
7. Save your changes to the *server.js* file.
> 📘 Note
>
> By default, Next.js applications run on the server included with Next.js. To integrate a Next.js application with the cPanel Node.js Selector however, you must run a [custom server](https://nextjs.org/docs/pages/building-your-application/configuring/custom-server) using the code above.
8. Open the *package.json* file in your preferred text editor. Locate the **"scripts"** section and replace the existing **"start"** line with the following line:
```
"start": "NODE_ENV=production node server.js",
```
9. Save your changes to the *package.json* file.
10. At the command prompt, change to the *nextapp* directory, and then type the following command:
```bash theme={null}
npm run build
```
11. In the *nextapp* directory, type the following command:
```bash theme={null}
zip -r ../nextapp.zip . --exclude ".git/*" .gitignore "node_modules/*" README.md
```
> 📘 Note
>
> * This command compresses the project (excluding unnecessary files and directories) and saves it in the *nextapp.zip* file in the parent directory.
>
> * If you do not have the **zip** command-line program installed, use your operating system's file manager to create the *nextapp.zip* file instead.
You are now ready to create a Node.js application on your hosting account in cPanel, and migrate the Next.js project to it.
## Migrating a Next.js project to cPanel
To migrate a Next.js project to cPanel's Node.js Selector, follow these steps:
1. Log in to cPanel.
> 📘 Note
>
> If you do not know how to log in to your cPanel account, please see [this article](/docs/accessing-cpanel).
2. Set up your application files in the correct location:
* Using the File Manager in cPanel, upload to your account the *nextapp.zip* file you created in the previous procedure.
* In the File Manager, create a directory in the *public\_html* directory named *nextapp*.
* In the File Manager, extract the *nextapp.zip* file to the *public\_html/nextapp* directory.
3. Create a Node.js application to run the Next.js application:
* On the **Tools** page, in the **Software** section, click **Setup Node.js App**:\

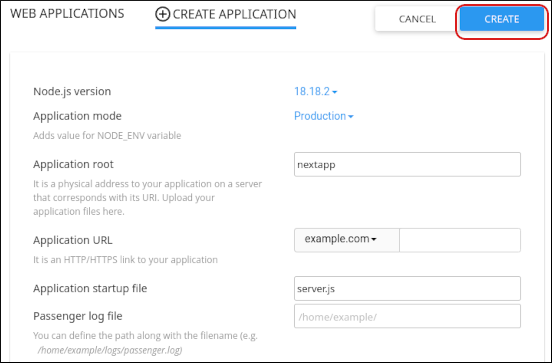
* On the Node.js selector page, click **CREATE APPLICATION** to start the application setup:\

* In the **Node.js version** list box, select the Node.js version.
> 📘 Note
>
> The version should match as closely as possible the Node.js version you used to create the application in the previous procedure. Next.js requires Node.js version 18.17 or higher.
* In the **Application mode** list box, select **Production**.
* In the **Application root** text box, type `nextapp`.
* In the **Application URL** list box, select your domain and leave the text box empty.
* In the **Application startup file** text box, type `server.js`.
* Click **CREATE**. cPanel creates the application:\
4. Click **STOP APP**.
5. Click **Run NPM Install**.
> 📘 Note
>
> * The NPM installation process may take a few minutes to complete.
>
> * If the **Run NPM Install** option is disabled (grayed out), try going back to the cPanel home screen, and then on the **Tools** page, click the **Setup Node.js App** icon again. This forces cPanel to re-scan all of the Node.js applications installed on your account.
6. When the NPM installation process is complete, click **START APP**.
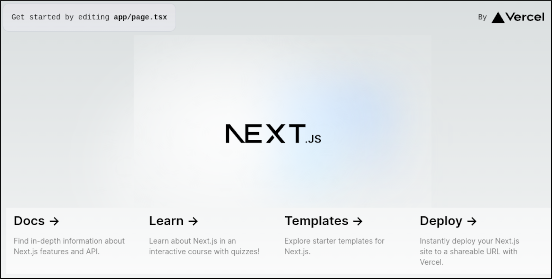
7. In your web browser, go to ***example.com***, where ***example.com*** represents your domain name. The Next.js application should appear:\
## More information
To view the official Next.js documentation, please visit [https://nextjs.org/docs](https://nextjs.org/docs).
## Related articles
* [Creating a Node.js application with cPanel using the Node.js Selector](/docs/create-application-with-nodejs-selector)
* [Migrating a Node.js application to Node.js Selector](/docs/migrating-a-node-js-application-to-node-js-selector)
* [Connecting to MySQL using Node.js](/docs/connecting-to-mysql-using-node-js)
* [Migrating an existing application from Node.js Selector to a manual installation](/docs/migrating-an-existing-application-from-node-js-selector-to-a-manual-installation)
* [Node.js application error message: "Cannot GET" URL](/docs/node-js-application-error-message-cannot-get-url)
* [Using an SSL certificate in a Node.js app](/docs/using-an-ssl-certificate-in-a-node-js-app)