> ## Documentation Index
> Fetch the complete documentation index at: https://kb.hosting.com/llms.txt
> Use this file to discover all available pages before exploring further.
# Password-protected directories in Plesk
> Secure your site by using Plesk to password-protect directories, requiring visitors to log in for access.
This article describes how to use Plesk to protect specific directories with a password. Visitors to password-protected directories must enter a username and password to view the directory's contents.
Plesk is no longer included with new hosting.com plans, but it is still available on legacy Managed WordPress accounts. You can install Plesk manually on unmanaged VPS and Dedicated servers.
## Adding password protection to a directory
When you add password protection to a directory, site visitors are prompted for a username and password when they try to access it. They can only view the directory contents after typing a valid username and password.
When you protect a directory with a password, all directories beneath it are automatically protected as well.
To watch a video that demonstrates the following procedure, please click below:
To add password protection to a directory, follow these steps:
1. Log in to Plesk.
> 📘 Note
>
> If you do not know how to log in to your Plesk account, please see [this article](/docs/logging-in-and-out-of-plesk).
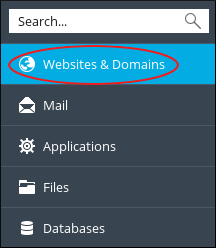
2. In the left sidebar, click **Websites & Domains**:\
3. Click the **Password-Protected Directories** icon.
4. Under **Tools**, click **Add Protected Directory**.
5. Under **Settings**, in the **Directory name** text box, type the name of the directory you want to protect.
> 🚧 Important
>
> Do not include *httpdocs* in the directory name. Only type the name of the directory.
6. In the **Title of the protected area** text box, you can optionally type a name for the protected directory.
7. Click **OK**.
8. Under **Protected directories**, click the name of the directory you specified in step 5.
9. Under **Tools**, click **Add a User**.
10. Under **Protected directory user**, in the **Username** text box, type a name for the user.
11. In the **New Password** and **Confirm Password** text boxes, type the user's password.
12. Click **OK**. Password protection is now enabled for the directory.
## Removing password protection from a directory
You can remove password protection from a directory if you no longer want to protect it with a password. To do this, follow these steps:
1. Log in to Plesk.
> 📘 Note
>
> If you do not know how to log in to your Plesk account, please see [this article](/docs/logging-in-and-out-of-plesk).
2. Locate the directory for which you want to remove password protection, and then select the check box to the left of the directory name.
3. Click **Remove Protection**.
4. On the **Removal Confirmation** page, select the **Confirm removal** check box.
5. Click **OK**. Plesk removes password protection for the directory.
## More information
For more information about Plesk, please visit [https://www.plesk.com](https://www.plesk.com).
## Related articles
* [Backing up and restoring databases in Plesk](/docs/backing-up-and-restoring-databases-with-plesk)
* [Changing your Plesk password](/docs/changing-your-plesk-password)