> ## Documentation Index
> Fetch the complete documentation index at: https://kb.hosting.com/llms.txt
> Use this file to discover all available pages before exploring further.
# Publishing your web site with Dreamweaver
> Learn how to publish a website developed with Dreamweaver. Just follow our easy, step-by-step instructions to publish your Dreamweaver site fast!
This article describes how to publish a web site created in Adobe Dreamweaver to a hosting.com server.
This article assumes that you have already created a web site using Dreamweaver, and you are ready to publish it to a hosting.com web server.
## Publishing a Dreamweaver web site to a hosting.com server
After you create a web site in Dreamweaver, you can publish it to the hosting.com server associated with your account. To do this, follow these steps:
1. Start Dreamweaver and open your web site project.
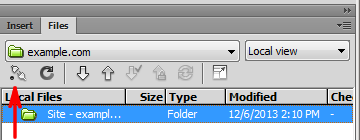
2. Click the **Connect to Remote Server** icon:\\
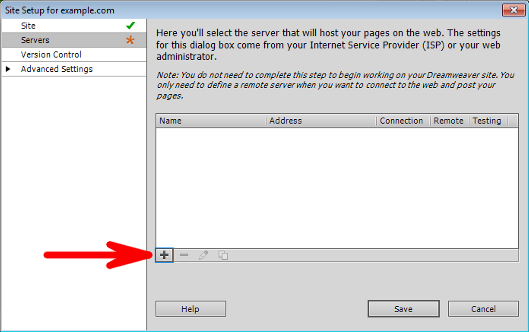
3. In the **Site Setup** dialog box, click the **Add new server** icon:\\
4. In the **Server Name** text box, type a descriptive name for the server, which can be anything you want:\\
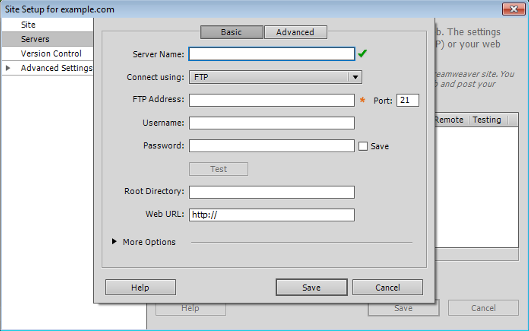
5. In the **Connect using** list box, select **SFTP**.
6. In the **SFTP Address** text box, type your domain name (for example, *example.com* ).
If you have not set up your domain to point to hosting.com's name servers yet, you can use the name of the server that hosts your account instead. For information about how to determine your account's server name, please see [this article](/docs/determining-your-accounts-server-name).
7. In the **Port** text box, type `22`.
> 🚧 Important
>
> Make sure you use the correct SSH port number for your account. For example, some hosting accounts use a different port for SSH, such as 7822.
8. In the **Username** text box, type your hosting.com account (cPanel) username.
If you do not know your cPanel username or password, you can use the hosting.com Hosting Panel to view it. For more information, please see [this article](/docs/viewing-and-changing-login-settings-for-shared-hosting-accounts).
9. In the **Password** text box, type your hosting.com account (cPanel) password.
If you do not want to retype your password every time you connect to your account, select the **Save** check box.
10. Click **Test**. When you receive a **Dreamweaver connected to your Web server successfully** message, click **OK**. If you receive an error message, click **OK**, verify the settings you provided in steps 4 to 9, and then try again.
11. In the **Root Directory** text box, type `/home/username/public_html`, where\_username\_ represents your account (cPanel) username.
The */home/username/public\_html* path assumes that you want to upload files to your web site's document root directory. If you want to upload files to a subdirectory instead, then add it to the end of the path.
12. In the **Web URL** text box, type `http://www.example.com`, where *example.com* represents your domain name.
13. Click **Save**, and then click **Save** again.
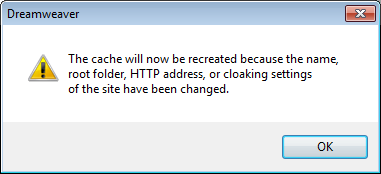
14. When Dreamweaver prompts you to recreate the cache, click **OK**:\\
15. To connect to your hosting.com account, click the **Connect to Remote Server** icon:\\

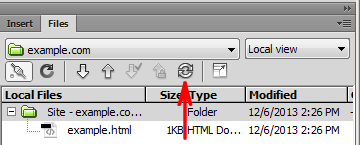
16. After Dreamweaver connects to your account, click the **Synchronize with Remote Server** icon:\\
17. In the **Synchronize with Remote Server** dialog box, in the **Synchronize** list box, select **Entire 'sitename' Site**, where\_sitename\_ represents your project's name:\\
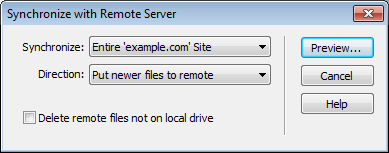
18. In the **Direction** list box, select **Put newer files to remote**.
19. Click **Preview**.
20. Review the list of files to upload, and then click **OK**.
21. After Dreamweaver uploads the files to your hosting.com account, you can view them in any web browser.
## More information
### What is Dreamweaver?
Dreamweaver is an easy-to-use software solution used to design web sites. Dreamweaver features a WYSIWYG ("what you see is what you get") that makes it intuitive for all users, regardless of website creation experience, to build a website. Dreamweaver supports a number of markup languages ranging from JavaScript, XML, HTML and CSS.
Dreamweaver created by Macromedia in 1997. In 2005, Adobe purchased Macromedia, and that included Dreamweaver. Adobe continued to develop and improve upon Dreamweaver.
### Dreamweaver features
Dreamweaver is loaded with features that have helped it become a popular web page builder solution. Here are some of those features:
* Toggle between you code view and the design view.
* Coding suggestions makes it quicker to build your site, with fewer potential mistakes.
* Dreamweaver highlights the different code types in different colors making it easy to differentiate between each.
* Properties menu allows you to include links, change colors, update fonts and select heading sizes with ease.
* Preview modes lets you view what your website will look like before you publish it live to the web.
### Learn more about Dreamweaver
For more information about Adobe Dreamweaver, please visit [http://www.adobe.com/products/dreamweaver](http://www.adobe.com/products/dreamweaver).