> ## Documentation Index
> Fetch the complete documentation index at: https://kb.hosting.com/llms.txt
> Use this file to discover all available pages before exploring further.
# Using a subdomain as an account's primary domain
> There may be times when you want to use a subdomain as an account's primary domain. Just follow our easy step-by-step instructions to learn how!
This article describes how to use a subdomain as an account's primary domain. For example, you may have clients who have not purchased a domain name yet. In this scenario, you can go ahead and create their account, and they can start developing their site. In the meantime, they access their site by using a subdomain of another account.
## Creating the account
The first step is to create the account that will use the subdomain. To do this, follow the same steps to create the account that you do for other accounts. The only difference is that when you specify the domain, make sure you include the subdomain. For example, if you want to use a subdomain named *testing* for the *example.com* domain, specify *testing.example.com* as the domain when you create the account.
For information about how to create an account in WebHost Manager, please see [this article](/docs/managing-whm-accounts).
## Editing the DNS zone
After you create the account, you must edit the DNS zone for the primary domain. Using the example above for the *testing.example.com* subdomain, the *example.com* domain's DNS zone must be updated. Specifically, you must add an A record for the subdomain that points to the IP address of the new account.
To do this, follow these steps:
1. Log in to WebHost Manager.
> 📘 Note
>
> If you do not know how to log in to your WebHost Manager account, please see [this article](/docs/accessing-webhost-manager).
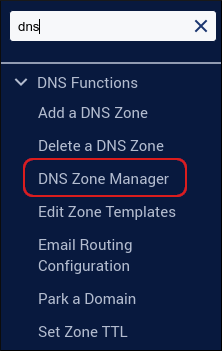
2. In the search box at the upper left of the WebHost Manager screen, start typing **dns**, and then click **DNS Zone Manager** when it becomes visible:\
3. Select the primary domain, and then click **Manage**. The DNS zone information for the domain appears.
If the primary domain is not visible in the list, start typing the domain name in the search box until it appears in the list.
4. Click **Add Record**.
5. In the **Valid zone name** text box, type the name of the subdomain. Leave the value **14400** in the second text box.
6. In the **Type** list box, select **A**.
7. In the **IPv4 address** text box, type the IP address of the account you created for the subdomain.
8. Click **Save Record**. WebHost Manager updates the DNS zone.
9. After DNS propagation completes, you can access the new account using the subdomain.
## Related articles
* [Managing WHM accounts](/docs/managing-whm-accounts)
* [Managing WHM packages](/docs/managing-whm-packages)