> ## Documentation Index
> Fetch the complete documentation index at: https://kb.hosting.com/llms.txt
> Use this file to discover all available pages before exploring further.
# Using Google Drive to back up and restore data
> Learn to automatically back up and restore your hosting.com data with Google Drive using the gdrive command-line tool.
This article describes how to back up data on your hosting.com account to a Google Drive account, as well as how to restore data from Google Drive to your account. Using this configuration, your data is backed up securely to an off-site storage location.
* If you have not already set up a Google Drive account, you must do so before following the procedures below. To set up a Google Drive account, please visit [https://www.google.com/drive](https://www.google.com/drive).
* You can configure Google Drive backups on any hosting.com plan.
* Google has changed the process for creating Google API credentials. As a result, the Google Drive configuration process now requires completing multiple procedures. Make sure you follow the procedures below in the order in which they appear.
## Step 1: Create Google API credentials
First you must create a set of Google API credentials. At the end of this procedure, you will have a **Client Id** and **Client Secret** to use with the [gdrive command-line program](https://github.com/glotlabs/gdrive). The *gdrive* program enables you to access and manipulate Google Drive files and directories from the command line.
To create Google API credentials for your account, follow these steps:
1. Log in to the Google Cloud Console with your Google Mail account at [https://console.cloud.google.com/](https://console.cloud.google.com/).
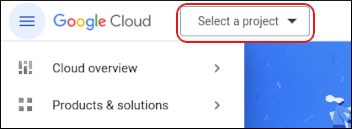
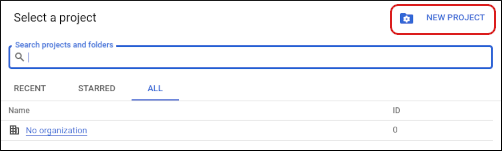
2. Click the project list box, and then click **NEW PROJECT**:\
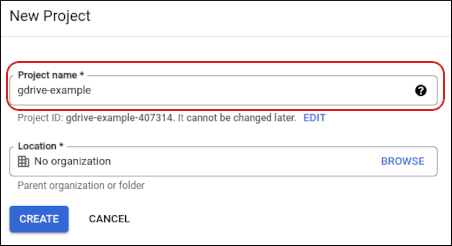
3. In the **Project name** list box, type a name for the project. In this procedure, we use the **gdrive-example** project name:\
4. Click **CREATE**.
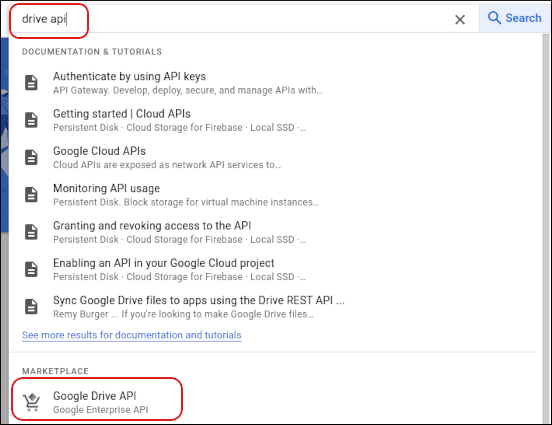
5. In the search bar, type `drive api`, and then under **MARKETPLACE**, click **Google Drive API**:\
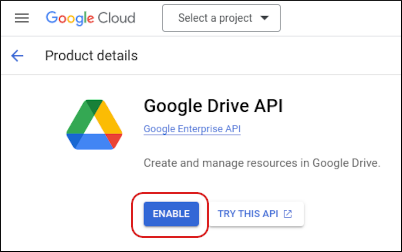
6. Click **ENABLE**:\
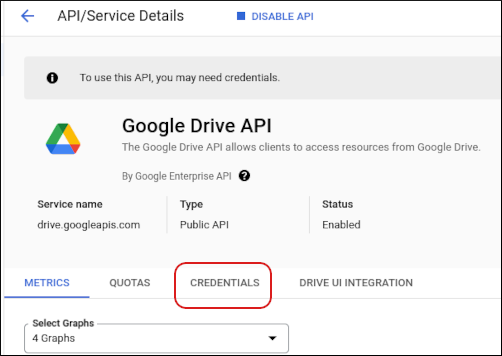
7. Click the **CREDENTIALS** tab:\
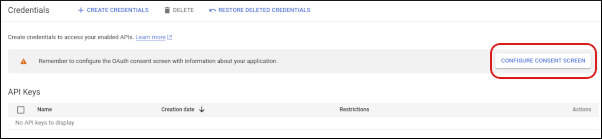
8. Click **CONFIGURE CONSENT SCREEN**:\
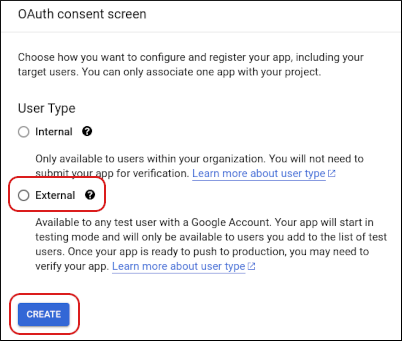
9. Under **User Type**, click **External**, and then click **CREATE**:\
10. In the **App name** text box, type `gdrive-example`:\
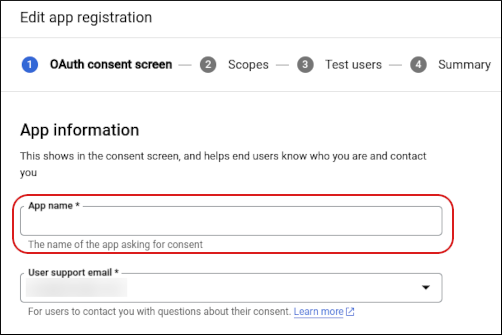
11. In the **User support email** list box, select your Google account.
12. In the **Developer contact information** text box, type the email address for the developer.
13. Click **SAVE AND CONTINUE**.
14. Click **ADD OR REMOVE SCOPES**:\
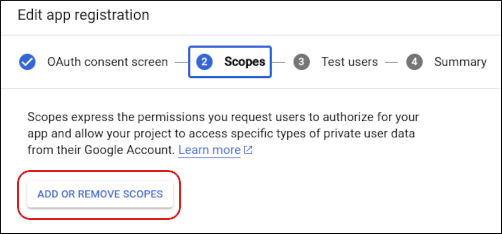
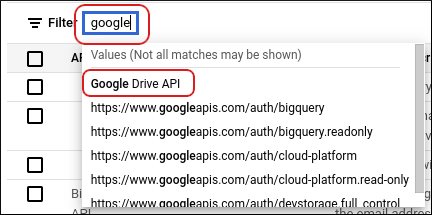
15. In the **Filter** text box, type `google drive api`, and then click **Google Drive API**:\
16. Select the **../auth/drive** check box and **../auth/drive.metadata.readonly** check box:\
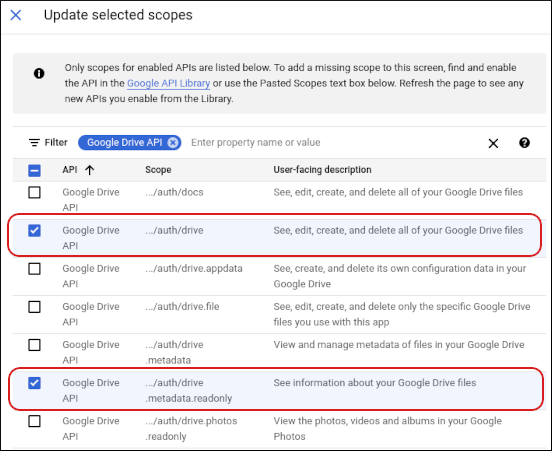
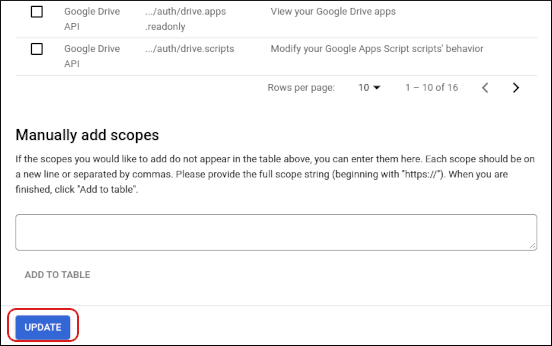
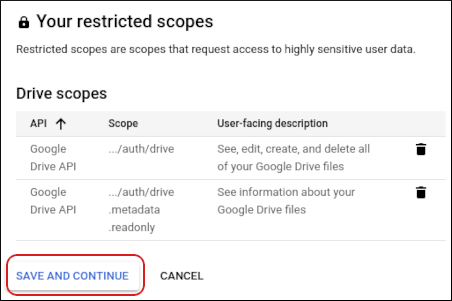
17. Click **UPDATE**, and then click **SAVE AND CONTINUE**:\
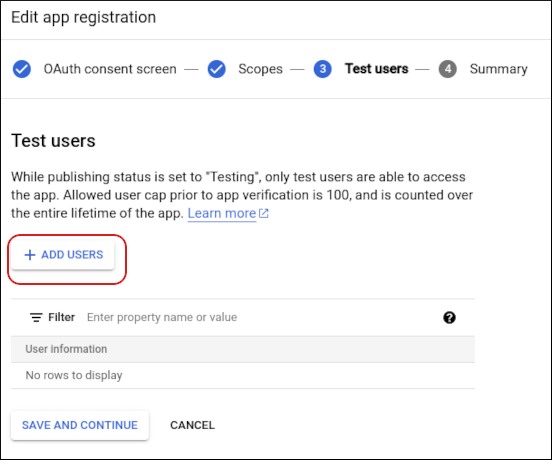
18. Click **ADD USERS**:\
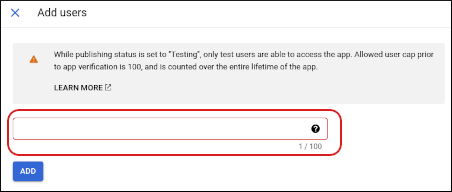
19. In the text box, type the email address for your Google account, and then click **ADD**:\
20. Click **SAVE AND CONTINUE**:\
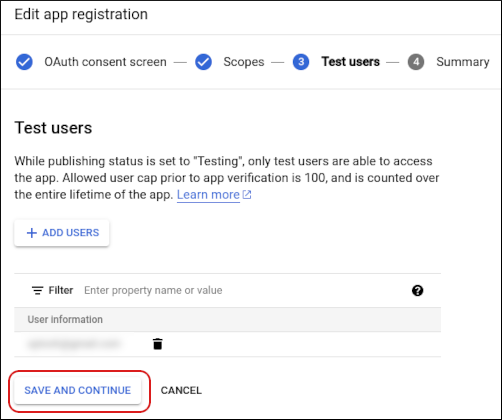
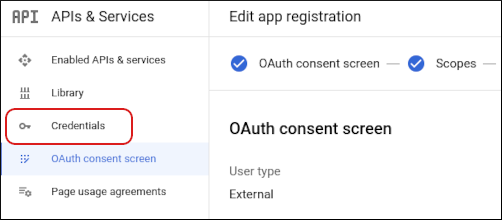
21. In the left sidebar, click **Credentials**:\
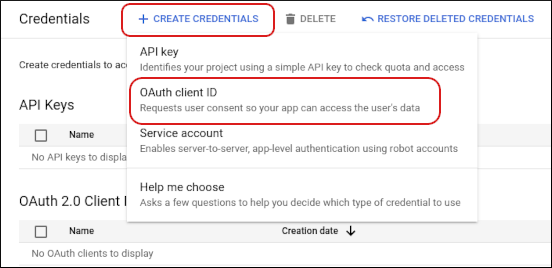
22. Click **CREATE CREDENTIALS**, and then click **OAuth client ID**:\
23. In the **Application type** list box, select **Desktop app**:\
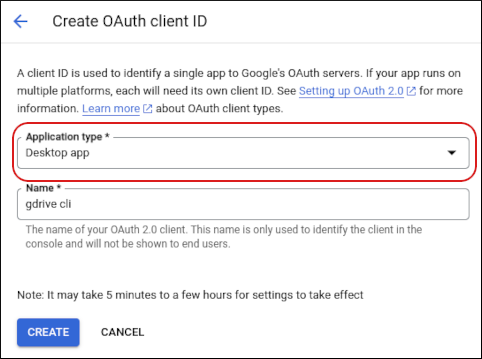
24. In the **Name** text box, type `gdrive cli`.
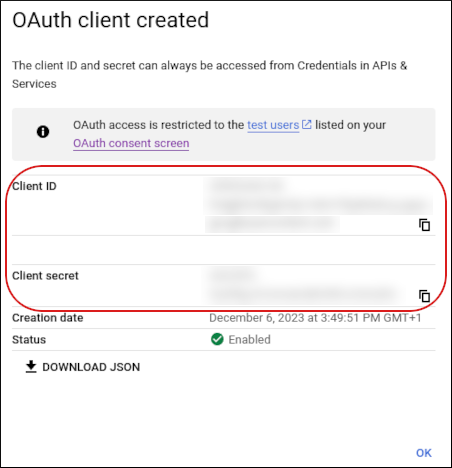
25. Click **CREATE**. The **Client ID** and **Client secret** appear. Click the clipboard icons to copy them, and then save them in a file. You will need these values later during the configuration process:\
26. Click **OK**.
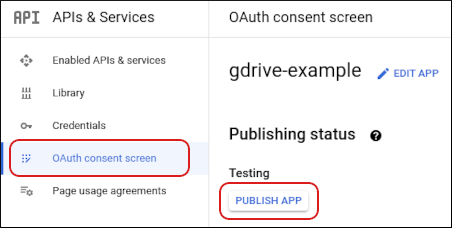
27. In the left sidebar, click **OAuth consent screen**, and then click **PUBLISH APP**:\
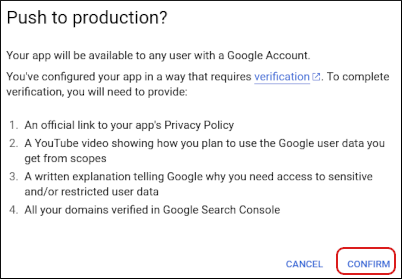
28. In the **Push to production?** dialog box, click **CONFIRM**:\
29. Under **Publishing status** should appear **In production**:\
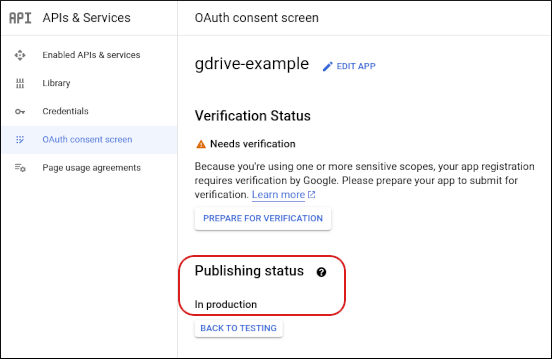
You can ignore the **Needs verification** warning in the **Verification Status** section. Gdrive functions normally without verification.
## Step 2: Install the gdrive program on your local computer
After you create Google API credentials, you are ready to install the *gdrive* program on your local computer. The *gdrive* program enables you to access and manipulate Google Drive files and directories from the command line.
To add an account to *gdrive*, you must use a web browser during the initial setup process. However, the command-line environment on the server does not have a web browser. To work around this problem, you add the account to *gdrive* on your local computer, export the configuration, and then import that configuration into your hosting.com account on the web server. The following procedures demonstrate how to do this.
To install*gdrive* on your local computer, follow these steps:
1. In your web browser, go to [https://github.com/glotlabs/gdrive/releases](https://github.com/glotlabs/gdrive/releases).
2. Download the correct file for your operating system:
* **Linux**: *gdrive\_linux-x64.tar.gz*
* **Apple macOS**: *gdrive\_macos-x64.tar.gz*
* **Microsoft Windows**: *gdrive\_windows-x64.zip*
The most recent version when this article was published was 3.9.0.
3. Decompress the compressed *.tar.gz* or *.zip* file to obtain the *gdrive* executable program.
4. Open a command prompt (terminal) window in the directory where you extracted the downloaded file.
5. To ensure*gdrive* works, type one of the following commands:
* For Microsoft Windows:
```bash theme={null}
gdrive version
```
* For Linux and macOS:
```bash theme={null}
./gdrive version
```
The version number should appear.
## Step 3: Add your Google account to gdrive
After you install*gdrive* on your local computer, you are ready to add your Google account to the *gdrive* configuration. To do this, follow these steps:
1. Open a command prompt (terminal) window.
2. At the command prompt, type the following command:
```bash theme={null}
gdrive account add
```
3. At the **Client ID** prompt, type (or copy and paste) the Client ID you obtained when creating Google API credentials.
4. At the **Client secret** prompt, type (or copy and paste) the Client secret you obtained when creating Google API credentials.
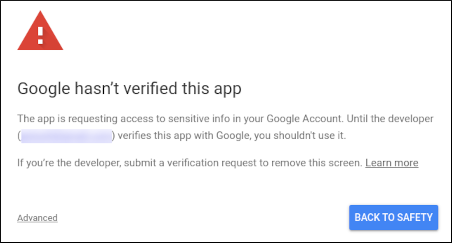
5. A URL appears. Open the URL in your web browser. You receive the **Google hasn't verified this app** message:\
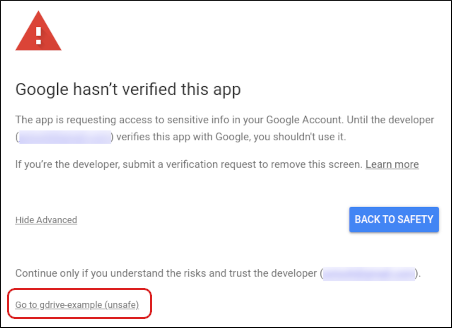
6. Click **Advanced**, and then click **Go to gdrive-example**:\
7. Select the **Select all** check box, and then click **Continue**:\
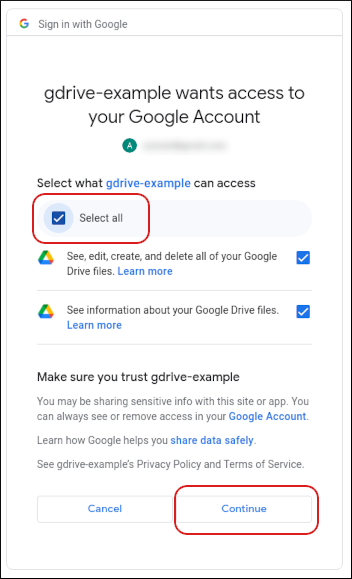
Google adds your account.
8. At the command prompt, type the following command:
```bash theme={null}
gdrive account list
```
Your Google account email address should appear.
## Step 4: Export the gdrive account configuration and upload it to the hosting.com server
Now that your Google account is configured in*gdrive*, you are ready to export the configuration and upload it to your hosting account on the hosting.com server. To do this, follow these steps:
1. On your local computer, open a command prompt (terminal) window.
2. At the command prompt, type the following command. Replace ***email-address*** with the email address of your Google account:
```bash theme={null}
gdrive account export email-address
```
3. The previous step generates a *.tar* file. Using FTP or SCP, upload the *.tar* file to your hosting.com account on the remote server.
## Step 5: Install the gdrive program on your hosting.com account
You are now ready to install the *gdrive* program on your hosting account and import the configuration you uploaded in the previous procedure. To do this, follow these steps:
1. Log in to your hosting.com account [using SSH](/docs/using-ssh-secure-shell).
2. At the command prompt, type the following commands to download and extract the *gdrive* program:
```bash theme={null}
cd ~
wget https://github.com/glotlabs/gdrive/releases/download/3.9.0/gdrive_linux-x64.tar.gz
tar xvzf gdrive_linux-x64.tar.gz
```
3. To make the *gdrive* program accessible from any directory in your account, type the following commands:
```bash theme={null}
mkdir ~/bin
mv ~/gdrive ~/bin
```
4. To confirm*gdrive* is installed correctly, type the following command:
```bash theme={null}
gdrive version
```
You should receive output that resembles the following text:
```
gdrive 3.9.0
Commit: unknown
Rust: 1.68.0
Arch: x86_64
OS: linux
```
5. To import the account configuration, type the following command. Replace ***filename*** with the name of the *.tar* file you uploaded in the previous procedure:
```bash theme={null}
gdrive account import filename
```
The Google account configuration process is now complete, and you are ready to configure backups for your hosting.com account.
## Step 6: Back up data to Google Drive
After you install and configure the *gdrive* program, and have verified that*gdrive* can connect to Google Drive, you are ready to:
* Create a directory on Google Drive to contain your backup files.
* Create a cron job on your hosting account to do the actual backup.
To do this, follow these steps:
1. To create a directory on Google Drive in which to store your backup files, type the following command. You can replace *backups* with any name you want to use:
```bash theme={null}
gdrive files mkdir backups
```
2. To verify that the directory was created successfully, type the following command:
```bash theme={null}
gdrive files list
```
Note the ID for the directory, as you will need this information below.
3. After you verify that the Google Drive directory was created successfully, you are ready to set up a cron job that backs up files to the directory automatically. To do this, the cron command must run the *gdrive* program with the correct ID of the destination directory.For example, the following cron command demonstrates how to back up the entire*public\_html* directory to the Google Drive*backups* directory daily at 2:30 AM. Replace ***username*** with your own hosting.com account username, and replace ***ID*** with the ID of the *backups* directory:
```
30 2 * * * /home/username/bin/gdrive files upload --parent ID --recursive /home/username/public_html
```
You can also back up individual files. The following cron job shows how to do this with a file named *backup.tar.gz*:
```
30 2 * * * /home/username/bin/gdrive files upload --parent ID /home/username/backup.tar.gz
```
You can set up the cron job using the *crontab* command line program, or by using cPanel (if your account includes cPanel access). For information about how to set up a cron job in cPanel, please see [this article](/docs/cron-jobs).
## Step 7 (optional): Restore data from Google Drive
To restore data from Google Drive to your hosting.com account, follow this step:
1. Use the *gdrive* **files download** commands:
* To restore an individual file, type the following command. Replace ***ID*** with the ID of the file you want to restore:
```bash theme={null}
gdrive files download ID
```
* To restore an entire directory, type the following command. Replace ***ID*** with the ID of the directory you want to restore:
```bash theme={null}
gdrive files download --recursive ID
```
## More information
* For general information about Google Drive, please visit [https://www.google.com/drive](https://www.google.com/drive).
* To view the official Google Drive documentation, please visit [https://support.google.com/drive](https://support.google.com/drive).
## Related articles
* [Backups on dedicated servers and VPS](/docs/backups-on-dedicated-servers-and-vps)
* [Backups on shared hosting and reseller accounts](/docs/backups-on-shared-hosting-and-reseller-accounts)
* [Using Amazon S3 to back up and restore data](/docs/using-amazon-s3-to-back-up-and-restore-data)