> ## Documentation Index
> Fetch the complete documentation index at: https://kb.hosting.com/llms.txt
> Use this file to discover all available pages before exploring further.
# Using hosting.com Cloud Backup
> Learn to view, manage, and restore data backups with hosting.com Cloud Backup for managed VPS and dedicated servers.
This article describes how to access and use hosting.com Cloud Backup (formerly A2 Cloud Backup). hosting.com Cloud Backup enables you to view, manage, and restore backups.
The hosting.com Cloud Backup feature is only available on legacy managed VPS and managed dedicated servers.
## About hosting.com Cloud Backup
Hosting.com Cloud Backup provides an easy and effective way to back up and restore files, MySQL databases, and more on a managed VPS or managed dedicated server.
When the hosting.com Cloud Backup feature is enabled for your account, you do not need to take any additional action. It begins generating backups of your server automatically.
If a problem occurs on your site, or you need to restore data for some reason, you can access your backups using the convenient cPanel interface.
**Important**
* There are currently two versions of hosting.com Cloud Backup: one powered by JetBackup, and the other powered by R1Soft. Only some older Dedicated server accounts still use R1Soft, and are being transitioned to use JetBackup instead.
* Some shared hosting, reseller hosting, and Turbo web hosting accounts also use JetBackup for managing backups. For information about how to use JetBackup with these types of accounts, please see [this article](/docs/restoring-files-email-and-databases-using-jetbackup).
## JetBackup
The following procedures show how to use hosting.com Cloud Backup powered by JetBackup. If you do not see the **JetBackup 5** icon in cPanel, follow the procedures for R1Soft instead.
### Accessing JetBackup
JetBackup is integrated with cPanel, which makes it easy to access and use. To do this, follow these steps:
1. Log in to cPanel.
> 📘 Note
>
> If you do not know how to log in to your cPanel account, please see [this article](/docs/accessing-cpanel).
2. On the **Tools** page, in the **Files** section, click **JetBackup 5**:\

3. After a few seconds, the JetBackup dashboard appears and displays the following information:
* Any alerts.
* The number of total backups for your account.
* The amount of disk space all of the files in your account use.
Additionally, there are several shortcuts which are described in the next sections.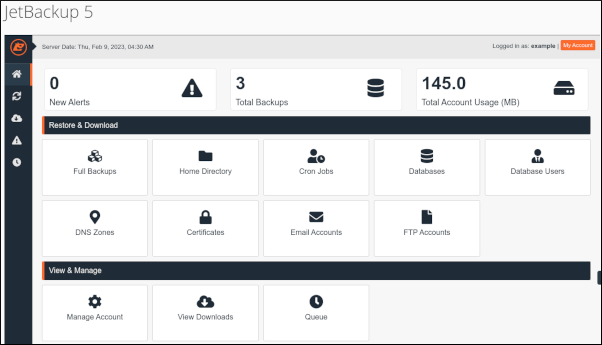
Please note that email notifications from JetBackup are not functional at this time. If you enter your email address in the **My Account** section, you will not receive email notifications from JetBackup.
### Viewing, restoring, and downloading backups
You can view all of the backups for your account. Additionally, you can restore a backup to return your site to a previous state. You can also download a backup to your local computer for safekeeping. To do these tasks, follow these steps:
1. From the JetBackup dashboard, in the **Restore & Download** section, click the icon of the backup you want to view:
* **Full Backups**
* **Home Directory**
* **Cron Jobs**
* **Databases**
* **Database Users**
* **DNS Zones**
* **Certificates**
* **Email Accounts**
* **FTP Accounts**
2. Detailed information appears for the backup you selected, including:
* When the backup was created.
* The backup schedule.
* The backup size.\
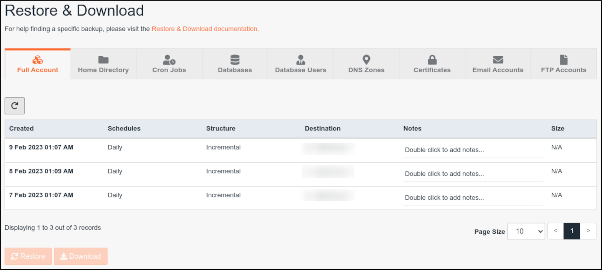
To help organize your backups, you can add notes to them. To do this, in the **Notes** column, double-click **Double click to add notes** , type your note, and then press Enter.
3. To restore a backup:
* Click the backup you want to restore, and then click **Restore**:\
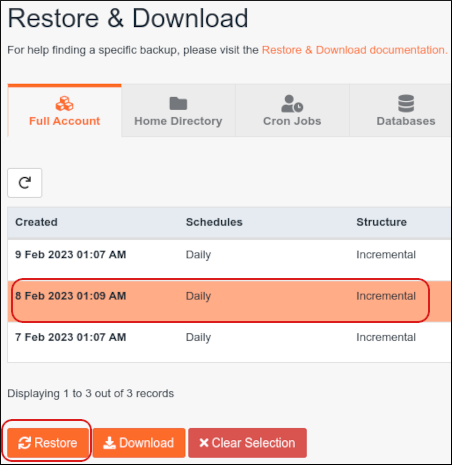
* Review the items to restore. You can click **Remove items** to exclude a set of files from the restore.
* Click **Restore Selected Items**. The restore process begins. You can monitor the progress in the **Queue** section.
4. To download a backup:
* Click the backup you want to download, and then click **Download**:\
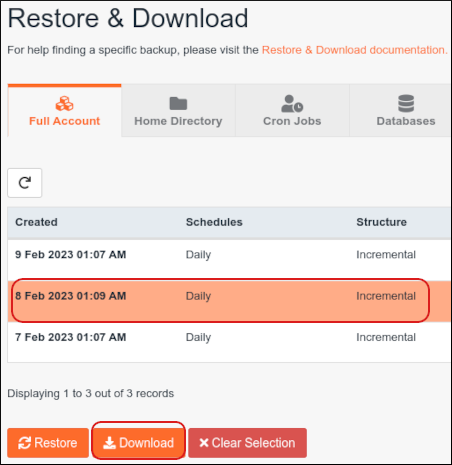
* Review the items to download. You can click **Remove items** to exclude a set of files from the download.
* Click **Download Selected Items**. The download process to your account begins. You can monitor the progress in the **Queue** section.
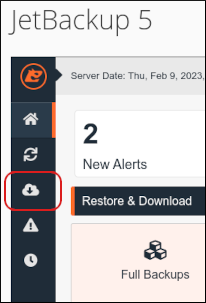
* To download the backup to your local computer, in the left sidebar, click the **Downloads** icon:\
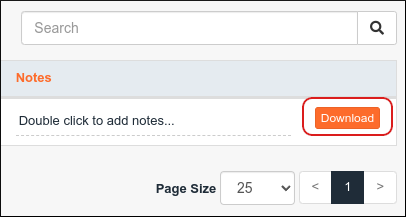
* Click **Download** to download the files, and then select where on your computer you want to save the compressed file:\
## R1Soft
The following procedures show how to use hosting.com Cloud Backup powered by R1Soft. If you do not see the **R1Soft Restore Backups** icon in cPanel, follow the procedures for JetBackup instead.
### Accessing the Server Backup Manager
R1Soft's [Server Backup Manager](http://wiki.r1soft.com/display/ServerBackup/Server+Backup+Manager) is integrated with cPanel, which makes it easy to log in. To access and use the Server Backup Manager, follow these steps:
1. Log in to cPanel.
> 🚧 Important
>
> If your server has WebHost Manager (WHM) installed, you must log in directly to cPanel. If you log in to cPanel through WHM and then try to access the Server Backup Manager, you receive an **Authentication Failed** error message.
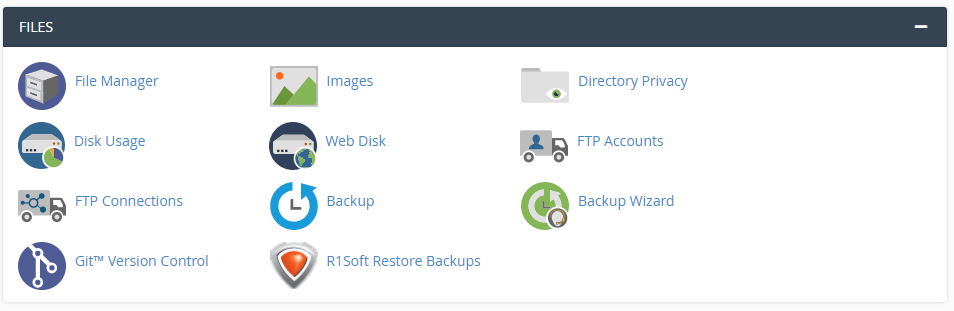
2. In the **Files** section of the cPanel home screen, click **R1Soft Restore Backups**:\
3. You are automatically logged in to the **Server Backup Manager**:\
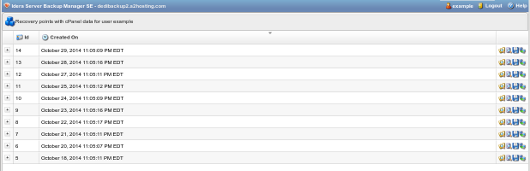
4. The Server Backup Manager displays a list of available backups, which are called*recovery points*. For each recovery point, there are icons for the following operations:
* The **Browse** () icon enables you to manage file backups. For more information, see the **Managing file backups** procedure below.
* The **Browse Databases** () icon enables you to manage database backups. For more information, see the **Managing database backups** procedure below.
* The **Download** () icon enables you to download the entire backup file. For more information, see the **Downloading backup files** procedure below.
* The **Send to Agent** () icon is currently unused.
### Managing file backups
To manage your file backups, follow these steps:
1. From the **Server Backup Manager** home page, locate the recovery point that you want to access, and then click the  icon. The **Browse Recovery Point** window appears.
2. To restore all of your files at once, select the check box next to the **home** directory, and then click **Restore Selected**.
> 📘 Note
>
> The Server Backup Manager backs up your entire server, but as a cPanel user, you can only see your home directory.
3. To view the contents of your home directory, double-click **home**. A file listing appears:\
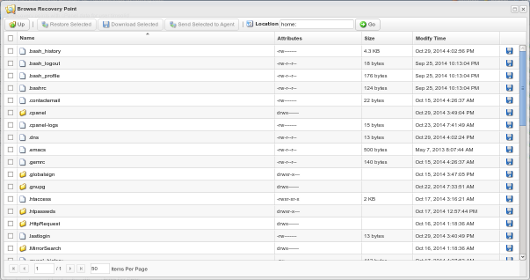
4. You can do any of the following operations:
* To open a directory, double-click the directory name.
* To move back up a directory, click the **Up** () icon.
* To restore a specific file (or multiple files), select the check box next to the filename (or filenames), and then click **Restore Selected**.
* To download a specific file (or multiple files), select the check box next to the filename (or filenames), and then click **Download Selected**.
### Managing database backups
With hosting.com Cloud Backup, your MySQL databases are easy to back up and restore. To do this, follow these steps:
1. From the **Server Backup Manager** home page, locate the recovery point that you want to access, and then click the  icon. The **Browse Databases** window appears.
2. Click the **+** icon next to **Databases**. A list of your databases appears:\
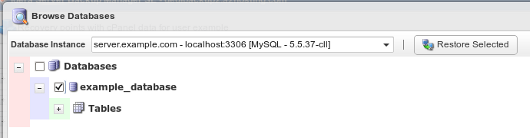
You can continue clicking the **+** icon to show the database tables.
3. To restore a specific database (or multiple databases), select the check box next to the database name (or names), and then click **Restore Selected**.
### Downloading recovery points
As described in the preceding **Managing file backups** procedure, you can download specific files from a recovery point. However, you can also download the entire recovery point that contains your home directory. To do this, follow these steps:
1. From the **Server Backup Manager** home page, locate the recovery point that you want to download, and then click the  icon. The **Download stored files** dialog box appears:
2. In the **Introduction** section, click **Next**.
3. In the **File Type** section, select the compressed file format you want to use, and then click **Next**.
> 📘 Note
>
> Normally, if your local computer runs Microsoft Windows, you want to download the file as a *.zip* file. If your local computer runs Linux or Apple macOS, you want to download the file as a *.tar.gz* file (this is a tar file compressed with gzip).
4. In the **Download Filename** section, select the filename you want to use for the download, and then click **Next**.
> 📘 Note
>
> * To let hosting.com Cloud Backup generate the filename, click **Use Generated Filename**. hosting.com Cloud Backup uses your username and the recovery point's date and time to generate the filename.
>
> * To specify your own custom filename, click **Specify Filename**, and then type the filename you want to use in the **Filename** text box.
5. In the **Summary** section, review the options you selected, and then click **Download**.
6. Select a location on your local computer to save the file.
If you have a lot of files in your home directory, it may take some time to download the entire file.
## More information
* For more information about JetBackup, please visit [https://www.jetbackup.com](https://www.jetbackup.com).
* For more information about R1Soft, please visit [https://www.r1soft.com](https://www.r1soft.com).
## Related articles
* [Backups on dedicated servers and VPS](/docs/backups-on-dedicated-servers-and-vps)