> ## Documentation Index
> Fetch the complete documentation index at: https://kb.hosting.com/llms.txt
> Use this file to discover all available pages before exploring further.
# Using shared URLs to access your site
> Discover how to find your shared URL for testing or before domain setup, applicable for shared, reseller, managed VPS, and Dedicated Server hosting.
This article describes how to use a shared URL (which is also sometimes called a "temporary URL") to access your site. With a shared URL, you do not have to use your domain name to view your site. This feature is useful for website testing, or if you have not configured your domain name settings yet.
**Important**
Alternatively, if you have a dedicated IP address for your account you can use that to access your site.
## Using shared URLs to access your site
Hosting.com provides shared URLs that enable you to access your website without using your domain name. The URL you use depends on the type of account you have, and which hosting.com server hosts your account.
**Important**
Some content management systems (CMS) and web applications may not display correctly when you use a shared URL. This is because they are configured to use your domain name (such as *example.com* ), which is different from your shared URL (for example, *mi3-ss33.a2hosting.com* ). For example, you must update two database settings every time you [use a different domain name with WordPress](/docs/changing-the-website-url-in-wordpress).
### Shared hosting accounts
To determine the shared URL for a shared hosting account, follow these steps:
1. Make sure you know the hosting.com server name for your account. For information about how to determine the server name for your account, please see [this article](/docs/determining-your-accounts-server-name).
2. If the server name for your account contains a hyphen (-), make the following changes to the server name to construct the shared URL:
* Change *a2hosting.com* to *a2hosted.com*.
* Add *www* to the beginning of the URL.
* Add your username followed by a period (.) to the beginning of the URL.
> 👍 Tip
>
> For example, if your server name is *mi3-ss2.a2hosting.com*, and your username is *example*, then the shared URL is **example.wwwmi3-ss2.a2hosted.com** .
3. If the server name for your account does **not** contain a hyphen (-), use the following table to find the corresponding shared URL for your server. Replace ***username*** with your own hosting.com account username, and replace ***X*** with the server number:
| If your server name is… | ... then the shared URL is: |
| ----------------------- | ------------------------------ |
| | |
| a2sX.a2hosting.com | username.wwwX.a2hosted.com |
| a2ssX.a2hosting.com | username.wwwssX.a2hosted.com |
| a2lsX.a2hosting.com | username.wwwlsX.a2hosted.com |
| nlssX.a2hosting.com | username.wwwnlssX.a2hosted.com |
| nllsX.a2hosting.com | username.wwwnllsX.a2hosted.com |
| sgssX.a2hosting.com | username.wwwsgssX.a2hosted.com |
| sglsX.a2hosting.com | username.wwwsglsX.a2hosted.com |
### Reseller hosting accounts
To determine the shared URL for a reseller hosting account, follow these steps:
1. Make sure you know the hosting.com server name for your account. For information about how to determine the server name for your account, please see [this article](/docs/determining-your-accounts-server-name).
2. If the server name for your account contains a hyphen (-), make the following changes to the server name to construct the shared URL:
* Add *www* to the beginning of the URL.
* Add your username followed by a period (.) to the beginning of the URL.
> 👍 Tip
>
> For example, if your server name is *az1-lr2.supercp.com*, and your username is *example*, then the shared URL is **example.wwwaz1-lr2.supercp.com** .
3. If the server name for your account does **not** contain a hyphen (-), use the following table to find the corresponding shared URL for your server. Replace ***username*** with your own hosting.com account username, and replace ***X*** with the server number:
| If your server name is… | ... then the shared URL is: |
| ----------------------- | ------------------------------ |
| srX.supercp.com | username.wwwsrX.supercp.com |
| ssrX.supercp.com | username.wwwssrX.supercp.com |
| nlssrX.supercp.com | username.wwwnlssrX.supercp.com |
| sgssrX.supercp.com | username.wwwsgssrX.supercp.com |
| srcX.supercp.com | username.wwwsrcX.supercp.com |
| nlsrcX.supercp.com | username.wwwnlsrcX.supercp.com |
| sgsrcX.supercp.com | username.wwwsgsrcX.supercp.com |
### Managed WordPress hosting accounts
**Important**
For older Managed WordPress accounts that are on Plesk, shared URLs are not available. Instead, you can use a modified *hosts* file to temporarily access your site. For information about how to do this, please see [this article](/docs/accessing-your-web-site-before-dns-propagation-is-complete).
To access the shared URL for a Managed WordPress account on cPanel, follow these steps:
1. Log in to the Hosting Panel at [https://my.hosting.com](https://my.hosting.com).
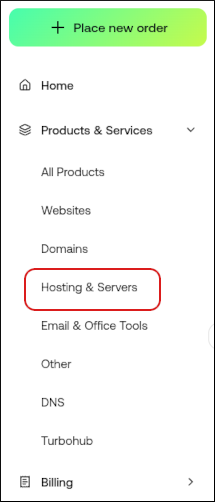
2. In the left sidebar, under **Products & Services**, click **Hosting & Servers**:
3. On the **Hosting & Servers** page, locate your shared hosting account, and then click **Manage**.
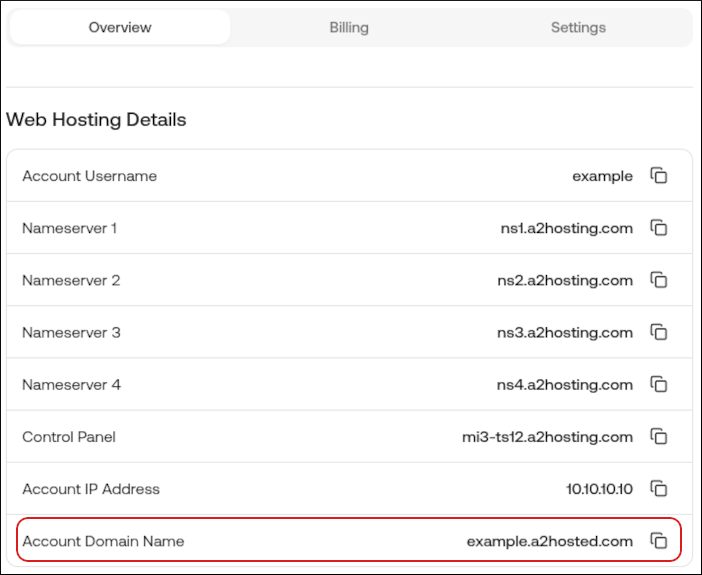
4. On the **Overview** tab, locate the **Account Domain Name** field. This is your shared URL:
### Managed VPS and managed Dedicated Server accounts
For managed VPS and managed Dedicated Server accounts, use the shared URL*[http://username.wwwXXX-XXX-XXX-XXX.a2hosted.com](http://username.wwwXXX-XXX-XXX-XXX.a2hosted.com)*. Replace ***username*** with your hosting.com account username, and replace ***XXX-XXX-XXX-XXX*** with your server's IP address.
For example, if your username is *example*, and your server IP address is 192.168.1.24, then the shared URL is *[http://example.www192-168-1-24.a2hosted.com](http://example.www192-168-1-24.a2hosted.com)*.
### Accessing subdomains and addon domains
If you have configured a subdomain or addon domain for your account, you can also access them using a shared URL.
Subdomains and addon domains are only accessible using a shared URL if the document root is within the *public\_html* directory.
* **Subdomains:** To access a subdomain, add its basename to the end of the shared URL. For example, if your subdomain is *test.example.com*, and your shared URL is *username.wwwaz1-ss25.a2hosted.com*, to access the subdomain use the URL *username.wwwaz1-ss25.a2hosted.com/test*.
* **Addon domains:** To access an addon domain, add it to the end of the shared URL. For example, if your addon domain is *example.com*, and your shared URL is *username.wwwaz1-ss25.a2hosted.com*, to access the addon domain use the URL *username.wwwaz1-ss25.a2hosted.com/example.com*.
## Related articles
* [Accessing your web site before DNS propagation is complete](/docs/accessing-your-web-site-before-dns-propagation-is-complete)
* [Determining your account’s server name](/docs/determining-your-accounts-server-name)