> ## Documentation Index
> Fetch the complete documentation index at: https://kb.hosting.com/llms.txt
> Use this file to discover all available pages before exploring further.
# Using the Manage Team feature in cPanel
> Learn to use cPanel's Manage Team feature to create subaccounts for team members to access and modify your hosting account.
This article describes how to use the [Manage Team feature](https://docs.cpanel.net/cpanel/preferences/manage-team/) in cPanel. With this feature, you can create team users (subaccounts) that can log in and modify selected areas of your hosting account. For example, you could set up a team user account for your developer to access databases and web files. Or you could create a team user account for someone to manage your domains.
* An entire team can include up to seven team users (not counting your own parent cPanel account).
* For Managed VPS and Dedicated server plans, the Manage Team feature is only available if you have a Premier (100 accounts) cPanel license.
## Accessing the Manage Team feature
To access the Manage Team feature, follow these steps:
1. Log in to cPanel.
> 📘 Note
>
> If you do not know how to log in to your cPanel account, please see [this article](/docs/accessing-cpanel).
2. On the **Tools** page, in the **Preferences** section, click **Manage Team**:\
3. The **Manage Team** page appears.
## Creating a team user
To create a new team user, follow these steps:
1. Log in to cPanel.
> 📘 Note
>
> If you do not know how to log in to your cPanel account, please see [this article](/docs/accessing-cpanel).
2. On the **Tools** page, in the **Preferences** section, click **Manage Team**:\

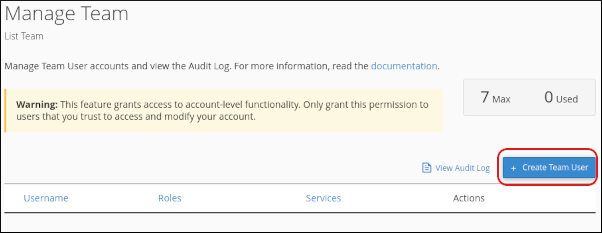
3. On the **Manage Team** page, click **Create Team User**:\
4. In the **Username** text box, type the username you want to use:\
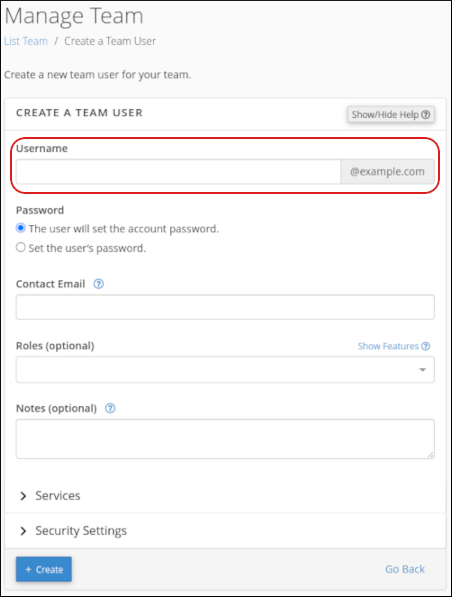
> 📘 Note
>
> Usernames are in the format [*username@example.com*](mailto:_username@example.com_), where *example.com* represents your domain name.
5. In the **Password** section, select **The user will set the account password** or **Set the user's password**.
> 📘 Note
>
> If you select **Set the user’s password** , type the password, or click **Generate** and cPanel generates a random, strong password for you.
6. In the **Contact email** text box, type the new user's email address.
7. In the **Roles** list box, you can optionally assign roles to the new user:
* **Administrator**: This role includes access to the **Database**, **Email**, and **Web** roles.
* **Database**: This role provides access to tools related to database management.
* **Email**: This role provides access to tools related to email administration.
* **Web**: This role provides access to tools related to website functionality.
> 👍 Tip
>
> To see the specific features assigned to each role, click **Show Features** .
8. In the **Notes** text box, you can optionally add notes about the new user.
9. Click **Services** and then select any services you want the new user to access:
* **Email**: You can enable or disable [email access](/docs/e-mail-accounts) for the user.
* **FTP**: You can enable or disable [FTP access](/docs/ftp-accounts-and-sessions) for the user.
* **Web Disk**: You can enable or disable [web disk access](/docs/web-disk) for the user.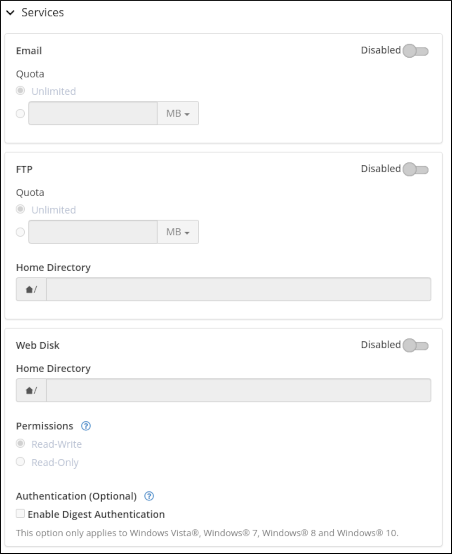
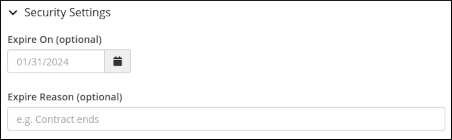
10. If you want the new user's access to expire on a specific date, click **Security Settings**. Select the date on which the account will expire:\
11. Click **Create**. cPanel creates the new user.
## Editing a team user
To edit an existing team member, follow these steps:
1. Log in to cPanel.
> 📘 Note
>
> If you do not know how to log in to your cPanel account, please see [this article](/docs/accessing-cpanel).
2. On the **Tools** page, in the **Preferences** section, click **Manage Team**:\

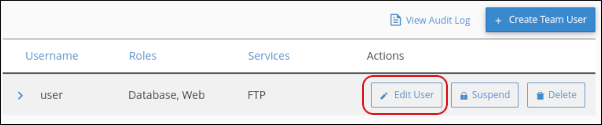
3. On the **Manage Team** page, locate the user you want to edit, and then click **Edit User**:\
4. Make the changes to the user account, and then click **Save**.
## Suspending and unsuspending a team user
You can temporarily suspend a team user's access to your account at any time. To do this, follow these steps:
1. Log in to cPanel.
> 📘 Note
>
> If you do not know how to log in to your cPanel account, please see [this article](/docs/accessing-cpanel).
2. On the **Tools** page, in the **Preferences** section, click **Manage Team**:\

3. On the **Manage Team** page, locate the user you want to suspend, and then click **Suspend**:\
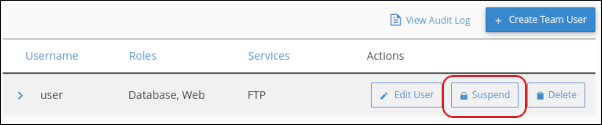
4. cPanel suspends the user. To unsuspend the user, click **Unsuspend**:\

## Deleting a team user
To delete a team member, follow these steps:
1. Log in to cPanel.
> 📘 Note
>
> If you do not know how to log in to your cPanel account, please see [this article](/docs/accessing-cpanel).
2. On the **Tools** page, in the **Preferences** section, click **Manage Team**:\

3. On the **Manage Team** page, locate the user you want to delete, and then click **Delete**:\
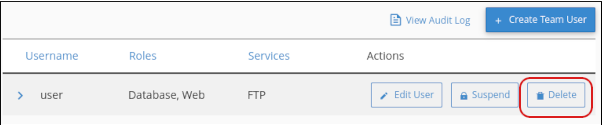
4. Click **Delete**. cPanel deletes the user.
## Logging in as a team user
To log in as a team user, use the full username including the domain (for example,[*username@example.com*](mailto:_username@example.com_) ) and the password. The login URL is the same URL that the primary user uses to log in to cPanel.
For more information about cPanel login URLs, please see [this article](/docs/accessing-cpanel).
## Viewing the audit log
You can monitor team user actions in the audit log.
Because team users have access to your account, for security reasons you should review the audit log regularly.
To view the audit log, follow these steps:
1. Log in to cPanel.
> 📘 Note
>
> If you do not know how to log in to your cPanel account, please see [this article](/docs/accessing-cpanel).
2. On the **Tools** page, in the **Preferences** section, click **Manage Team**:\

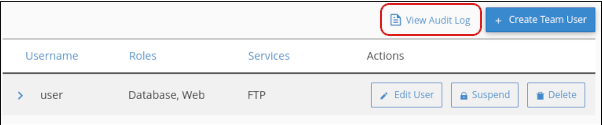
3. On the **Manage Team** page, click **View Audit Log**:\
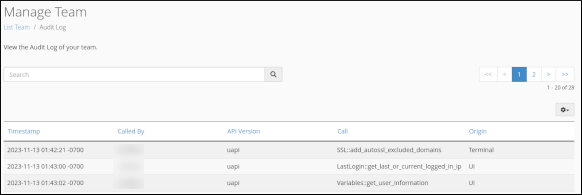
cPanel displays the audit log:\
## More information
For more information about the Manage Team feature, please visit [https://docs.cpanel.net/cpanel/preferences/manage-team/](https://docs.cpanel.net/cpanel/preferences/manage-team/).
## Related articles
* [Accessing cPanel](/docs/accessing-cpanel)
* [Granting limited cPanel account access to a developer](/docs/granting-limited-cpanel-account-access-to-a-developer)
* [cPanel User Manager](/docs/cpanel-user-manager)