> ## Documentation Index
> Fetch the complete documentation index at: https://kb.hosting.com/llms.txt
> Use this file to discover all available pages before exploring further.
# Using the SolusVM control panel to administer an unmanaged VPS
> The SolusVM control panel allows you to administer an unmanaged VPS using a convenient web interface. Learn how to run your VPS here!
This article describes how to use the SolusVM control panel to administer an unmanaged VPS. SolusVM enables you to manage many aspects of your VPS using a convenient web interface.
**Important**
Newer unmanaged VPS products do not use the SolusVM administration interface. They use the Hosting Panel directly instead. For information about how to do this for newer unmanaged VPS products, please see [this article](/docs/unmanaged-vps-quick-start-guide).
## Accessing SolusVM
To access the SolusVM control panel for your VPS, follow these steps:
1. Log in to the [Hosting Panel](https://my.hosting.com).
> 📘 Note
>
> If you do not know how to log in to the Hosting Panel, please see [this article](/docs/accessing-the-hosting-panel).
2. In the list of products and services, locate your unmanaged VPS, and then click **Login**. The Hosting Panel logs you in to SolusVM automatically.
If you have previously changed your password in SolusVM, the automatic login functionality in the Hosting Panel does not work. However, you can access SolusVM without going through the Hosting Panel. To do this, follow these steps:
1. Use your web browser to go to [https://solusvm2.a2hosting.com:5656](https://solusvm2.a2hosting.com:5656).
2. In the **Username** text box, type your SolusVM username.
3. In the **Password** text box, type your SolusVM password.
4. Click **Login**.
## Resetting the SolusVM Control Panel Password
To reset your password for the SolusVM control panel, please follow the steps below. If you already know your SolusVM username, please jump to step 5:
1. Log in to the [Hosting Panel](https://my.hosting.com).
> 📘 Note
>
> If you do not know how to log in to the Hosting Panel, please see [this article](/docs/accessing-the-hosting-panel).
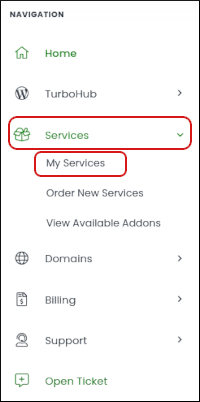
2. In the **Navigation** sidebar, click **Services**, and then click **My Services**:
3. Under **My Products & Services**, locate your unmanaged VPS, and then click **Manage**:\

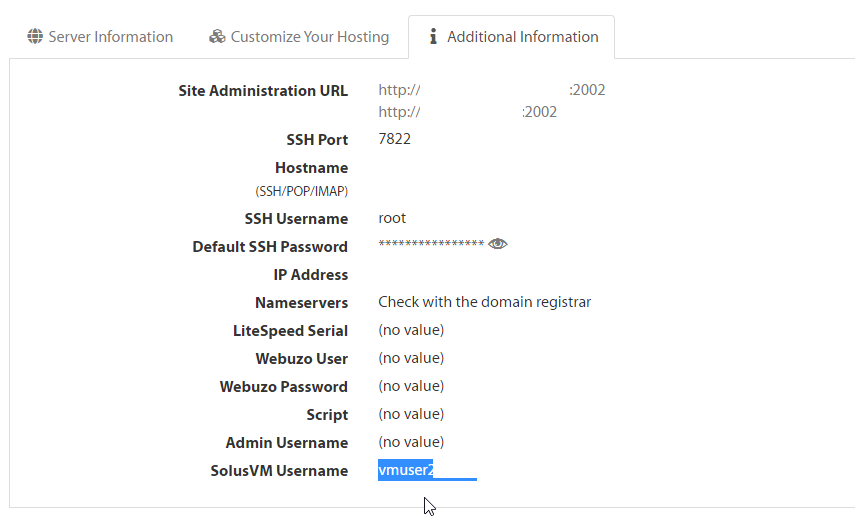
4. Under the **Additional Information** tab, navigate to the **SolusVM Username** field and copy your username:\
5. Navigate to the link below which will reset your password. Use the **SolusVM Username** which was found in the steps above: [https://solusvm2.a2hosting.com:5656/lostpassword.php](https://solusvm2.a2hosting.com:5656/lostpassword.php)
## Viewing VPS statistics
SolusVM enables you to view usage statistics for your server. To do this, follow these steps:
1. Log in to SolusVM. The **Virtual Servers** page appears.
2. The **Virtual Servers** page displays bar graphs showing current bandwidth usage, memory usage, virtual swap usage, and disk usage.
> 👍 Tip
>
> To update the bar graphs, click **Refresh** .
3. To view historical usage data for your server, under **Controls**, click the **Statistics** tab.
4. In the **Select a Time Span** list box, select the length of time that you want the statistics to cover. SolusVM displays graphs that show historical data for bandwidth usage, CPU load usage, and memory (RAM) usage.
## Using the serial console
The serial console enables you to access the command line shell of your VPS. Normally, it is faster and easier to use an [SSH (Secure Shell) connection](/docs/using-ssh-secure-shell) to administer your VPS from the command line. There are occasions, however, when the serial console may be the only way to access your server (for example, if you accidentally set a firewall rule that blocks SSH access).
The SolusVM serial console uses Java. Recent Java updates have made the SolusVM serial console non-functional. As an alternative, you can use the HTML 5-based serial console in the Hosting Panel. The following procedure describes how to do this.
To access the serial console from the Hosting Panel, follow these steps:
1. Log in to the [Hosting Panel](https://my.hosting.com).
> 📘 Note
>
> If you do not know how to log in to the Hosting Panel, please see [this article](/docs/accessing-the-hosting-panel).
2. In the **Navigation** sidebar, click **Services**, and then click **My Services**:\
3. Under **My Products & Services**, locate your unmanaged VPS, and then click **Manage**:\

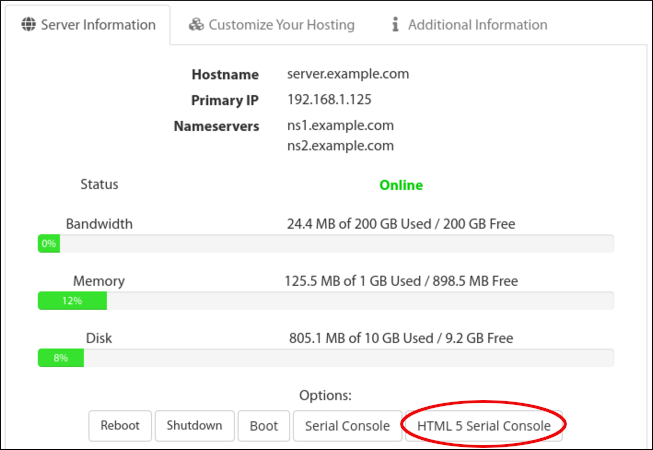
4. Under **Manage**, on the **Server Information** tab, click **HTML 5 Serial Console**:\
5. In the **Time** list box, select the duration of the console session:\

6. Click **Create Session**. The serial console opens with a command prompt for the root user:\
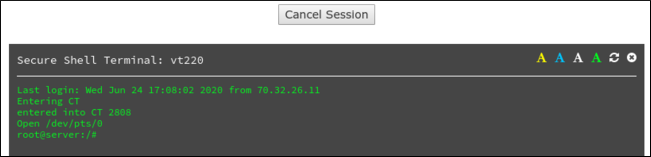
7. When you are done with the serial console session, click **Cancel Session**.
## Controlling the power state
You can use the SolusVM control panel to reboot, shut down, and restart the VPS. To do this, follow these steps:
1. Log in to SolusVM. The **Virtual Servers** page appears.
2. Click **Manage**:\

3. Under **Controls**, on the **General** tab, select the function you want to do:
* To reboot the VPS, click **Reboot**.
* To shut down the VPS, click **Shutdown**.
* To start the VPS, click **Boot**.
> 📘 Note
>
> If the VPS is already running, this action has no effect.
## Changing the root password
The SolusVM control panel enables you to quickly change the root password for your server. To do this, follow these steps:
1. Log in to SolusVM. The **Virtual Servers** page appears.
2. Click **Manage**:\

3. Under **Controls**, click the **Root Password** tab.
4. In the **New Root Password** text box, type the new root password for the server.
5. Click **Change**. The new password takes effect immediately.
## Reinstalling the operating system
When you ordered your VPS, you selected an operating system (OS) image for the initial setup on the server. You can easily change the installed OS image at any time by using SolusVM. To do this, follow these steps:
1. Log in to SolusVM. The **Virtual Servers** page appears.
2. Click **Manage**:\

3. Under **Controls**, on the **General** tab, click **Reinstall**. A list of operating system images appears.
4. Select the operating system image you want to install on your VPS, and then click **Reinstall**.
5. At the confirmation prompt, click **Yes**.
**️ Warning**
This process **erases all data on the VPS** . Make sure you back up any important data or files and transfer them to a safe location **before** you reinstall the operating system.
6. After a few minutes, the reinstallation process finishes and you can log in to the server.
## Managing contact information
We may occasionally need to contact you regarding your VPS, so please keep your contact information up to date.
**Important**
To ensure you receive communications regarding your VPS, you should use an e-mail address that is accessible even if the VPS is not working.
To view or modify your contact information in SolusVM, follow these steps:
1. Log in to SolusVM. The **Virtual Servers** page appears.
2. Click **My Account**.
3. Update your contact information, and then click **Update Settings**.
> 👍 Tip
>
> To receive an e-mail message every time someone logs in to your SolusVM account, select the **Login Alert** check box.
## Related articles
* [Managed VPS Quick Start Guide](/docs/vps-quick-start-guide)
* [Using SSH (Secure Shell)](/docs/using-ssh-secure-shell)