> ## Documentation Index
> Fetch the complete documentation index at: https://kb.hosting.com/llms.txt
> Use this file to discover all available pages before exploring further.
# Using Plesk to stage websites
> Learn to stage websites with Plesk: set up the environment, copy sites and databases, and publish effortlessly.
This article describes how to use Plesk to stage websites.
Plesk is no longer included with new hosting.com plans, but it is still available on legacy Managed WordPress accounts. You can install Plesk manually on unmanaged VPS and Dedicated servers.
## About website staging
It is important to test a site's code and content before you publish it and make it available to the public. The easiest way to do this is by using a website staging environment. With just a few quick steps, Plesk enables you to easily configure a testing environment for your site.
## Setting up the website staging environment
You can host the staging environment in your current webspace on Plesk by creating a new domain or subdomain. For example, if your primary domain is *example.com*, you could create a *staging.example.com* subdomain to use as the testing environment.
For information about how to create a domain or subdomain in Plesk, please see [this article](/docs/adding-new-domains-and-subdomains-in-plesk).
## Copying the website
After you configure the staging environment, you must copy everything from the existing production environment to the new staging environment. To do this, follow these steps:
1. Log in to Plesk.
> 📘 Note
>
> If you do not know how to log in to your Plesk account, please see [this article](/docs/logging-in-and-out-of-plesk).
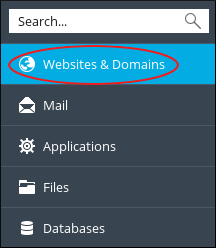
2. In the left sidebar, click **Websites & Domains**:\
3. Locate the website you want to copy, and then click **Website Copying**:\

The **Copy Files** page appears:\
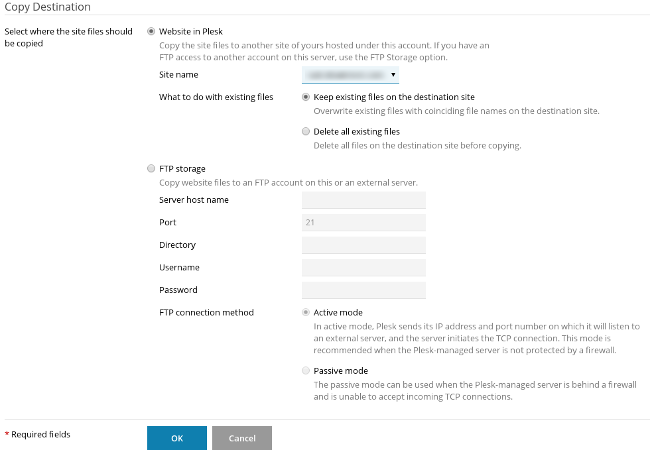
4. Under **Copy Destination**, select **Website in Plesk**.
5. In the **Site name** list box, select the destination domain.
6. In the **What to do with existing files** section, select what you want to do with any files that may already exist on the destination domain.
7. Click **OK**. Plesk copies the site to the destination domain.
## Copying databases
If your website uses a database (or multiple databases), you should copy them to the staging environment also. To do this, follow these steps:
1. Log in to Plesk.
> 📘 Note
>
> If you do not know how to log in to your Plesk account, please see [this article](/docs/logging-in-and-out-of-plesk).
2. In the left sidebar, click **Databases**.
3. Locate the database you want to copy, and then click **Copy**:\

The **Copy Database** page appears:\
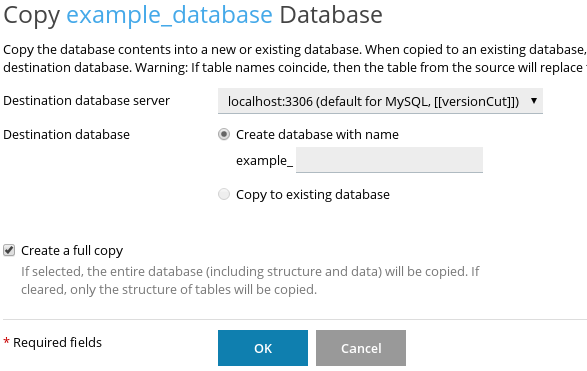
4. In the **Destination database server** list box, select **localhost:3306**.
5. In the **Destination database** section, select **Create database with name**, and then type a name for the new database.
6. Select the **Create a full copy** check box.
7. Click **OK**. Plesk copies the database.
**Important**
After the database copy is complete, you should modify your site’s scripts in the website staging environment to connect to the newly copied database. For example, you may need to modify the connection string to use the new database name, username, and password.
## Publishing the site
After you have tested the staging environment, you can "go live" and publish it. To do this, follow these steps:
1. Log in to Plesk.
> 📘 Note
>
> If you do not know how to log in to your Plesk account, please see [this article](/docs/logging-in-and-out-of-plesk).
2. In the left sidebar, click **Websites & Domains**:\

3. In the list of domains, locate your production site, and then click **Hosting Settings**:\
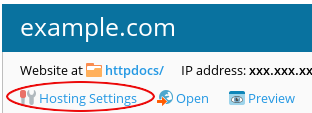
4. In the **Document root** text box, type the directory for the staging site environment.
5. Click **OK**.
**Important**
If your site uses a database, don’t forget to adjust the database connection strings to connect to your live database!
## More information
For more information about Plesk, please visit [https://www.plesk.com](https://www.plesk.com).