.jpg?fit=max&auto=format&n=E2LlsT5gBITvo732&q=85&s=ec11e1673894bdf46663a5d73602eb87)
- Make sure you have already created at least one e-mail account for your domain. If you have not done this, please see this article to learn how to create an e-mail account using cPanel.
- Start Mail.
-
Click Accounts, and then in the Manage Accounts sidebar, click Add account:
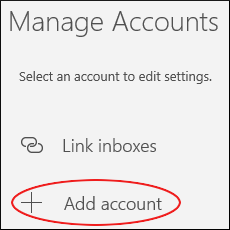
📘 Note The user interface displayed in these images may differ slightly from the version you have installed.
-
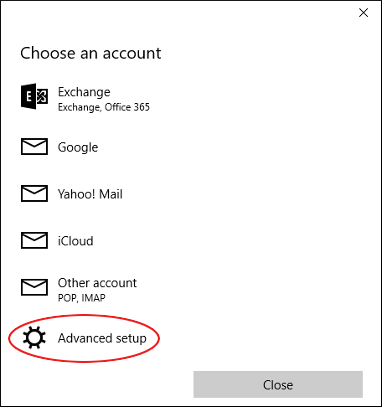
In the Choose an account dialog box, scroll down, and then click Advanced setup:
-
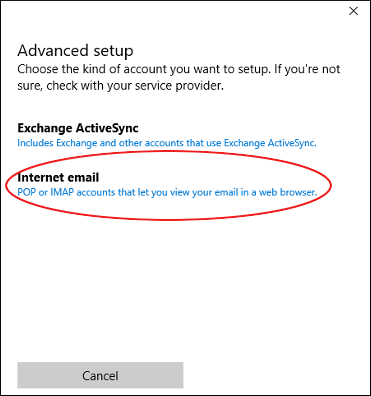
In the Advanced setup dialog box, click Internet email:
-
In the Internet email account dialog box, in the Account name text box, type a descriptive name for the account. The name can be anything you want:
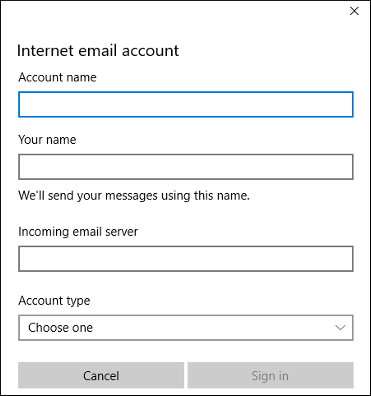
- In the Your name text box, type the name you want to appear on messages you send.
-
In the Incoming email server text box, type either mail.example.com, where example.com represents your domain name, or the hosting.com server name for your account.
📘 Note For information about how to determine your account’s server name, please see this article.
-
In the Account type list box, select the type of incoming mail server that you want to use:
- If you want to use POP, select POP3.
- If you want to use IMAP, select IMAP4.
- In the Email address text box, type the e-mail address of the account you created in cPanel.
- In the User name text box, type the e-mail address of the account you created in cPanel.
- In the Password text box, type the password for the e-mail account you created in cPanel.
-
In the Outgoing (SMTP) email server text box, type either mail.example.com, where example.com represents your domain name, or the hosting.com server name for your account.
📘 Note For information about how to determine your account’s server name, please see this article.
-
Confirm that all of the following check boxes are selected:
- Outgoing server requires authentication
- Use the same user name and password for sending email
- Require SSL for incoming email
- Require SSL for outgoing email
- Click Sign in. When Mail finishes configuring the account, the All done! Your account was set up successfully message appears.
-
Click Done, and then click the refresh icon:
 Mail downloads the messages in the account.
Retired — pending deletion
Setting up the Windows Mail app
How to add a hosting.com mailbox to the Mail app bundled with Windows 10.
This article demonstrates how to set up the Microsoft Mail client to access a hosting.com e-mail account.
To configure Microsoft Mail to work with your hosting.com e-mail account, follow these steps:
Was this page helpful?