.jpg?fit=max&auto=format&n=E2LlsT5gBITvo732&q=85&s=ec11e1673894bdf46663a5d73602eb87)
For general information about what CAPTCHAs are and what they do, please see this article.
Adding CAPTCHA protection
There are several PrestaShop modules available that add CAPTCHA support to a site. Some plugins require a fee, while others require registration. One CAPTCHA plugin that is free is SlideCaptcha. Unlike most CAPTCHAs, which require users to enter a series of characters, SlideCaptcha simply requires a user to drag a slider, which unlocks the page: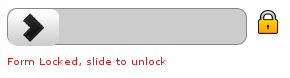 To add CAPTCHA protection to a PrestaShop site using the SlideCaptcha plugin, follow these steps:
- Use your web browser to visit the SlideCaptcha page at http://catalogo-onlinersi.net/en/add-ons-prestashop-modules/264-slide-captcha-prestashop-module.html:
- Add SlideCaptcha to your cart and complete the checkout process.
- After you complete checkout, you can download the slidecaptcha.zip file to your local computer.
- Log in to your PrestaShop site as the administrator.
- On the MODULES menu, click Modules.
- Click Add a new module.
- Click Choose a file, select the slidecaptcha.zip file on your local computer, and then click Open.
- Click Upload this module. PrestaShop uploads the file.
- Under MODULES LIST, in the Filter by list box, select Installed & Not Installed, and then click Front Office Features.
- In the module list, locate SlideCaptcha, and then click Install. PrestaShop installs the module and then displays the SlideCaptcha configuration page.
- On the SlideCaptcha configuration page is the following line of code:
- Open the themes/default-bootstrap/contact-form.tpl in a text editor.
- Add the line of code to where you want SlideCaptcha to appear. For example, you can insert the code just before the <div class=“submit”> line.
- Save the changes to the contact-form.tpl file.
- Use your browser to go to the site’s contact page. You should only be able to submit a message after you move the slider and unlock the form.
- Repeat these steps for any other forms that you want to protect with SlideCaptcha.