

Step #1: Create a subdomain using cPanel
Before you can install WordPress, you must create the subdomain in cPanel. To do this, follow these steps:-
Log in to cPanel.
📘 Note If you do not know how to log in to your cPanel account, please see this article.
-
On the Tools page, in the Domains section, click Domains:

-
On the Domains tool main page, click Create a New Domain. The Create a New Domain page appears:
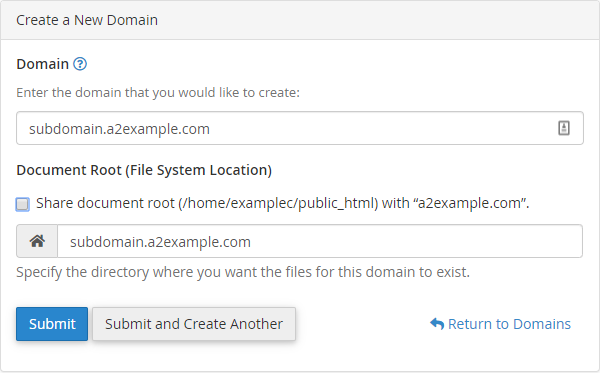
- In the Domain text box, type the name of the subdomain you want to add.
- Clear the Share document root check box.
- In the Document Root text box, type the directory you want to use, or use the directory suggested by cPanel.
- Click Submit.
Step #2: Install WordPress using Softaculous
After you create the subdomain, you’re ready to install WordPress. To do this, follow these steps:- On the Tools page, in the Softaculous Apps Installer section, click Softaculous Apps Installer (or any of the icons under Scripts or Categories).
- In the Search text box, type
wordpressand then press Enter.📘 Note Alternatively, you can use the navigation pane on the left side. To do this, click Blogs , and then click WordPress .
- Click Install. The installation page appears.
- In the Choose Protocol list box, select the protocol.
📘 Note If you have an SSL certificate installed on your site, select https:// or https://www . If you do not have an SSL certificate installed on your site, select http:// or http://www .
- In the Choose Domain list box, select the subdomain that you created in the previous procedure.
- Leave the In Directory text box blank.
- In the Site Name text box, type the site name. By default, the site name appears in the title bar of users’ web browsers when they visit your site.
- In the Site Description text box, type the site description. By default, the site description also appears in the title bar of users’ web browsers when they visit your site.
- To enable the WordPress Multisite feature (also known as WordPress Multiuser or WPMU), select the check box.
- In the Admin Username text box, type the administrator username.
- In the Admin Password text box, type the administrator password.
🚧 Important Make sure that you choose a strong password! The Softaculous installer provides a ranking for your password’s strength, and turns green when the password is strong. Alternatively, you can click the
 icon next to the Admin Password text box, and Softaculous generates a strong, random password for you.
- In the Admin Email text box, type the site administrator e-mail address.
- In the Select Language list box, select the default language for the application.
- To limit the number of login attempts, under Select Plugin(s), select the Limit Login Attempts check box.
📘 Note Limiting the number of login attempts can help increase the security of your WordPress installation.
- Click the
 icon to expand Advanced Options.
 - In the Database Name text box, type the name of the database to create for the application, or accept the default value.
- In the Table Prefix text box, type the database table prefix, or accept the default value.
- If you do not want to receive e-mail notifications when application updates are available, select the Disable Update Notifications Emails check box.
🚧 Important We strongly recommend that you receive e-mail notifications when application updates are available. Keeping your site updated helps prevent unauthorized access attempts and data loss.
- To automatically update the application when updates are available, select the Auto Upgrade check box.
- To automatically update plugins when updates are available, select the Auto Upgrade WordPress Plugins check box.
- To automatically update themes when updates are available, select the Auto Upgrade WordPress Themes check box.
- In the Backup Location list box, you can select a location to store application backups.
- In the Automated backups list box, you can select whether or not Softaculous makes periodic backups of your application.
- In the Backup Rotation list box, you can select how often Softaculous overwrites the oldest backup file with a new backup file.
- To receive site configuration information after the installation is complete, type an e-mail address in the Email installation details to text box.
- Review the installation options and settings, and then click Install. When installation is complete, Softaculous provides information about the WordPress configuration.
- Use your web browser to visit the subdomain you created in the previous procedure. You should see the WordPress home page.