How to create a staging site on hosting.com Managed WordPress
Learn how to create a staging site to test changes and new ideas before you take them live.
Making changes to your live, revenue generating site can be problematic and even devastating. A staging site is designed to let you test new themes, plugins, style changes, and even trying new ways to create posts and articles, all without making changes to your live website.You can think of a staging site as a sandbox to play in without affecting your live website.
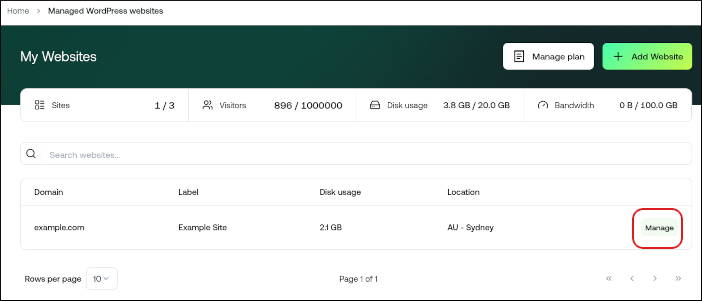
On the My Websites page, locate the site, and then click Manage:
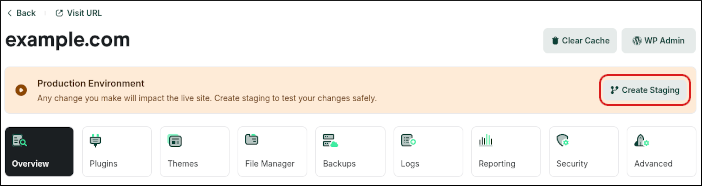
On the hosting.com dashboard, click Create Staging:
This process can take a few moments to complete. When it does, a message appears stating you are in staging mode. You can now work with the staging site to perfect the changes you’d like to make.
When you’re ready to make the staging site live, click Publish in the top right corner.
ImportantPublishing a staging site overwrites your live website with the changes from the staging site.Any changes made on the live site after the staging site was created, including new content, orders, customer information, or other updates, may be lost.Before publishing, make sure you review the changes carefully and confirm that you want to replace the current live site.
Confirm that the staging site is selected the top left corner, where the white box says staging.
Click Delete Staging to the right.
ImportantDeleting a staging site is not reversible — when you delete it, it is gone for good.
Was this page helpful?
{"docsConfig":{"theme":"mint","$schema":"https://mintlify.com/docs.json","name":"hosting.com","colors":{"primary":"#0D493D","light":"#46FDAE","dark":"#0B3E2A"},"logo":{"light":"https://mintcdn.com/hosting-9143814e/E2LlsT5gBITvo732/images/Hosting-logo-gradient-dark-landscape(1).jpg?fit=max\u0026auto=format\u0026n=E2LlsT5gBITvo732\u0026q=85\u0026s=ec11e1673894bdf46663a5d73602eb87","dark":"https://mintcdn.com/hosting-9143814e/DI66jigZet4ItWkE/images/Hosting-logo-gradient-white-landscape.png?fit=max\u0026auto=format\u0026n=DI66jigZet4ItWkE\u0026q=85\u0026s=44df05a0feb2a2f0e626ac9dfb707c80"},"favicon":{"light":"https://mintcdn.com/hosting-9143814e/sMxgVKUdaGzsRmyG/favicon.svg?fit=max\u0026auto=format\u0026n=sMxgVKUdaGzsRmyG\u0026q=85\u0026s=df1d1e3a5ed61d304225c1d83a8cb730","dark":"https://mintcdn.com/hosting-9143814e/sMxgVKUdaGzsRmyG/favicon.svg?fit=max\u0026auto=format\u0026n=sMxgVKUdaGzsRmyG\u0026q=85\u0026s=df1d1e3a5ed61d304225c1d83a8cb730"},"integrations":{"gtm":{"tagId":"GTM-WN5D6XF4"}},"styling":{"latex":true},"navigation":{"pages":[]}},"deployment":{"deploymentMetadataValue":{"subdomain":"hosting-9143814e","hasAudioNarration":false,"actualSubdomain":"hosting-9143814e","customDomains":["kb.hosting.com"],"gitSource":{"type":"github","owner":"panaras10","repo":"hostingcomdocsmigration","deployBranch":"main","contentDirectory":"","isPrivate":true,"mountPath":"","label":""},"chroma":{"collectionId":"53c69a95-d280-4409-84f2-6fa4665b3286","liveDeploymentHistoryId":"6ac8a320d01a2240ccc67579","schemaVersion":"v3","latestBuiltDeploymentHistoryId":"6ac8a320d01a2240ccc67579"},"feedback":{"thumbs":true},"entitlements":{"AI_CHAT":{"status":"DISABLED"}},"buildId":"6acdfd8f0b2e18a68eb4caaa","clientVersion":"0.0.3883","searchFilterCounts":[{"language":"default","tag":"Other hosting panels","count":348},{"language":"default","tag":"Using hosting.com","count":347},{"language":"default","tag":"Using your software","count":334},{"language":"default","tag":"cPanel","count":312},{"language":"default","tag":"Developers","count":265},{"language":"default","tag":"WordPress","count":234},{"language":"default","tag":"Softaculous autoinstaller","count":184},{"language":"default","tag":"Managed WordPress","count":76},{"language":"default","tag":"Email","count":73},{"language":"default","tag":"PHP","count":60}]},"assistantConfig":{"enableAskAiButton":false,"enableStarterQuestions":false,"enableContextualStarterQuestions":false,"enableAskAiSearchBar":true},"hasChatPermissions":false,"hasWebMcpPermissions":false,"toggles":[{"name":"kill-isr","enabled":true,"variant":{"name":"disabled","enabled":false,"feature_enabled":true},"impressionData":false},{"name":"agent-mintlify-slack","enabled":true,"variant":{"name":"disabled","enabled":false,"feature_enabled":true},"impressionData":false},{"name":"editor-v7-file-tree","enabled":true,"variant":{"name":"disabled","enabled":false,"feature_enabled":true},"impressionData":false},{"name":"agent-integrations-settings","enabled":true,"variant":{"name":"disabled","enabled":false,"feature_enabled":true},"impressionData":false},{"name":"automations-pr-grouping","enabled":true,"variant":{"name":"disabled","enabled":false,"feature_enabled":true},"impressionData":false},{"name":"custom-prefix","enabled":true,"variant":{"name":"disabled","enabled":false,"feature_enabled":true},"impressionData":false},{"name":"analytics-v7","enabled":true,"variant":{"name":"disabled","enabled":false,"feature_enabled":true},"impressionData":false},{"name":"user-flows-analytics","enabled":true,"variant":{"name":"disabled","enabled":false,"feature_enabled":true},"impressionData":false},{"name":"no-publish-flow","enabled":true,"variant":{"name":"disabled","enabled":false,"feature_enabled":true},"impressionData":false},{"name":"llms-txt-v2","enabled":true,"variant":{"name":"disabled","enabled":false,"feature_enabled":true},"impressionData":false},{"name":"pause-universal-search-reconcile","enabled":true,"variant":{"name":"disabled","enabled":false,"feature_enabled":true},"impressionData":false},{"name":"snapshot-serving-live","enabled":true,"variant":{"name":"disabled","enabled":false,"feature_enabled":true},"impressionData":false},{"name":"stripTemperatureMiddleware","enabled":true,"variant":{"name":"disabled","enabled":false,"feature_enabled":true},"impressionData":false},{"name":"per-site-search-delta","enabled":true,"variant":{"name":"disabled","enabled":false,"feature_enabled":true},"impressionData":false},{"name":"support-platform-pylon-zendesk","enabled":true,"variant":{"name":"disabled","enabled":false,"feature_enabled":true},"impressionData":false},{"name":"editor-branches-v2-autocommit","enabled":true,"variant":{"name":"disabled","enabled":false,"feature_enabled":true},"impressionData":false},{"name":"editor-branches-v2","enabled":true,"variant":{"name":"disabled","enabled":false,"feature_enabled":true},"impressionData":false},{"name":"snapshot-serving","enabled":true,"variant":{"name":"disabled","enabled":false,"feature_enabled":true},"impressionData":false},{"name":"instant-rollback","enabled":true,"variant":{"name":"disabled","enabled":false,"feature_enabled":true},"impressionData":false},{"name":"granular-notifications-server","enabled":true,"variant":{"name":"disabled","enabled":false,"feature_enabled":true},"impressionData":false},{"name":"granular-notifications","enabled":true,"variant":{"name":"disabled","enabled":false,"feature_enabled":true},"impressionData":false},{"name":"editor-private-page-search","enabled":true,"variant":{"name":"disabled","enabled":false,"feature_enabled":true},"impressionData":false},{"name":"automations-fable","enabled":true,"variant":{"name":"disabled","enabled":false,"feature_enabled":true},"impressionData":false},{"name":"fixed-ai-action-pricing","enabled":true,"variant":{"name":"disabled","enabled":false,"feature_enabled":true},"impressionData":false},{"name":"automation-resolve-merge-conflict","enabled":true,"variant":{"name":"disabled","enabled":false,"feature_enabled":true},"impressionData":false},{"name":"scoped-publishing","enabled":true,"variant":{"name":"disabled","enabled":false,"feature_enabled":true},"impressionData":false},{"name":"mintql","enabled":true,"variant":{"name":"disabled","enabled":false,"feature_enabled":true},"impressionData":false},{"name":"page-level-analytics","enabled":true,"variant":{"name":"disabled","enabled":false,"feature_enabled":true},"impressionData":false},{"name":"teamspace","enabled":true,"variant":{"name":"disabled","enabled":false,"feature_enabled":true},"impressionData":false},{"name":"editor-version-history-v2","enabled":true,"variant":{"name":"disabled","enabled":false,"feature_enabled":true},"impressionData":false},{"name":"vite-origin","enabled":true,"variant":{"name":"disabled","enabled":false,"feature_enabled":true},"impressionData":false},{"name":"editor-nav-generations","enabled":true,"variant":{"name":"disabled","enabled":false,"feature_enabled":true},"impressionData":false},{"name":"workspace-projects","enabled":true,"variant":{"name":"disabled","enabled":false,"feature_enabled":true},"impressionData":false},{"name":"assistant-v5","enabled":true,"variant":{"name":"disabled","enabled":false,"feature_enabled":true},"impressionData":false},{"name":"byok-sep-25","enabled":true,"variant":{"name":"disabled","enabled":false,"feature_enabled":true},"impressionData":false},{"name":"revalidation-jwt","enabled":true,"variant":{"name":"disabled","enabled":false,"feature_enabled":true},"impressionData":false},{"name":"editor-agent-model-picker","enabled":true,"variant":{"name":"disabled","enabled":false,"feature_enabled":true},"impressionData":false},{"name":"client-snapshot-docs-config","enabled":true,"variant":{"name":"disabled","enabled":false,"feature_enabled":true},"impressionData":false},{"name":"hobby-abuse-scan","enabled":true,"variant":{"name":"disabled","enabled":false,"feature_enabled":true},"impressionData":false}],"isAtlas":false,"googleFontsInlined":false},"customCss":[],"page":{"pagePath":"docs/how-to-create-a-staging-site-on-hostingcom-managed-wordpress","slug":"/docs/how-to-create-a-staging-site-on-hostingcom-managed-wordpress","pageMetadata":{"title":"How to create a staging site on hosting.com Managed WordPress","description":"Learn how to create a staging site to test changes and new ideas before you take them live.","href":"/docs/how-to-create-a-staging-site-on-hostingcom-managed-wordpress"},"description":{"compiledSource":"\"use strict\";\nconst {jsx: _jsx} = arguments[0];\nconst {useMDXComponents: _provideComponents} = arguments[0];\nfunction _createMdxContent(props) {\n const _components = {\n p: \"p\",\n ..._provideComponents(),\n ...props.components\n };\n return _jsx(_components.p, {\n children: \"Learn how to create a staging site to test changes and new ideas before you take them live.\"\n });\n}\nfunction MDXContent(props = {}) {\n const {wrapper: MDXLayout} = {\n ..._provideComponents(),\n ...props.components\n };\n return MDXLayout ? _jsx(MDXLayout, {\n ...props,\n children: _jsx(_createMdxContent, {\n ...props\n })\n }) : _createMdxContent(props);\n}\nreturn {\n default: MDXContent\n};\n","frontmatter":{},"scope":{}},"pageType":"default","mdx":{"mdxSource":{"compiledSource":"\"use strict\";const{Fragment:_Fragment,jsx:_jsx,jsxs:_jsxs}=arguments[0];const{useMDXComponents:_provideComponents}=arguments[0];function _createMdxContent(props){const _components={a:`a`,img:`img`,li:`li`,ol:`ol`,p:`p`,strong:`strong`,..._provideComponents(),...props.components},{Heading,Note,Warning}=_components;if(!Heading)_missingMdxReference(`Heading`,true);if(!Note)_missingMdxReference(`Note`,true);if(!Warning)_missingMdxReference(`Warning`,true);return _jsxs(_Fragment,{children:[_jsx(_components.p,{children:`Making changes to your live, revenue generating site can be problematic and even devastating. A staging site is designed to let you test new themes, plugins, style changes, and even trying new ways to create posts and articles, all without making changes to your live website.`}),`\n`,_jsx(_components.p,{children:`You can think of a staging site as a sandbox to play in without affecting your live website.`}),`\n`,_jsx(Heading,{level:`2`,id:`creating-a-staging-site`,children:`Creating a staging site`}),`\n`,_jsx(Note,{children:_jsx(_components.p,{children:`Staging is only supported for standalone WordPress installations. Multisites cannot be staged.`})}),`\n`,_jsx(_components.p,{children:`To create a staging site, follow these steps:`}),`\n`,_jsxs(_components.ol,{children:[`\n`,_jsxs(_components.li,{children:[`Log in to the Hosting Panel at `,_jsx(_components.a,{href:`https://my.hosting.com`,children:`https://my.hosting.com`}),`.`]}),`\n`,_jsxs(_components.li,{children:[`In the left sidebar, click `,_jsx(_components.strong,{children:`Managed WordPress`}),`:\n`,_jsx(_components.img,{src:`https://files.readme.io/6f570e0ca5d448c0cc2e1bd0fc2fabad74a0c1c5367ea425e652a938e8d5053d-image.png`,alt:``})]}),`\n`,_jsxs(_components.li,{children:[`On the `,_jsx(_components.strong,{children:`My Websites`}),` page, locate the site, and then click `,_jsx(_components.strong,{children:`Manage`}),`:\n`,_jsx(_components.img,{src:`https://files.readme.io/6fe1aa300f93cf0bc299f70bf22337e249a3fe6fa2ae47ddc7455c52eec45fcb-image.png`,alt:``})]}),`\n`,_jsxs(_components.li,{children:[`On the hosting.com dashboard, click `,_jsx(_components.strong,{children:`Create Staging`}),`:\n`,_jsx(_components.img,{src:`https://files.readme.io/1705fbdec6334b66c64bc20a790492f1731695f2db471a534c24c6b460f81e37-image.png`,alt:``})]}),`\n`,_jsx(_components.li,{children:`This process can take a few moments to complete. When it does, a message appears stating you are in staging mode. You can now work with the staging site to perfect the changes you’d like to make.`}),`\n`]}),`\n`,_jsx(Heading,{level:`2`,id:`publishing-your-staging-site`,children:`Publishing your staging site`}),`\n`,_jsxs(_components.p,{children:[`When you’re ready to make the staging site live, click `,_jsx(_components.strong,{children:`Publish`}),` in the top right corner.`]}),`\n`,_jsxs(Warning,{children:[_jsx(_components.p,{children:_jsx(_components.strong,{children:`Important`})}),_jsx(_components.p,{children:`Publishing a staging site overwrites your live website with the changes from the staging site.`}),_jsx(_components.p,{children:`Any changes made on the live site after the staging site was created, including new content, orders, customer information, or other updates, may be lost.`}),_jsx(_components.p,{children:`Before publishing, make sure you review the changes carefully and confirm that you want to replace the current live site.`})]}),`\n`,_jsx(Heading,{level:`2`,id:`deleting-your-staging-site`,children:`Deleting your staging site`}),`\n`,_jsx(_components.p,{children:`To delete your staging site, follow these steps:`}),`\n`,_jsxs(_components.ol,{children:[`\n`,_jsxs(_components.li,{children:[`Confirm that the staging site is selected the top left corner, where the white box says `,_jsx(_components.strong,{children:`staging`}),`.`]}),`\n`,_jsxs(_components.li,{children:[`Click `,_jsx(_components.strong,{children:`Delete Staging`}),` to the right.`]}),`\n`]}),`\n`,_jsxs(Warning,{children:[_jsx(_components.p,{children:_jsx(_components.strong,{children:`Important`})}),_jsx(_components.p,{children:`Deleting a staging site is not reversible — when you delete it, it is gone for good.`})]})]})}function MDXContent(props={}){const{wrapper:MDXLayout}={..._provideComponents(),...props.components};return MDXLayout?_jsx(MDXLayout,{...props,children:_jsx(_createMdxContent,{...props})}):_createMdxContent(props)}return{default:MDXContent};function _missingMdxReference(id,component){throw new Error(`Expected `+(component?`component`:`object`)+\" `\"+id+\"` to be defined: you likely forgot to import, pass, or provide it.\")}","frontmatter":{},"scope":{"config":{},"pageMetadata":{"title":"How to create a staging site on hosting.com Managed WordPress","description":"Learn how to create a staging site to test changes and new ideas before you take them live.","href":"/docs/how-to-create-a-staging-site-on-hostingcom-managed-wordpress"}}},"mdxSourceWithNoJs":null},"mdxExtracts":{"tableOfContents":[{"title":"Creating a staging site","slug":"creating-a-staging-site","depth":2,"children":[]},{"title":"Publishing your staging site","slug":"publishing-your-staging-site","depth":2,"children":[]},{"title":"Deleting your staging site","slug":"deleting-your-staging-site","depth":2,"children":[]}],"codeExamples":{}},"jsLinks":[],"subdomain":"hosting-9143814e","siteName":"hosting.com","title":"How to create a staging site on hosting.com Managed WordPress - hosting.com","navMaps":{"firstHrefInVersion":{},"firstHrefInLanguage":{}},"lastModified":"2026-07-13T08:42:19.647Z","originalFileLocation":"docs/how-to-create-a-staging-site-on-hostingcom-managed-wordpress.mdx"},"headHtml":"\u003cmeta data-mint-head name=\"description\" content=\"Learn how to create a staging site to test changes and new ideas before you take them live.\">\u003cmeta data-mint-head name=\"application-name\" content=\"hosting.com\">\u003cmeta data-mint-head name=\"generator\" content=\"Mintlify\">\u003clink data-mint-head rel=\"icon\" type=\"image/png\" sizes=\"192x192\" href=\"/mintlify-assets/_mintlify/favicons/hosting-9143814e/LHUWpGT9qBecCfOw/_generated/favicon/android-chrome-192x192.png\" media=\"(prefers-color-scheme: light)\">\u003clink data-mint-head rel=\"apple-touch-icon\" type=\"image/png\" sizes=\"180x180\" href=\"/mintlify-assets/_mintlify/favicons/hosting-9143814e/LHUWpGT9qBecCfOw/_generated/favicon/apple-touch-icon.png\">\u003clink data-mint-head rel=\"icon\" type=\"image/png\" sizes=\"16x16\" href=\"/mintlify-assets/_mintlify/favicons/hosting-9143814e/LHUWpGT9qBecCfOw/_generated/favicon/favicon-16x16.png\" media=\"(prefers-color-scheme: light)\">\u003clink data-mint-head rel=\"icon\" type=\"image/png\" sizes=\"32x32\" href=\"/mintlify-assets/_mintlify/favicons/hosting-9143814e/LHUWpGT9qBecCfOw/_generated/favicon/favicon-32x32.png\" media=\"(prefers-color-scheme: light)\">\u003clink data-mint-head rel=\"shortcut icon\" type=\"image/x-icon\" href=\"/mintlify-assets/_mintlify/favicons/hosting-9143814e/LHUWpGT9qBecCfOw/_generated/favicon/favicon.ico\" media=\"(prefers-color-scheme: light)\">\u003clink data-mint-head rel=\"icon\" type=\"image/png\" sizes=\"192x192\" href=\"/mintlify-assets/_mintlify/favicons/hosting-9143814e/LHUWpGT9qBecCfOw/_generated/favicon-dark/android-chrome-192x192.png\" media=\"(prefers-color-scheme: dark)\">\u003clink data-mint-head rel=\"icon\" type=\"image/png\" sizes=\"16x16\" href=\"/mintlify-assets/_mintlify/favicons/hosting-9143814e/LHUWpGT9qBecCfOw/_generated/favicon-dark/favicon-16x16.png\" media=\"(prefers-color-scheme: dark)\">\u003clink data-mint-head rel=\"icon\" type=\"image/png\" sizes=\"32x32\" href=\"/mintlify-assets/_mintlify/favicons/hosting-9143814e/LHUWpGT9qBecCfOw/_generated/favicon-dark/favicon-32x32.png\" media=\"(prefers-color-scheme: dark)\">\u003clink data-mint-head rel=\"shortcut icon\" type=\"image/x-icon\" href=\"/mintlify-assets/_mintlify/favicons/hosting-9143814e/LHUWpGT9qBecCfOw/_generated/favicon-dark/favicon.ico\" media=\"(prefers-color-scheme: dark)\">\u003cmeta data-mint-head property=\"og:title\" content=\"How to create a staging site on hosting.com Managed WordPress - hosting.com\">\u003cmeta data-mint-head property=\"og:description\" content=\"Learn how to create a staging site to test changes and new ideas before you take them live.\">\u003cmeta data-mint-head property=\"og:site_name\" content=\"hosting.com\">\u003cmeta data-mint-head property=\"og:url\" content=\"https://kb.hosting.com/docs/how-to-create-a-staging-site-on-hostingcom-managed-wordpress\">\u003cmeta data-mint-head property=\"og:type\" content=\"website\">\u003cmeta data-mint-head name=\"twitter:card\" content=\"summary_large_image\">\u003cmeta data-mint-head name=\"twitter:title\" content=\"How to create a staging site on hosting.com Managed WordPress - hosting.com\">\u003cmeta data-mint-head name=\"twitter:description\" content=\"Learn how to create a staging site to test changes and new ideas before you take them live.\">\u003cmeta data-mint-head name=\"msapplication-config\" content=\"/mintlify-assets/_mintlify/favicons/hosting-9143814e/LHUWpGT9qBecCfOw/_generated/favicon/browserconfig.xml\">\u003cmeta data-mint-head name=\"apple-mobile-web-app-title\" content=\"hosting.com\">\u003cmeta data-mint-head name=\"msapplication-TileColor\" content=\"#0D493D\">\u003clink data-mint-head rel=\"canonical\" href=\"https://kb.hosting.com/docs/how-to-create-a-staging-site-on-hostingcom-managed-wordpress\">\u003clink data-mint-head rel=\"alternate\" type=\"application/xml\" href=\"/sitemap.xml\">\u003clink data-mint-head rel=\"alternate\" type=\"text/markdown\" href=\"/docs/how-to-create-a-staging-site-on-hostingcom-managed-wordpress.md\">\u003cscript data-mint-head type=\"application/ld+json\">{\"@context\":\"https://schema.org\",\"@graph\":[{\"@type\":\"Organization\",\"@id\":\"https://kb.hosting.com/#organization\",\"name\":\"hosting.com\",\"url\":\"https://kb.hosting.com\",\"logo\":{\"@type\":\"ImageObject\",\"url\":\"https://mintcdn.com/hosting-9143814e/E2LlsT5gBITvo732/images/Hosting-logo-gradient-dark-landscape(1).jpg?fit=max\u0026auto=format\u0026n=E2LlsT5gBITvo732\u0026q=85\u0026s=ec11e1673894bdf46663a5d73602eb87\"}},{\"@type\":\"WebSite\",\"@id\":\"https://kb.hosting.com#website\",\"name\":\"hosting.com\",\"url\":\"https://kb.hosting.com\",\"publisher\":{\"@id\":\"https://kb.hosting.com/#organization\"}},{\"@type\":\"WebPage\",\"@id\":\"https://kb.hosting.com/docs/how-to-create-a-staging-site-on-hostingcom-managed-wordpress#webpage\",\"url\":\"https://kb.hosting.com/docs/how-to-create-a-staging-site-on-hostingcom-managed-wordpress\",\"name\":\"How to create a staging site on hosting.com Managed WordPress\",\"description\":\"Learn how to create a staging site to test changes and new ideas before you take them live.\",\"dateModified\":\"2026-07-13T08:42:19.647Z\",\"isPartOf\":{\"@id\":\"https://kb.hosting.com#website\"},\"breadcrumb\":{\"@id\":\"https://kb.hosting.com/docs/how-to-create-a-staging-site-on-hostingcom-managed-wordpress#breadcrumb\"}},{\"@type\":\"BreadcrumbList\",\"@id\":\"https://kb.hosting.com/docs/how-to-create-a-staging-site-on-hostingcom-managed-wordpress#breadcrumb\",\"itemListElement\":[{\"@type\":\"ListItem\",\"position\":1,\"name\":\"Using hosting.com\",\"item\":\"https://kb.hosting.com/docs/getting-started\"},{\"@type\":\"ListItem\",\"position\":2,\"name\":\"Managed WordPress\",\"item\":\"https://kb.hosting.com/docs/managed-hosting-for-wordpress-powered-by-rocketnet\"},{\"@type\":\"ListItem\",\"position\":3,\"name\":\"Getting started\",\"item\":\"https://kb.hosting.com/docs/how-to-create-a-site-on-hostingcom-managed-wordpress\"},{\"@type\":\"ListItem\",\"position\":4,\"name\":\"How to create a staging site on hosting.com Managed WordPress\",\"item\":\"https://kb.hosting.com/docs/how-to-create-a-staging-site-on-hostingcom-managed-wordpress\"}]},{\"@type\":[\"Article\",\"TechArticle\"],\"@id\":\"https://kb.hosting.com/docs/how-to-create-a-staging-site-on-hostingcom-managed-wordpress#article\",\"headline\":\"How to create a staging site on hosting.com Managed WordPress\",\"name\":\"How to create a staging site on hosting.com Managed WordPress\",\"description\":\"Learn how to create a staging site to test changes and new ideas before you take them live.\",\"url\":\"https://kb.hosting.com/docs/how-to-create-a-staging-site-on-hostingcom-managed-wordpress\",\"mainEntityOfPage\":{\"@id\":\"https://kb.hosting.com/docs/how-to-create-a-staging-site-on-hostingcom-managed-wordpress#webpage\"},\"dateModified\":\"2026-07-13T08:42:19.647Z\",\"publisher\":{\"@id\":\"https://kb.hosting.com/#organization\"},\"isPartOf\":{\"@id\":\"https://kb.hosting.com#website\"}}]}\u003c/script>\u003cscript data-mint-head type=\"application/ld+json\">{\"@context\":\"https://schema.org\",\"@type\":\"WebSite\",\"name\":\"hosting.com\",\"creator\":{\"@type\":\"Organization\",\"name\":\"Mintlify\",\"url\":\"https://mintlify.com\"}}\u003c/script>","siteName":"hosting.com","nav":{"global":null,"pages":[{"title":"hosting.com Knowledge Base","href":"/index"},{"group":"Using hosting.com","pages":[{"title":"Getting Started with hosting.com","href":"/docs/getting-started"},{"title":"Web Hosting","sidebarTitle":"Web Hosting","href":"/docs/shared-hosting"},{"group":"Quick start guides","pages":[{"title":"How to manage your websites in the Hosting Panel","href":"/docs/how-to-manage-your-websites-in-the-hosting-panel"},{"title":"How to manage your applications in the Hosting Panel","href":"/docs/how-to-manage-your-applications-in-the-hosting-panel"},{"title":"Common web hosting terms and definitions","href":"/docs/common-web-hosting-terms"},{"title":"How to start a website on your hosting plan","href":"/docs/hosting-plan-introduction"},{"group":"How to start a blog","pages":[{"title":"Starting a blog","href":"/docs/how-to-start-a-blog"},{"title":"Blogging basics","href":"/docs/blogging-basics"},{"title":"WordPress basics","href":"/docs/wordpress-basics"},{"title":"Beyond WordPress basics","href":"/docs/beyond-wordpress-basics"},{"title":"Nibbleblog basics","href":"/docs/nibbleblog-basics"}]},{"title":"Launching an eCommerce website","href":"/docs/opening-an-e-commerce-store-at-hosting-com"},{"group":"Migrate your data","pages":[{"title":"Migrating your data","href":"/docs/migrating-your-data"},{"title":"Differences between site migrations and domain transfers","href":"/docs/differences-between-site-migrations-and-domain-transfers"},{"title":"What is included and not included in cPanel migrations?","href":"/docs/what-is-included-and-not-included-in-cpanel-migrations"},{"title":"Migrating an account from another web host","href":"/docs/migrating-an-account-from-another-web-host"}]},{"group":"Back up your data","pages":[{"title":"Backing up your data","href":"/docs/backing-up-your-data"},{"title":"Backing up data on dedicated servers and VPS","href":"/docs/backups-on-dedicated-servers-and-vps"}]},{"group":"Access your account","pages":[{"title":"Using SSH (Secure Shell) to access your account","href":"/docs/using-ssh-secure-shell"},{"title":"Accessing your account using SSH keys","href":"/docs/using-ssh-keys"},{"title":"Warning message when you try to connect to a server using SSH","href":"/docs/warning-message-when-you-try-to-connect-to-a-server-using-ssh"},{"title":"Disabling SSH logins for the root account","href":"/docs/disabling-ssh-logins-for-root"},{"title":"Using SSHFS (Secure Shell Filesystem)","href":"/docs/using-sshfs-secure-shell-filesystem"},{"title":"Enabling two-factor authentication for SSH","href":"/docs/enabling-two-factor-authentication-for-ssh"},{"title":"Keeping SSH connections alive","href":"/docs/keeping-ssh-connections-alive"},{"title":"Changing the SSH server port number","href":"/docs/changing-the-ssh-server-port-number"},{"title":"Setting up SFTP access for multiple users","href":"/docs/setting-up-sftp-access-for-multiple-users"},{"title":"Using the SolusVM control panel to administer an unmanaged VPS","hidden":true,"href":"/docs/using-the-solusvm-control-panel"}]},{"group":"Work with Linux","pages":[{"title":"Working with Linux","href":"/docs/working-with-linux"},{"title":"Introduction to Linux commands","href":"/docs/introduction-linux-commands"},{"title":"Editing text files from the command line","href":"/docs/editing-text-files"}]},{"title":"Unmanaged VPS Quick Start Guide","href":"/docs/unmanaged-vps-quick-start-guide"},{"title":"Managed Dedicated Server Quick Start Guide","href":"/docs/dedicated-server-quick-start-guide"},{"title":"Managed VPS Quick Start Guide","href":"/docs/vps-quick-start-guide"},{"title":"Which Managed WordPress plan do I have?","sidebarTitle":"Which plan do I have?","href":"/docs/managed-wordpress-quick-start-guide"},{"title":"Reseller Hosting Quick Start Guide","href":"/docs/reseller-quick-start-guide"},{"title":"Shared Hosting Quick Start Guide","href":"/docs/shared-hosting-quick-start-guide"},{"title":"Register a Domain","href":"/docs/register-a-domain"},{"title":"Put your first site live: from nothing to a real URL","href":"/docs/put-your-site-live-from-nothing-to-a-real-url"},{"title":"Connect a domain you bought somewhere else","href":"/docs/connect-a-domain-you-bought-somewhere-else"},{"title":"Set up Your Mailbox","href":"/docs/set-up-your-mailbox"},{"title":"Add your email to your phone and desktop","href":"/docs/add-your-email-to-your-phone-and-desktop"}]},{"group":"Websites and files","pages":[{"title":"Managing your website in the Hosting Panel","href":"/docs/managing-your-website-in-the-hosting-panel"},{"title":"Managing your website files in the Hosting Panel","href":"/docs/managing-your-website-files-in-the-hosting-panel"},{"group":"FTP and file transfer","pages":[{"title":"Accessing your hosting","href":"/docs/accessing-your-account"},{"title":"Using FTP (File Transfer Protocol)","href":"/docs/using-ftp-file-transfer-protocol"},{"title":"Using FTP with Linux hosting accounts","href":"/docs/using-ftp-with-linux-hosting-accounts"},{"title":"Transferring files using SCP (Secure Copy)","href":"/docs/transferring-files-using-scp-secure-copy"},{"title":"Too many connections from this IP'' error message","href":"/docs/too-many-connections-from-this-ip-error-message"},{"title":"Output truncated'' message when you try to list files using FTP","href":"/docs/output-truncated-message-when-you-try-to-list-files-using-ftp"},{"title":"FTP accounts do not work after FileZilla upgrade","href":"/docs/ftp-accounts-do-not-work-after-filezilla-upgrade"},{"title":"Managing FTP accounts in the Hosting Panel","href":"/docs/managing-ftp-accounts-in-the-hosting-panel"}]},{"group":"Backups","pages":[{"title":"Backing up data on shared hosting and reseller accounts","href":"/docs/backups-on-shared-hosting-and-reseller-accounts"},{"title":"Using hosting.com Cloud Backup","hidden":true,"href":"/docs/using-hosting-com-cloud-backup"},{"title":"Using Amazon S3 to back up and restore data","href":"/docs/using-amazon-s3-to-back-up-and-restore-data"},{"title":"Using Google Drive to back up and restore data","href":"/docs/using-google-drive-to-back-up-and-restore-data"},{"title":"Managing backups in the Hosting Panel","href":"/docs/managing-backups-in-the-hosting-panel"}]},{"title":"Editing .htaccess files with Plesk, cPanel, or the command line","href":"/docs/editing-htaccess"},{"title":"Troubleshooting blank pages","href":"/docs/troubleshooting-blank-pages"},{"title":"Working with compressed files on Microsoft Windows","href":"/docs/working-with-compressed-files"},{"title":"What makes hosting.com's service fast?","href":"/docs/what-makes-hosting-com-fast"},{"group":"Caching and performance","pages":[{"title":"Optimizing website performance","href":"/docs/optimizing-website-performance"},{"title":"Enabling the LiteSpeed cache","href":"/docs/enabling-caching-on-turbo-web-hosting"},{"title":"Enabling the LiteSpeed cache for WordPress","href":"/docs/enabling-caching-for-wordpress-on-turbo-web-hosting"},{"title":"Enabling the LiteSpeed cache for Drupal","href":"/docs/enabling-caching-for-drupal-on-turbo-web-hosting"},{"title":"Enabling the LiteSpeed cache for Joomla","href":"/docs/enabling-caching-for-joomla-on-turbo-web-hosting"},{"title":"Enabling the LiteSpeed cache for PrestaShop","href":"/docs/enabling-caching-for-prestashop-on-turbo-web-hosting"},{"title":"Using the LiteSpeed Web Cache Manager","href":"/docs/litespeed-web-cache-manager"},{"title":"Clearing the LiteSpeed cache","href":"/docs/clearing-the-litespeed-cache"},{"title":"Disabling OPcache","href":"/docs/disabling-opcache-on-turbo-web-hosting"},{"title":"Disabling PHP connection timeouts","href":"/docs/disabling-php-connection-timeouts-on-turbo-web-hosting"},{"title":"Optimizing images for your website","href":"/docs/optimizing-images"},{"title":"Measuring website performance using Pingdom","href":"/docs/measuring-website-performance-using-pingdom"},{"title":"Measuring website performance using Google Chrome Developer Tools","href":"/docs/measuring-website-performance-using-google-chrome-developer-tools"},{"title":"Optimizing web requests","href":"/docs/optimizing-web-requests"},{"title":"Configuring memcached on managed servers","href":"/docs/using-memcached-on-managed-servers"},{"title":"Configuring Redis on managed servers","href":"/docs/using-redis-on-managed-servers"}]}]},{"group":"Domains and DNS","pages":[{"group":"Understanding domains and DNS","pages":[{"title":"Introduction to domain names and DNS","href":"/docs/introduction-to-domains"},{"title":"What are wildcard subdomains?","href":"/docs/wildcard-subdomains"},{"title":"What is a DNS TXT record?","href":"/docs/what-is-a-dns-txt-record"},{"title":"What are subdomains, addon domains, and parked domains?","href":"/docs/domain-types-explained"}]},{"group":"Register a domain","pages":[{"title":"Registering a domain","href":"/docs/registering-a-domain"},{"title":"Registering a domain at hosting.com","href":"/docs/registering-a-domain-at-hosting-com"},{"title":"Requirements for registering Canadian .ca domain names","href":"/docs/requirements-for-ca-domains"},{"title":"Protecting your domain name","href":"/docs/protecting-your-domain-registration"},{"title":"Choosing an effective domain name","href":"/docs/choosing-an-effective-domain-name"},{"title":"Registering and using internationalized domain names (IDNs)","href":"/docs/internationalized-domain-names"},{"title":"Domain privacy","href":"/docs/domain-privacy"},{"title":"Top-level domain (TLD) availability","href":"/docs/top-level-domain-tld-availability"},{"title":"ICANN Registration Data Policy changes","href":"/docs/icann-registration-data-policy-changes"}]},{"group":"Managing your domains","pages":[{"title":"Managing your domains in the Hosting Panel","href":"/docs/managing-your-domains-in-the-hosting-panel"},{"title":"Managing Your Domain","href":"/docs/domain-management-in-the-hosting-panel"},{"title":"Configuring domain settings","href":"/docs/configuring-domain-settings"},{"title":"Domain renewals, auto-renewal and expiry","sidebarTitle":"Renewals and expiry","href":"/docs/renewing-a-domain"},{"title":"Transferring a domain to hosting.com","href":"/docs/transferring-a-domain-to-hosting-com"},{"title":"How to Update Registrant Contact Information","href":"/docs/how-to-update-registrant-contact-information"},{"title":"Validating your domain with ICANN","href":"/docs/icann-domain-validation"},{"title":"Updating your account's primary domain name","href":"/docs/changing-your-accounts-primary-domain-name"},{"title":"Using shared URLs to access your site","href":"/docs/using-shared-urls-to-access-your-site"}]},{"group":"Nameservers","pages":[{"title":"Pointing a domain at your hosting","sidebarTitle":"Pointing a domain at hosting","href":"/docs/setting-the-name-servers-dns-for-a-domain"},{"title":"Updating the nameservers at third-party registrars","href":"/docs/updating-nameservers-at-third-party-registrars"},{"title":"Setting the name servers for a domain registered at GoDaddy","href":"/docs/setting-the-name-servers-for-a-domain-at-godaddy"},{"title":"Setting the name servers for a domain at OpenSRS","href":"/docs/setting-the-name-servers-for-a-domain-at-opensrs"},{"title":"Configuring custom nameservers","href":"/docs/configuring-custom-name-servers"},{"title":"Configuring a .dk hosted custom name server","href":"/docs/configuring-a-dk-hosted-custom-name-server"},{"title":"Using Anycast DNS with a web hosting account","href":"/docs/anycast-dns"}]},{"group":"DNS records","pages":[{"title":"Managing DNS settings in the Hosting Panel","href":"/docs/managing-dns-settings-in-the-hosting-panel"},{"title":"Hosting.com DNS management","href":"/docs/hosting-com-dns-management"},{"title":"Adding an SRV record to a domain","href":"/docs/adding-an-srv-record-to-a-domain"},{"title":"Autodiscovery and autoconfiguration DNS records","href":"/docs/autodiscovery-and-autoconfiguration-dns-records"},{"title":"Configuring reverse DNS","href":"/docs/configuring-reverse-dns"},{"title":"Accessing your web site before DNS propagation is complete","href":"/docs/accessing-your-web-site-before-dns-propagation-is-complete"},{"title":"Verifying site ownership with Google","href":"/docs/verifying-site-ownership-with-google"}]}]},{"group":"Email","pages":[{"title":"Managing your email in the Hosting Panel","href":"/docs/managing-your-email-in-the-hosting-panel"},{"title":"Configuring and accessing your e-mail","href":"/docs/configuring-and-accessing-your-e-mail"},{"group":"Setting up email","pages":[{"title":"Setting up email","href":"/docs/setting-up-e-mail"},{"title":"Introduction to e-mail protocols","href":"/docs/introduction-to-e-mail-protocols"},{"title":"Using a catch-all e-mail address","href":"/docs/using-a-catch-all-e-mail-address"},{"title":"Monitoring e-mail using MailChannels","href":"/docs/mailchannels-email-monitoring"},{"title":"Viewing e-mail message headers","href":"/docs/viewing-e-mail-message-headers"},{"group":"Email client setup","pages":[{"title":"Setting up e-mail on Android","href":"/docs/setting-up-e-mail-on-android"},{"title":"Setting up Apple (Mac) Mail on macOS","href":"/docs/setting-up-apple-mac-mail"},{"title":"Setting up e-mail on Apple iOS","href":"/docs/setting-up-e-mail-on-apple-ios"},{"title":"Setting up Gmail to access your hosting.com e-mail account","href":"/docs/setting-up-gmail-to-access-your-e-mail-account"},{"title":"Setting up Gmail on Apple iOS","href":"/docs/setting-up-gmail-on-apple-ios"},{"title":"Setting up e-mail with Mozilla Thunderbird","href":"/docs/setting-up-mozilla-thunderbird"},{"title":"Setting up email on Microsoft clients","sidebarTitle":"Microsoft clients","href":"/docs/setting-up-microsoft-e-mail"},{"title":"Setting up the Microsoft Outlook 365 and Outlook 2016 e-mail clients","href":"/docs/setting-up-the-microsoft-outlook-365-and-outlook-2016-e-mail-clients"},{"title":"Setting up the Microsoft Outlook 2010 and 2013 e-mail clients","href":"/docs/setting-up-microsoft-outlook"},{"title":"Setting up Microsoft Outlook on iOS","href":"/docs/setting-up-microsoft-outlook-on-ios"},{"title":"Setting up Microsoft Outlook on Android","href":"/docs/setting-up-microsoft-outlook-on-android"},{"title":"Setting up Proton to access your e-mail account","href":"/docs/setting-up-proton-to-access-your-e-mail-account"}]}]},{"group":"Webmail","pages":[{"title":"Accessing e-mail accounts through webmail","href":"/docs/accessing-e-mail-accounts-through-webmail"},{"title":"Accessing webmail clients directly","href":"/docs/accessing-webmail-clients-directly"},{"title":"Configuring e-mail accounts through webmail","href":"/docs/configuring-e-mail-accounts-through-webmail"},{"title":"Changing the time zone in webmail","href":"/docs/changing-the-time-zone-in-webmail"},{"title":"Importing and exporting webmail contacts","href":"/docs/importing-and-exporting-webmail-contacts"},{"title":"Synchronizing local clients with webmail calendars and contacts","href":"/docs/calendars-and-contacts"},{"title":"Adding signatures to webmail","href":"/docs/add-signatures-to-webmail"}]},{"group":"Deliverability and spam","pages":[{"title":"Email authentication: SPF, DKIM and DMARC","sidebarTitle":"SPF, DKIM and DMARC","href":"/docs/managing-e-mail-deliverability-settings"},{"title":"Email sending limits","sidebarTitle":"Email sending limits","href":"/docs/sending-limits-for-professional-and-business-email"},{"title":"Outbound email blocked: relay locks and IP reputation","sidebarTitle":"Outbound email blocked","href":"/docs/outbound-email-blocks-and-relay-locks"},{"title":"Setting up DMARC","href":"/docs/dmarc"},{"title":"Your email is landing in spam folders","sidebarTitle":"Email landing in spam","href":"/docs/preventing-outgoing-e-mail-from-being-marked-as-spam"},{"title":"Using external SMTP servers to send email","href":"/docs/using-external-smtp-servers-to-send-e-mail"}]},{"group":"Migrating email","pages":[{"title":"Migrating e-mail from another host to hosting.com","href":"/docs/migrating-e-mail-from-another-web-host"},{"title":"Migrating email from Microsoft 365 to hosting.com","href":"/docs/migrating-email-from-microsoft-365-to-hosting-com"},{"title":"Migrations and legacy e-mail client applications","href":"/docs/migrations-and-legacy-e-mail-client-applications"}]},{"group":"Troubleshooting","pages":[{"title":"Troubleshooting e-mail accounts","href":"/docs/troubleshooting-e-mail-accounts"},{"title":"Emails are not arriving","sidebarTitle":"Emails not arriving","href":"/docs/missing-incoming-email"},{"title":"Email stopped working after too many failed logins","sidebarTitle":"Email blocked after failed logins","href":"/docs/troubleshooting-banned-ip-stemming-from-email-issues"},{"title":"Resolving the '550 sender verify failed' error message","href":"/docs/550-sender-verify-failed-error-message"},{"title":"Forwarded email is not arriving at Gmail or Outlook.com","sidebarTitle":"Forwarded mail not arriving","href":"/docs/e-mail-messages-do-not-forward-to-gmail-accounts"},{"title":"Exceeding mailbox storage quotas","href":"/docs/exceeding-mailbox-storage-quotas"},{"title":"Mailing list recipients do not receive list messages","href":"/docs/mailing-list-recipients-do-not-receive-list-messages"},{"title":"Troubleshooting Apple (Mac) Mail","href":"/docs/troubleshooting-apple-mac-mail"},{"title":"Messages are not copied to the Sent folder when using IMAP","href":"/docs/messages-are-not-copied-to-the-sent-folder-when-using-imap"}]},{"title":"Creating e-mail backups","href":"/docs/e-mail-backups"}]},{"group":"Databases","pages":[{"title":"Managing your MySQL databases in the Hosting Panel","href":"/docs/managing-your-mysql-databases-in-the-hosting-panel"},{"title":"How to Fix phpMyAdmin Access Errors","href":"/how-to-fix-php-my-admin-access-errors"}]},{"group":"Security and SSL","pages":[{"title":"Security certifications and compliance documentation","sidebarTitle":"Certifications and compliance","href":"/docs/security-certifications"},{"group":"SSL","pages":[{"title":"SSL","href":"/docs/ssl"},{"title":"Introduction to SSL","href":"/docs/introduction-to-ssl"},{"group":"Ordering and installing certificates","pages":[{"title":"Installing an SSL certificate in the Hosting Panel","href":"/docs/installing-an-ssl-certificate-in-the-hosting-panel"},{"title":"Ordering an SSL certificate","href":"/docs/ordering-an-ssl-certificate"},{"title":"Renewing an SSL certificate","href":"/docs/ssl-certificate-renewal"},{"title":"Generating a private key and CSR from the command line","href":"/docs/generating-a-private-key-and-csr-from-the-command-line"},{"title":"Installing a Domain Verified SSL certificate","hidden":true,"href":"/docs/installing-your-domain-verified-ssl-certificate"},{"title":"Installing an Organization Verified SSL certificate","hidden":true,"href":"/docs/installing-your-organization-verified-ssl-certificate"},{"title":"Installing a third-party SSL certificate","href":"/docs/installing-a-third-party-ssl-certificate"},{"title":"Installing a self-signed SSL certificate","href":"/docs/installing-a-self-signed-ssl-certificate"},{"title":"Securing an unmanaged server with a Let's Encrypt SSL certificate","href":"/docs/securing-your-site-with-a-lets-encrypt-ssl-certificate"},{"title":"Installing an SSL certificate site seal","hidden":true,"href":"/docs/installing-an-ssl-certificate-site-seal"}]},{"group":"Configuring SSL on your site","pages":[{"title":"Redirecting visitors to SSL connections","href":"/docs/redirecting-users-to-ssl-connections"},{"title":"Using www and non-www domains with an SSL certificate","href":"/docs/using-www-and-non-www-domains-with-an-ssl-certificate"},{"title":"Mixing of secure and insecure content on a web page","href":"/docs/secure-and-insecure-content-on-a-web-page"},{"title":"Managing HTTP Strict Transport Security (HSTS) for your site","href":"/docs/enabling-http-strict-transport-security-hsts-for-your-site"},{"title":"SSL certificates and Server Name Indication (SNI) support","href":"/docs/ssl-certificates-and-server-name-indication-sni-support"}]},{"group":"Certificate reference","pages":[{"title":"SSL/TLS certificate validity periods","href":"/docs/ssl-tls-certificate-validity-periods"},{"title":"Differences between a cPanel certificate and a traditional CA-issued certificate","href":"/docs/differences-between-a-cpanel-certificate-and-a-traditional-ca-issued-certificate"},{"title":"Differences between Let's Encrypt SSL certificates and traditional CA-issued certificates","href":"/docs/differences-between-lets-encrypt-certificates-and-traditional-ca-issued-certificates"},{"title":"Where are Comodo SSL certificates banned?","href":"/docs/comodo-banned-country-list"},{"title":"Determining the OpenSSL version","href":"/docs/determining-the-openssl-version"},{"title":"Finding SSL certificate fingerprints","href":"/docs/finding-ssl-certificate-fingerprints"}]}]},{"group":"Account security","pages":[{"title":"Creating a strong password","href":"/docs/choosing-a-strong-password"},{"title":"Understanding software vulnerabilities and protecting your account","href":"/docs/understanding-software-vulnerabilities-and-protecting-your-account"}]},{"group":"Scams and phishing","pages":[{"title":"Known scams","href":"/docs/known-scams"},{"title":"Protecting yourself from email phishing scam attempts","href":"/docs/email-phishing-scam-attempts"},{"title":"Email spoofing","href":"/docs/email-spoofing"}]},{"group":"Site security","pages":[{"title":"WordPress security","href":"/docs/wordpress-security"},{"title":"Generating Google reCAPTCHA keys for site security","href":"/docs/obtaining-google-recaptcha-site-key-and-secret-key"},{"title":"Adding CAPTCHA protection to your web site","href":"/docs/adding-captcha-protection-to-your-web-site"},{"title":"What is PCI compliance and how do I take secure payments?","href":"/docs/do-you-support-pci-compliance"}]},{"group":"Recovering a hacked site","pages":[{"title":"Repairing and securing a hacked site","href":"/docs/securing-a-hacked-site"},{"title":"Requesting Google to review hacked sites and remove 'Deceptive Site Ahead' warning","href":"/docs/requesting-google-for-review-of-hacked-sites"}]}]},{"group":"Installable applications and software","pages":[{"group":"WordPress","pages":[{"title":"Managing your WordPress site in the Hosting Panel","href":"/docs/managing-your-wordpress-site-in-the-hosting-panel"},{"group":"TurboHub","pages":[{"title":"TurboHub","href":"/docs/turbohub"},{"title":"TurboHub: centralized, simplified WordPress site management","href":"/docs/turbohub-centralized-simplified-wordpress-site-management"},{"title":"TurboHub onboarding for WordPress with AI enhancements","href":"/docs/turbohub-onboarding-for-wordpress-with-ai-enhancements"},{"title":"TurboHub staging for WordPress","href":"/docs/turbohub-staging-for-wordpress"},{"title":"TurboHub's Intelligent Performance feature for WordPress","href":"/docs/turbohubs-intelligent-performance-feature-for-wordpress"},{"title":"TurboHub's Intelligent Performance and WordPress plugins","href":"/docs/turbohubs-intelligent-performance-and-wordpress-plugins"},{"title":"TurboHub \"Implementation of Phase 2\" error message","href":"/docs/turbohub-implementation-of-phase-2-error-message"}]},{"title":"Using the AI Website Builder for WordPress","href":"/docs/using-the-ai-website-builder-for-wordpress"},{"group":"WordPress on hosting.com","pages":[{"title":"Installing WordPress on a subdomain","href":"/docs/installing-wordpress-on-a-subdomain"},{"title":"Importing a WordPress site using Softaculous","href":"/docs/importing-wordpress-with-softaculous"},{"title":"How to migrate an existing WordPress site to hosting.com","href":"/docs/migrating-an-existing-wordpress-site-to-hosting-com"},{"title":"Redirecting the main domain to an existing WordPress install","href":"/docs/redirecting-the-primary-domain-to-an-existing-wordpress-installation"},{"title":"Using APC or OPcache with WordPress","href":"/docs/using-apc-or-opcache-with-wordpress"},{"title":"Installing and configuring the LiteSpeed Cache for WordPress plugin","href":"/docs/installing-and-configuring-the-litespeed-cache-for-wordpress-plugin"},{"title":"Configuring WordPress to use Redis","href":"/docs/configuring-wordpress-to-use-redis"},{"title":"Customizing PHP settings for WordPress using the Custom PHP Settings plugin","href":"/docs/customising-php-settings-for-wordpress-site"}]}]},{"title":"OpenClaw Guide","href":"/docs/openclaw-guide"},{"group":"Manual installations","pages":[{"title":"Installing ExpressionEngine","href":"/docs/installing-expressionengine"},{"title":"Installing Concrete CMS manually","href":"/docs/installing-concrete-cms-manually"},{"title":"Installing MediaWiki manually","href":"/docs/installing-mediawiki-manually"},{"title":"Installing CakePHP manually","href":"/docs/installing-cakephp-manually"},{"title":"Installing Slim Framework for PHP","href":"/docs/installing-slim-framework-for-php"},{"title":"Installing Nibbleblog manually","href":"/docs/installing-nibbleblog-manually"},{"title":"Installing CuteNews","href":"/docs/installing-cutenews"},{"title":"Installing CiviCRM in Drupal, Joomla, and WordPress","href":"/docs/installing-civicrm-in-drupal-joomla-and-wordpress"},{"title":"Installing VirtueMart using Softaculous","href":"/docs/installing-virtuemart"},{"title":"Installing Ubercart for Drupal","href":"/docs/installing-ubercart-for-drupal"},{"title":"Installing WordPress manually","href":"/docs/installing-wordpress-manually"},{"title":"Installing Webuzo","href":"/docs/installing-webuzo"},{"title":"Installing and configuring Node.js on managed hosting","href":"/docs/installing-and-configuring-nodejs-on-managed-hosting"},{"title":"Installing PrestaShop manually","href":"/docs/installing-prestashop-manually"},{"title":"Installing Elxis","href":"/docs/installing-elxis"},{"title":"Installing Jaws Project","href":"/docs/installing-jaws-project"},{"title":"Installing Joget Workflow","href":"/docs/installing-joget-workflow"},{"title":"Installing Angular manually","href":"/docs/installing-angular-manually"},{"title":"Installing phpLD manually","href":"/docs/installing-phpld-manually"},{"title":"Installing Laravel manually","href":"/docs/installing-laravel-manually"},{"title":"Migrating an existing Laravel installation","href":"/docs/migrating-a-laravel-installation"},{"title":"Installing Matomo manually","href":"/docs/installing-matomo-manually"},{"title":"Installing Sails.js on managed hosting accounts","href":"/docs/installing-sails-js-on-managed-hosting-accounts"},{"title":"Installing CS-Cart","href":"/docs/installing-cs-cart"},{"title":"Installing OpenCart manually","href":"/docs/installing-opencart-manually"},{"title":"Installing the FlatPress blogging engine","href":"/docs/installing-flatpress"},{"title":"Installing and configuring Yarn on managed hosting accounts","href":"/docs/installing-and-configuring-yarn-on-managed-hosting-accounts"},{"title":"Installing Symphony CMS","href":"/docs/installing-symphony-cms"}]}]},{"group":"Managed WordPress","pages":[{"title":"Managed WordPress","href":"/docs/managed-hosting-for-wordpress-powered-by-rocketnet"},{"title":"Managed WordPress quick start guide","href":"/docs/hostingcom-managed-wordpress-quick-start-guide"},{"group":"Getting started","pages":[{"title":"How to create a site on hosting.com Managed WordPress","href":"/docs/how-to-create-a-site-on-hostingcom-managed-wordpress"},{"title":"First-time login to WordPress on hosting.com Managed WordPress","href":"/docs/first-time-login-to-wordpress-on-hostingcom-managed-wordpress"},{"title":"How to log in to your WordPress admin area on hosting.com Managed WordPress","href":"/docs/how-to-log-in-to-your-wordpress-admin-area-on-hostingcom-managed-wordpress"},{"title":"How to manage your site on hosting.com Managed WordPress","description":"Learn how to use the hosting.com Dashboard to manage your websites quickly and easily.","href":"/docs/how-to-manage-your-site-on-hostingcom-managed-wordpress"},{"title":"How to create a staging site on hosting.com Managed WordPress","href":"/docs/how-to-create-a-staging-site-on-hostingcom-managed-wordpress"},{"title":"Changing the WordPress language on hosting.com Managed WordPress","description":"Learn how to change the WordPress language on hosting.com Managed WordPress.","href":"/docs/changing-the-wordpress-language-on-hostingcom-managed-wordpress"},{"title":"Migrating to hosting.com Managed WordPress","href":"/docs/migrating-to-hostingcom-managed-wordpress"},{"title":"How to Transfer Site Ownership","href":"/docs/how-to-transfer-site-ownership"},{"title":"How to remove a WordPress site from hosting.com Managed WordPress","href":"/docs/how-to-remove-a-wordpress-site-from-hostingcom-wordpress"},{"title":"Useful WordPress online resources for hosting.com Managed WordPress","href":"/docs/useful-wordpress-online-resources-for-hostingcom-managed-wordpress"}]},{"group":"DNS and domains","pages":[{"title":"How to configure DNS settings for hosting.com Managed WordPress at any provider","href":"/docs/how-to-configure-dns-settings-for-hostingcom-managed-wordpress-at-any-provider"},{"title":"How to configure DNS at GoDaddy for hosting.com Managed WordPress","href":"/docs/how-to-configure-dns-at-godaddy-for-hostingcom-managed-wordpress"},{"title":"How to configure DNS at Cloudflare for hosting.com Managed WordPress","href":"/docs/how-to-configure-dns-at-cloudflare-for-hostingcom-managed-wordpress"},{"title":"How to configure DNS at Namecheap for hosting.com Managed WordPress","href":"/docs/how-to-configure-dns-at-namecheap-for-hostingcom-managed-wordpress"},{"title":"Adding a subdomain to a website on hosting.com Managed WordPress","href":"/docs/adding-a-subdomain-to-a-website-on-hostingcom-managed-wordpress"},{"title":"Changing the domain name of a website on hosting.com Managed WordPress","href":"/docs/changing-the-domain-name-of-a-website-on-hostingcom-managed-wordpress"}]},{"group":"Plugins and themes","pages":[{"title":"How to install a new WordPress plugin on hosting.com Managed WordPress","href":"/docs/how-to-install-a-new-wordpress-plugin-on-hostingcom-managed-wordpress"},{"title":"Managing WordPress plugins from the hosting.com Dashboard","href":"/docs/managing-wordpress-plugins-from-the-hostingcom-dashboard"},{"title":"Managing plugins on Managed WordPress hosting","href":"/docs/managing-plugins-on-managed-wordpress-hosting"},{"title":"How to install a new WordPress theme on hosting.com Managed WordPress","href":"/docs/how-to-install-a-new-wordpress-theme-on-hostingcom-managed-wordpress"},{"title":"Managing WordPress themes from the hosting.com dashboard","href":"/docs/managing-wordpress-themes-from-the-hostingcom-dashboard"},{"title":"How to update, activate, and deactivate themes on hosting.com Managed WordPress","href":"/docs/how-to-update-activate-and-deactivate-themes-on-hostingcom-managed-wordpress"},{"title":"How to enable automatic core, theme, and plugin updates on hosting.com Managed WordPress","href":"/docs/how-to-enable-automatic-theme-and-plugin-updates-on-hostingcom-managed-wordpress"},{"title":"Are any WordPress plugins or themes banned on hosting.com Managed WordPress?","href":"/docs/are-any-wordpress-plugins-or-themes-banned-on-hostingcom-managed-wordpress"},{"title":"Getting started with WooCommerce on hosting.com Managed WordPress","href":"/docs/getting-started-with-woocommerce-on-hostingcom-managed-wordpress"},{"title":"Using the \"All in One SEO Pack\" plugin on hosting.com Managed WordPress","href":"/docs/using-the-all-in-one-seo-pack-plugin-on-hostingcom-managed-wordpress"},{"title":"Using the Autoptimize plugin on hosting.com Managed WordPress","href":"/docs/using-the-autoptimize-plugin-on-hostingcom-managed-wordpress"},{"title":"Using the WP Rocket plugin on hosting.com Managed WordPress","href":"/docs/using-the-wp-rocket-plugin-on-hostingcom-managed-wordpress"},{"title":"Grow your business with the OptinMonster API on hosting.com Managed WordPress","href":"/docs/grow-your-business-with-optinmonster-api-on-hostingcom-managed-wordpress"},{"title":"How to integrate SendGrid with your hosting.com Managed WordPress site","href":"/docs/how-to-integrate-sendgrid-with-your-hostingcom-managed-wordpress-site"},{"title":"Improving mail delivery with the WP Mail SMTP plugin on hosting.com Managed WordPress","href":"/docs/improving-mail-delivery-with-the-wp-mail-smtp-plugin-on-hostingcom-managed-wordpress"},{"title":"Using the \"Coming Soon Page, Under Construction \u0026 Maintenance Mode\" plugin on hosting.com Managed WordPress","href":"/docs/using-the-coming-soon-page-under-construction-maintenance-mode-plugin-on-hostingcom-managed-wordpress"}]},{"group":"Files and databases","pages":[{"title":"How to use the File Manager on hosting.com Managed WordPress","href":"/docs/how-to-use-the-file-manager-on-hostingcom-managed-wordpress"},{"title":"Viewing WordPress error logs in the File Manager on hosting.com Managed WordPress","href":"/docs/viewing-wordpress-error-logs-in-the-file-manager-on-hostingcom-managed-wordpress"},{"title":"How to create an FTP account on hosting.com Managed WordPress","href":"/docs/how-to-create-an-ftp-account-on-hostingcom-managed-wordpress"},{"title":"How to use FTP with FileZilla Pro on hosting.com Managed WordPress","href":"/docs/how-to-use-ftp-with-filezilla-pro-on-hostingcom-managed-wordpress"},{"title":"How to use FTP with Cyberduck on hosting.com Managed WordPress","href":"/docs/how-to-use-ftp-with-cyberduck-on-hostingcom-managed-wordpress"},{"title":"How to use SFTP on hosting.com Managed WordPress","href":"/docs/how-to-use-sftp-on-hostingcom-managed-wordpress"},{"title":"How to manage your databases with phpMyAdmin on hosting.com Managed WordPress","href":"/docs/how-to-manage-your-databases-with-phpmyadmin-on-hostingcom-managed-wordpress"},{"title":"How to back up and restore a database on hosting.com Managed WordPress","href":"/docs/how-to-back-up-and-restore-a-database-on-hostingcom-managed-wordpress"},{"title":"How to find and restore automated backups on hosting.com Managed WordPress","href":"/docs/how-to-find-and-restore-automated-backups-on-hostingcom-managed-wordpress"},{"title":"How to manually generate and download a full cloud backup on hosting.com Managed WordPress","href":"/docs/how-to-manually-generate-and-download-a-full-cloud-backup-on-hostingcom-managed-wordpress"}]},{"group":"Performance and CDN","pages":[{"title":"Understanding the Managed WordPress CDN (Content Delivery Network)","href":"/docs/understanding-the-managed-wordpress-cdn"},{"title":"Manually purging the CDN cache on hosting.com Managed WordPress","href":"/docs/manually-purging-the-cdn-cache-on-hostingcom-managed-wordpress"},{"title":"hosting.com Managed WordPress CDN cache FAQ","href":"/docs/hostingcom-managed-wordpress-cdn-cache-faq"},{"title":"What is Cloudflare Enterprise and how does it benefit my site?","href":"/docs/what-is-cloudflare-enterprise-and-how-does-it-benefit-my-site"},{"title":"Cloudflare Error 1016: Origin DNS Error","href":"/docs/cloudflare-error-1016-origin-dns-error-on-hostingcom-managed-wordpress"},{"title":"Does my hosting.com Managed WordPress site need a caching plugin?","href":"/docs/does-my-hostingcom-managed-wordpress-site-need-a-caching-plugin"},{"title":"Do I need to use an image optimization plugin or CDN on hosting.com Managed WordPress?","href":"/docs/do-i-need-to-use-an-image-optimization-plugin-or-cdn-on-hostingcom-managed-wordpress"},{"title":"Site speed and bandwidth usage on hosting.com Managed WordPress","href":"/docs/site-speed-and-bandwidth-usage-on-hostingcom-managed-wordpress"}]},{"group":"Settings and access","pages":[{"title":"How to manage site security on hosting.com Managed WordPress","href":"/docs/how-to-manage-site-security-on-hostingcom-managed-wordpress"},{"title":"Giving access to individual sites on hosting.com Managed WordPress","href":"/docs/giving-access-to-individual-sites-with-site-users-on-hostingcom-managed-wordpress"},{"title":"Using the WordPress Activity Log on hosting.com Managed WordPress","href":"/docs/using-the-wordpress-activity-log-on-hostingcom-managed-wordpress"},{"title":"How to change the PHP version for your hosting.com Managed WordPress website","href":"/docs/how-to-change-the-php-version-for-your-hostingcom-managed-wordpress-website"},{"title":"How to enable SSH on your hosting.com Managed WordPress site","href":"/docs/how-to-enable-ssh-on-your-hostingcom-managed-wordpress-site"},{"title":"Using WP-CLI in the hosting.com Dashboard","href":"/docs/using-wp-cli-in-the-hostingcom-dashboard"},{"title":"How to use SSH and WP-CLI from the command line on hosting.com Managed WordPress","href":"/docs/how-to-use-ssh-and-wp-cli-from-the-command-line-on-hostingcom-managed-wordpress"},{"title":"Do my hosting.com Managed WordPress sites need dedicated IP addresses?","href":"/docs/do-my-hostingcom-managed-wordpress-sites-need-dedicated-ip-addresses"},{"title":"How many emails can I send through hosting.com Managed WordPress?","href":"/docs/how-many-emails-can-i-send-through-hostingcom-managed-wordpress"}]},{"group":"Statistics","pages":[{"title":"How to view site reporting statistics on hosting.com Managed WordPress","href":"/docs/how-to-view-site-statistics-on-hostingcom-managed-wordpress"},{"title":"Viewing combined statistics for your hosting.com Managed WordPress sites","href":"/docs/viewing-statistics-for-your-hostingcom-managed-wordpress-sites"},{"title":"Viewing Cloudflare bandwidth and Edge Analytics in the hosting.com Dashboard","href":"/docs/viewing-cloudflare-bandwidth-and-edge-analytics-in-the-hostingcom-dashboard"},{"title":"What is the difference between visitors on the hosting.com Dashboard and pageviews on Google Analytics?","href":"/docs/what-is-the-difference-between-visitors-on-the-hostingcom-dashboard-and-pageviews-on-google-analytics"}]},{"title":"Legacy managed WordPress hosting","href":"/docs/managed-wordpress-hosting"},{"group":"Managed WordPress on cPanel","pages":[{"title":"cPanel Managed WordPress","href":"/docs/managed-wordpress-on-cpanel"},{"title":"Getting started with cPanel-based Managed WordPress","href":"/docs/getting-started-with-cpanel-based-managed-wordpress"},{"title":"Configuring Jetpack backups on cPanel-based Managed WordPress","href":"/docs/configuring-jetpack-backups-on-managed-wordpress"},{"title":"Using Jetpack on cPanel-based Managed WordPress","href":"/docs/using-jetpack-on-cpanel-based-managed-wordpress"},{"title":"Resetting the WordPress administrator password in cPanel-based Managed WordPress","href":"/docs/resetting-the-wordpress-administrator-password-in-cpanel-based-managed-wordpress"}]},{"group":"Managed WordPress on Plesk","pages":[{"title":"Plesk Managed WordPress","href":"/docs/plesk-mwp"},{"title":"Getting started with Managed WordPress in Plesk","href":"/docs/getting-started-with-managed-wordpress-in-plesk"},{"title":"Managing backups with Jetpack on Plesk-based Managed WordPress","href":"/docs/managing-backups-with-jetpack-on-plesk-based-managed-wordpress"},{"title":"Resetting your Managed WordPress administrator password in Plesk","href":"/docs/resetting-the-administrator-password-on-plesk-managed-wordpress"},{"title":"Installing Jetpack on a managed WordPress site","href":"/docs/jetpack-installation"}]}]},{"group":"Profile and login","pages":[{"title":"You cannot log in","sidebarTitle":"You cannot log in","href":"/docs/cannot-log-in"},{"title":"Login or Register for the Hosting Panel","href":"/docs/accessing-the-hosting-panel"},{"title":"Managing your profile in the Hosting Panel","href":"/docs/managing-your-profile-in-the-hosting-panel"},{"title":"Updating the default email address for your account","href":"/docs/updating-the-default-email-address-for-your-account"},{"title":"Recovering access to your account","sidebarTitle":"Recovering account access","href":"/docs/recovering-account-access"},{"title":"Viewing and changing settings for shared hosting accounts","href":"/docs/viewing-and-changing-login-settings-for-shared-hosting-accounts"},{"title":"Service-Level Access Delegation","href":"/docs/service-level-access-delegation"}]},{"group":"Settings and access","pages":[{"title":"Accessing your hosting control panel","href":"/docs/accessing-your-hosting-control-panel"},{"title":"My IP address has been blocked","sidebarTitle":"IP address blocked","href":"/docs/ip-address-blocked"},{"title":"Changing PHP versions and settings in the Hosting Panel","href":"/docs/changing-php-versions-and-settings-in-the-hosting-panel"},{"title":"Configuring SSH access in the Hosting Panel","href":"/docs/configuring-ssh-access-in-the-hosting-panel"},{"title":"How Can you Change your cPanel Password from the Hosting Panel","href":"/docs/how-can-you-change-your-cpanel-password-from-the-hosting-panel"},{"title":"How to Add Notes Under Product Secrets","href":"/docs/how-to-add-information-in-notes-secrets"}]},{"group":"Account and server details","pages":[{"title":"Determining your account's server name","href":"/docs/determining-your-accounts-server-name"},{"title":"Finding the IP address for your hosting account","href":"/docs/find-your-hosting-ip-address"},{"title":"Dedicated IP Addresses: What They Are and When You Need One","href":"/docs/dedicated-ip-addresses-what-they-are-and-when-you-need-one"},{"title":"Ordering a dedicated IP address","href":"/docs/ordering-a-dedicated-ip-address"}]},{"group":"Billing and payments","pages":[{"title":"Billing FAQ","href":"/docs/hostingcom-billing-faq"},{"group":"Sales tax","pages":[{"title":"United States Sales Tax policy","href":"/docs/united-states-sales-tax-policy"},{"title":"European Union Value Added Tax (VAT) Policies","href":"/docs/european-union-value-added-tax-vat-policies"},{"title":"India Goods and Services Tax (GST) policy","href":"/docs/india-goods-and-services-tax-gst-policy"}]},{"title":"Uptime commitment and service credits","sidebarTitle":"Uptime and service credits","href":"/docs/uptime-commitment-and-service-credits"},{"title":"Paying invoices, overdue balances and suspended services","sidebarTitle":"Invoices and payments","href":"/docs/managing-billing-in-the-hosting-panel"},{"title":"Upgrading or downgrading your hosting plan","href":"/docs/upgrading-or-downgrading-your-hosting-plan"},{"title":"Cancelling a product or service","sidebarTitle":"Cancelling a service","href":"/docs/cancelling-a-product-or-service-on-the-hosting-panel"},{"title":"How to Add Credit Cards and other Payment Methods","href":"/docs/how-to-add-credit-cards-and-other-payment-methods"},{"title":"Payment Methods in Bangladesh","href":"/docs/payment-methods-in-bangladesh"}]},{"group":"Support","pages":[{"title":"Working with tickets in the Hosting Panel","href":"/docs/working-with-tickets"},{"title":"Viewing your support PIN","href":"/docs/viewing-your-support-pin"},{"title":"Reporting suspected policy violations","href":"/docs/reporting-suspected-policy-violations"},{"title":"Policy FAQ","href":"/docs/hosting-com-policy-faq"},{"title":"Requesting site migration from another host to hosting.com","href":"/docs/site-migration-request"},{"title":"Managed VPS migrations","href":"/docs/managed-vps-migrations"},{"title":"Migrating multiple domains from cPanel to the new Hosting Panel","href":"/docs/migrating-multiple-domains-from-cpanel-to-the-new-hosting-panel"},{"title":"Hosting.com uptime and incident status","href":"/docs/hostingcom-uptime-and-incident-status"},{"title":"RTO (Recovery Time Objective) and RPO (Recovery Point Objective) metrics","href":"/docs/rto-recovery-time-objective-and-rpo-recovery-point-objective-metrics"}]}]},{"group":"Other hosting panels","pages":[{"group":"cPanel","pages":[{"group":"Getting started","pages":[{"title":"Getting started with cPanel","href":"/docs/getting-started-with-cpanel"},{"title":"Logging in and out of cPanel","href":"/docs/accessing-cpanel"},{"title":"Using the cPanel home screen","href":"/docs/cpanel-home-screen"},{"title":"Changing your cPanel password","href":"/docs/changing-your-cpanel-password"},{"title":"Changing the cPanel language","href":"/docs/changing-the-cpanel-language"},{"title":"Changing the cPanel style","href":"/docs/changing-the-cpanel-style"},{"title":"Updating contact information in cPanel","href":"/docs/updating-contact-information-and-preferences-in-cpanel"},{"title":"cPanel error message: \"Your IP address has changed","href":"/docs/cpanel-error-message-your-ip-address-has-changed"}]},{"group":"Files and backups","pages":[{"title":"cPanel file features","href":"/docs/cpanel-file-features"},{"title":"cPanel File Manager","href":"/docs/cpanel-file-manager"},{"title":"Getting started with cPanel File Manager","href":"/docs/getting-started-with-file-manager"},{"title":"Viewing and editing files in cPanel's File Manager","href":"/docs/cpanel-file-manager-editors"},{"title":"Uploading and downloading files using cPanel's File Manager","href":"/docs/upload-and-download-files"},{"title":"Configuring file permissions in File Manager","href":"/docs/file-permissions"},{"title":"Compressing files using cPanel or the command line","href":"/docs/compressing-files-using-cpanel-or-the-command-line"},{"title":"Viewing disk usage information in cPanel","href":"/docs/disk-space-usage"},{"title":"Managing FTP accounts in cPanel","href":"/docs/ftp-accounts-and-sessions"},{"title":"Managing backups in cPanel","href":"/docs/backups-in-cpanel"},{"title":"Excluding files and directories from cPanel backups","href":"/docs/excluding-files-and-directories-from-cpanel-backups"},{"title":"Using Server Rewind to restore files and databases","href":"/docs/server-rewind"},{"title":"Using Server Rewind to restore e-mail","href":"/docs/using-server-rewind-to-restore-e-mail"},{"title":"Restoring files, email, and databases using JetBackup","href":"/docs/restoring-files-email-and-databases-using-jetbackup"},{"title":"Backing up your email accounts with cPanel's File Manager","href":"/docs/backing-up-your-email-accounts-via-cpanels-file-manager"},{"title":"Resetting site content for a managed account","href":"/docs/resetting-site-content"}]},{"group":"Web Disk","pages":[{"title":"Web Disk","href":"/docs/web-disk"},{"title":"Configuring web disk accounts","href":"/docs/web-disk-accounts"},{"title":"Accessing Web Disks on Linux and BSD operating systems","href":"/docs/accessing-web-disks-on-linux-and-bsd"},{"title":"Accessing Web Disks on Microsoft operating systems","href":"/docs/accessing-web-disks-on-microsoft"},{"title":"Accessing Web Disks on Apple operating systems","href":"/docs/accessing-web-disks-on-apple"}]},{"group":"Domains and website tools","pages":[{"title":"cPanel domain features","href":"/docs/cpanel-domain-features"},{"title":"Using the cPanel Domains tool","href":"/docs/cpanel-domains-tool"},{"title":"Configuring web page redirects in cPanel","href":"/docs/redirects"},{"title":"Using the cPanel Site Publisher to build a website","href":"/docs/cpanel-site-publisher"},{"title":"Creating custom error pages in cPanel","href":"/docs/custom-error-pages"},{"title":"Using the Index Manager in cPanel","href":"/docs/index-manager"},{"title":"MIME types in cPanel","href":"/docs/mime-types"},{"title":"Configuring custom Apache Handlers","href":"/docs/apache-handlers"},{"title":"Using the cPanel Optimize Website feature","href":"/docs/optimize-website-feature"},{"title":"Managing subdomains in cPanel","href":"/docs/subdomains"},{"title":"Using the DNS Zone Editor in cPanel","href":"/docs/using-the-cpanel-zone-editor"}]},{"group":"Email","pages":[{"title":"cPanel mail features","href":"/docs/cpanel-mail-features"},{"title":"Import e mail accounts and forwarders","href":"/docs/import-e-mail-accounts-and-forwarders"},{"title":"How to help prevent spam in cPanel","href":"/docs/managing-spam-in-cpanel"},{"title":"Using Imunify Email","href":"/docs/using-imunify-email"},{"title":"Managing GnuPG keys in cPanel","href":"/docs/gnupg-key-management"},{"title":"Managing e-mail accounts in cPanel","href":"/docs/e-mail-accounts"},{"title":"Accessing webmail through cPanel","href":"/docs/accessing-webmail-through-cpanel"},{"title":"Configuring autoresponders in cPanel","href":"/docs/cpanel-auto-responders"},{"title":"Setting up e-mail forwarders in cPanel","href":"/docs/e-mail-forwarders"},{"title":"Forwarding incoming e-mail messages to a script file","href":"/docs/forwarding-incoming-e-mail-messages-to-a-script-file"},{"title":"Configuring e-mail filtering in cPanel","href":"/docs/e-mail-filtering"},{"title":"Filtering incoming e-mail messages by IP address","href":"/docs/filtering-incoming-e-mail-messages-by-ip-address"},{"title":"Filtering unwanted e-mail (spam) in cPanel","href":"/docs/filtering-spam"},{"title":"Stopping unwanted e-mail using Spam Filters","href":"/docs/unwanted-e-mail-spam"},{"title":"Enabling Spam Box","href":"/docs/spam-box"},{"title":"Managing mailing lists in cPanel","href":"/docs/mailing-lists"},{"title":"MX records and mail routing","sidebarTitle":"MX records and routing","href":"/docs/mail-exchanger-mx-record-entry"},{"title":"Adding a Brand Indicators for Message Identification (BIMI) record in cPanel","href":"/docs/creating-brand-indicator-message-identification-bimi-record-in-cpanel"},{"title":"Managing e-mail disk usage in cPanel","href":"/docs/managing-e-mail-disk-usage-in-cpanel"},{"title":"Using cPanel to configure a domain for Google Workspace","href":"/docs/configuring-a-domain-for-google-workspace-using-cpanel"}]},{"group":"Security and SSL","pages":[{"title":"cPanel security features","href":"/docs/cpanel-security-features"},{"title":"Setting up two-factor authentication for cPanel","href":"/docs/two-factor-authentication-for-cpanel"},{"title":"Using the IP Blocker in cPanel","href":"/docs/ip-blocker"},{"title":"Protecting directory privacy in cPanel","href":"/docs/directory-privacy"},{"title":"Configuring leech protection in cPanel","href":"/docs/leech-protection"},{"title":"Configuring hotlink protection in cPanel","href":"/docs/hotlink-protection"},{"title":"Managing the ModSecurity module in cPanel","href":"/docs/managing-the-modsecurity-module-in-cpanel"},{"title":"Using Imunify360","href":"/docs/imunify360"},{"title":"Using Virus Scanner in cPanel","href":"/docs/virus-scanner"},{"title":"Setting up AutoSSL on your domain","href":"/docs/reconfiguring-autossl-on-domains"},{"title":"Changing cPanel AutoSSL notifications","href":"/docs/change-cpanel-autossl-notifications"},{"title":"Securing a cPanel account with Let's Encrypt SSL","href":"/docs/securing-a-cpanel-enabled-account-with-a-lets-encrypt-ssl-certificate"},{"title":"Securing a cPanel-enabled account with a cPanel SSL certificate","href":"/docs/securing-a-cpanel-enabled-account-with-a-sectigo-ssl-certificate"},{"title":"Installing a third-party SSL certificate with cPanel","href":"/docs/install-a-third-party-ssl-certificate-with-cpanel"},{"title":"Installing a self-signed SSL certificate in cPanel","href":"/docs/how-to-install-a-self-signed-ssl-certificate-in-cpanel"}]},{"group":"Logging and statistics","pages":[{"title":"cPanel logging features","href":"/docs/cpanel-logging-features"},{"title":"Viewing the error log in cPanel","href":"/docs/error-log"},{"title":"Configuring raw access log files in cPanel","href":"/docs/raw-access-log"},{"title":"Using log programs in cPanel","href":"/docs/log-programs"},{"title":"Excluding an IP address from AWStats","href":"/docs/excluding-an-ip-address-from-awstats-statistics"},{"title":"Viewing information about visitors, bandwidth, and resource usage in cPanel","href":"/docs/latest-visitors-bandwidth-resource-usage"},{"title":"Monitoring resource limits in cPanel","href":"/docs/resource-limit-information"}]},{"group":"Developer tools","pages":[{"title":"Changing PHP versions and settings using PHP Selector","href":"/docs/changing-php-versions-and-settings-in-cpanel"},{"title":"Changing PHP versions and settings with MultiPHP","href":"/docs/changing-php-versions-and-settings-using-multiphp"},{"title":"Installing PHP PEAR packages using cPanel","href":"/docs/php-pear-packages"},{"title":"Installing Perl modules using cPanel","href":"/docs/perl-modules"},{"title":"Using the Python Selector in cPanel","href":"/docs/using-the-python-selector"},{"title":"Creating a Node.js application with the Node.js Selector","href":"/docs/create-application-with-nodejs-selector"},{"title":"Migrating an existing Node.js application to Node.js Selector","href":"/docs/migrating-a-node-js-application-to-node-js-selector"},{"title":"Migrating an existing application from Node.js Selector to a manual installation","href":"/docs/migrating-an-existing-application-from-node-js-selector-to-a-manual-installation"},{"title":"Migrating a Next.js application to the Node.js Selector in cPanel","href":"/docs/migrating-a-next-js-application-to-the-node-js-selector-in-cpanel"},{"title":"Node.js application error message: \"Cannot GET\" URL","href":"/docs/node-js-application-error-message-cannot-get-url"},{"title":"Using the Application Manager to deploy applications with Passenger","href":"/docs/using-the-application-manager-to-deploy-applications-with-passenger"},{"title":"Using Git version control in cPanel to install and update a site","href":"/docs/use-git-to-install-and-update-a-site"},{"title":"Configuring SSH keys using cPanel","href":"/docs/configuring-ssh-keys-with-cpanel"},{"title":"How to Increase Memory Allocation for a Redis Instance on cPanel","href":"/docs/how-to-increase-memory-allocation-for-a-redis-instance-on-cpanel"},{"title":"How to Deploy a Pre-Built Next.js App in cPanel","href":"/docs/how-to-deploy-a-pre-built-next-js-app-in-c-panel"}]},{"group":"Advanced features","pages":[{"title":"cPanel advanced features","href":"/docs/advanced-features"},{"title":"Setting up cron jobs in cPanel","href":"/docs/cron-jobs"},{"title":"Setting up a WordPress cron job","href":"/docs/configuring-a-cron-job-for-wordpress"}]},{"group":"WordPress Toolkit","pages":[{"title":"WP Toolkit","href":"/docs/wordpress-toolkit"},{"title":"Installing WordPress using the cPanel WP Toolkit","href":"/docs/installing-wordpress-with-the-cpanel-wordpress-toolkit"},{"title":"Managing WordPress using the cPanel WP Toolkit","href":"/docs/managing-wordpress-with-the-cpanel-wordpress-toolkit"},{"title":"Managing multiple sites using the cPanel WP Toolkit","href":"/docs/managing-multiple-sites-with-the-cpanel-wordpress-toolkit"},{"title":"Managing plugins using the cPanel WP Toolkit","href":"/docs/managing-plugins-with-the-cpanel-wordpress-toolkit"},{"title":"Managing themes using the cPanel WP Toolkit","href":"/docs/managing-themes-with-the-cpanel-wordpress-toolkit"},{"title":"Staging WordPress with the cPanel WP Toolkit","href":"/docs/staging-wordpress-with-the-cpanel-wordpress-toolkit"},{"title":"Managing WordPress from the command line with the cPanel WP Toolkit","href":"/docs/managing-wordpress-from-the-command-line-with-the-cpanel-wordpress-toolkit"},{"title":"Updating PHP version for WordPress using cPanel","href":"/docs/update-php-in-wordpress"},{"title":"WP Toolkit for resellers","href":"/docs/wordpress-toolkit-for-resellers"}]},{"group":"Users and access","pages":[{"title":"Using the Manage Team feature in cPanel","href":"/docs/using-the-manage-team-feature-in-cpanel"},{"title":"Using the User Manager in cPanel","href":"/docs/cpanel-user-manager"},{"title":"Granting limited cPanel account access to a developer or other third-party contact","href":"/docs/granting-limited-cpanel-account-access-to-a-developer"},{"title":"Migrating cPanel accounts from Reseller to Shared Hosting","href":"/docs/migrating-cpanel-accounts-from-reseller-hosting-to-shared-hosting"}]},{"group":"Software","pages":[{"title":"cPanel software","href":"/docs/cpanel-software"},{"title":"Backing up and restoring your data using Backuply","href":"/docs/backing-up-and-restoring-your-data-using-backuply"},{"title":"Enabling the Redis extension for PHP","href":"/docs/enabling-the-redis-extension-for-php"}]},{"group":"Softaculous autoinstaller","pages":[{"title":"Softaculous","href":"/docs/softaculous"},{"title":"Managing your applications in Softaculous","href":"/docs/manage-your-applications"},{"title":"Importing an application into Softaculous","href":"/docs/importing-an-application-into-softaculous"},{"title":"Backing up a Softaculous-installed application to Google Drive","href":"/docs/backing-up-a-softaculous-application-to-google-drive"},{"title":"Backing up a Softaculous-installed application to Dropbox","href":"/docs/backing-up-a-softaculous-application-to-dropbox"},{"title":"Softaculous application availability","href":"/docs/available-softaculous-applications"},{"title":"Using the Softaculous WordPress Manager","href":"/docs/using-the-softaculous-wordpress-manager"},{"title":"Website staging with Softaculous","href":"/docs/website-staging-with-softaculous"},{"title":"Website cloning with Softaculous","href":"/docs/website-cloning-with-softaculous"},{"group":"Blogs","pages":[{"title":"Blogs","href":"/docs/blogs"},{"title":"Installing WordPress using Softaculous","href":"/docs/wordpress1"},{"title":"Installing Nibbleblog using Softaculous","href":"/docs/nibbleblog1"},{"title":"Installing StatusNet using Softaculous","href":"/docs/statusnet"},{"title":"Installing PageCookery using Softaculous","href":"/docs/pagecookery"},{"title":"Installing Nucleus using Softaculous","href":"/docs/nucleus"},{"title":"Installing HTMLy using Softaculous","href":"/docs/htmly"},{"title":"Installing Serendipity using Softaculous","href":"/docs/serendipity"},{"title":"Installing Textpattern using Softaculous","href":"/docs/textpattern"},{"title":"Installing Chyrp using Softaculous","href":"/docs/chyrp"},{"title":"Installing LifeType using Softaculous","href":"/docs/lifetype"},{"title":"Installing b2evolution using Softaculous","href":"/docs/b2evolution"},{"title":"Installing Pixie using Softaculous","href":"/docs/pixie"},{"title":"Installing Dotclear using Softaculous","href":"/docs/dotclear"},{"title":"Installing PivotX using Softaculous","href":"/docs/pivotx"},{"title":"Installing Storytlr using Softaculous","href":"/docs/storytlr"}]},{"group":"Portals and CMS","pages":[{"title":"Portals and CMS","href":"/docs/portals-and-cms"},{"title":"Installing Drupal using Softaculous","href":"/docs/drupal1"},{"title":"Installing Joomla using Softaculous","href":"/docs/joomla1"},{"title":"Installing Kirby using Softaculous","href":"/docs/kirby"},{"title":"Installing Concrete CMS using Softaculous","href":"/docs/concretecms"},{"title":"Installing Bolt using Softaculous","href":"/docs/bolt"},{"title":"Installing Website Baker using Softaculous","href":"/docs/website-baker"},{"title":"Installing ImpressCMS using Softaculous","href":"/docs/impresscms"},{"title":"Installing Microweber using Softaculous","href":"/docs/microweber"},{"title":"Installing PHP-Fusion using Softaculous","href":"/docs/php-fusion"},{"title":"Installing Geeklog using Softaculous","href":"/docs/geeklog"},{"title":"Installing Zenario using Softaculous","href":"/docs/zenario"},{"title":"Installing e107 using Softaculous","href":"/docs/e107"},{"title":"Installing Grav using Softaculous","href":"/docs/grav"},{"title":"Installing Zikula using Softaculous","href":"/docs/zikula"},{"title":"Installing Koken using Softaculous","href":"/docs/koken"},{"title":"Installing CMSimple using Softaculous","href":"/docs/cmsimple"},{"title":"Installing SilverStripe using Softaculous","href":"/docs/silverstripe"},{"title":"Installing ClipperCMS using Softaculous","href":"/docs/clippercms"},{"title":"Installing Sitemagic CMS using Softaculous","href":"/docs/sitemagic-cms"},{"title":"Installing XOOPS using Softaculous","href":"/docs/xoops"},{"title":"Installing ProcessWire using Softaculous","href":"/docs/processwire"},{"title":"Installing Fork using Softaculous","href":"/docs/fork"},{"title":"Installing razorCMS using Softaculous","href":"/docs/razorcms"},{"title":"Installing CMS Made Simple using Softaculous","href":"/docs/cms-made-simple"},{"title":"Installing Cotonti using Softaculous","href":"/docs/cotonti"},{"title":"Installing Contao using Softaculous","href":"/docs/contao"},{"title":"Installing PHP-Nuke using Softaculous","href":"/docs/php-nuke"},{"title":"Installing ImpressPages using Softaculous","href":"/docs/impresspages"},{"title":"Installing Croogo using Softaculous","href":"/docs/croogo"},{"title":"Installing Tiki Wiki CMS Groupware using Softaculous","href":"/docs/tiki-wiki-cms-groupware"},{"title":"Installing Mambo using Softaculous","href":"/docs/mambo"},{"title":"Installing MODX using Softaculous","href":"/docs/modx"},{"title":"Installing phpwcms using Softaculous","href":"/docs/phpwcms"},{"title":"Installing PyroCMS using Softaculous","href":"/docs/pyrocms"},{"title":"Installing SiteCake using Softaculous","href":"/docs/sitecake"},{"title":"Installing Mahara using Softaculous","href":"/docs/mahara"},{"title":"Installing TYPO3 using Softaculous","href":"/docs/typo3"}]},{"group":"Forums","pages":[{"title":"Forums","href":"/docs/forums"},{"title":"Installing Vanilla Forums using Softaculous","href":"/docs/vanilla-forums"},{"title":"Installing SMF using Softaculous","href":"/docs/smf"},{"title":"Installing Beehive using Softaculous","href":"/docs/beehive"},{"title":"Installing AEF (Advanced Electron Forum) using Softaculous","href":"/docs/aef-advanced-electron-forum"},{"title":"Installing FluxBB using Softaculous","href":"/docs/fluxbb"},{"title":"Installing Phorum using Softaculous","href":"/docs/phorum"},{"title":"Installing bbPress using Softaculous","href":"/docs/bbpress"},{"title":"Installing MyBB using Softaculous","href":"/docs/mybb"},{"title":"Installing phpBB using Softaculous","href":"/docs/phpbb"}]},{"group":"Image galleries","pages":[{"title":"Image galleries","href":"/docs/image-galleries"},{"title":"Installing 4images using Softaculous","href":"/docs/4images"},{"title":"Installing Plogger using Softaculous","href":"/docs/plogger"},{"title":"Installing Piwigo using Softaculous","href":"/docs/piwigo"},{"title":"Installing Pixelpost using Softaculous","href":"/docs/pixelpost"},{"title":"Installing Gallery using Softaculous","href":"/docs/gallery"},{"title":"Installing TinyWebGallery using Softaculous","href":"/docs/tinywebgallery"},{"title":"Installing Coppermine using Softaculous","href":"/docs/coppermine"},{"title":"Installing Zenphoto using Softaculous","href":"/docs/zenphoto"}]},{"group":"Wikis","pages":[{"title":"Installing PmWiki using Softaculous","href":"/docs/pmwiki"},{"title":"Installing MediaWiki using Softaculous","href":"/docs/mediawiki"},{"title":"Installing DokuWiki using Softaculous","href":"/docs/dokuwiki"},{"title":"Installing WikkaWiki using Softaculous","href":"/docs/wikkawiki"}]},{"group":"Social networking","pages":[{"title":"Installing Elgg using Softaculous","href":"/docs/elgg1"},{"title":"Installing Opensource-SocialNetwork using Softaculous","href":"/docs/opensource-socialnetwork"},{"title":"Installing Oxwall using Softaculous","href":"/docs/oxwall"},{"title":"Installing Jcow using Softaculous","href":"/docs/jcow"},{"title":"Installing Dolphin using Softaculous","href":"/docs/dolphin"},{"title":"Installing Etano using Softaculous","href":"/docs/etano"}]},{"group":"Calendars","pages":[{"title":"Installing Booked using Softaculous","href":"/docs/booked"},{"title":"Installing WebCalendar using Softaculous","href":"/docs/webcalendar"}]},{"group":"Mail","pages":[{"title":"Installing Roundcube using Softaculous","href":"/docs/roundcube1"},{"title":"Installing RainLoop Webmail using Softaculous","href":"/docs/rainloop-webmail"},{"title":"Installing WebMail Lite using Softaculous","href":"/docs/webmail-lite"}]},{"group":"Polls and analytics","pages":[{"title":"Installing phpESP using Softaculous","href":"/docs/phpesp"},{"title":"Installing Matomo using Softaculous","href":"/docs/matomo"},{"title":"Installing Open Web Analytics using Softaculous","href":"/docs/open-web-analytics"},{"title":"Installing Advanced Poll using Softaculous","href":"/docs/advanced-poll"},{"title":"Installing LimeSurvey using Softaculous","href":"/docs/limesurvey"}]},{"group":"Project management","pages":[{"title":"Installing eyeOS using Softaculous","href":"/docs/eyeos"},{"title":"Installing PHProjekt using Softaculous","href":"/docs/phprojekt"},{"title":"Installing Mantis Bug Tracker using Softaculous","href":"/docs/mantis-bug-tracker"},{"title":"Installing dotProject using Softaculous","href":"/docs/dotproject"},{"title":"Installing Feng Office using Softaculous","href":"/docs/feng-office"},{"title":"Installing ProjectPier using Softaculous","href":"/docs/projectpier"},{"title":"Installing Collabtive using Softaculous","href":"/docs/collabtive"}]},{"group":"E-commerce","pages":[{"title":"Installing Magento using Softaculous","href":"/docs/magento1"},{"title":"Installing PrestaShop using Softaculous","href":"/docs/prestashop1"},{"title":"Installing OpenCart using Softaculous","href":"/docs/opencart1"},{"title":"Installing Arastta using Softaculous","href":"/docs/arastta"},{"title":"Installing Open eShop using Softaculous","href":"/docs/open-eshop"},{"title":"Installing Invoice Ninja using Softaculous","href":"/docs/invoice-ninja"},{"title":"Installing Zeuscart using Softaculous","href":"/docs/zeuscart"},{"title":"Installing CubeCart using Softaculous","href":"/docs/cubecart"},{"title":"Installing osCommerce using Softaculous","href":"/docs/oscommerce"},{"title":"Installing ShopSite using Softaculous","href":"/docs/shopsite"},{"title":"Installing LiteCart using Softaculous","href":"/docs/litecart"},{"title":"Installing Shopware using Softaculous","href":"/docs/shopware"},{"title":"Installing InvoicePlane using Softaculous","href":"/docs/invoiceplane"},{"title":"Installing Avactis using Softaculous","href":"/docs/avactis"},{"title":"Installing AbanteCart using Softaculous","href":"/docs/abantecart"},{"title":"Installing Zen Cart using Softaculous","href":"/docs/zen-cart"},{"title":"Installing BoxBilling using Softaculous","href":"/docs/boxbilling"},{"title":"Installing Loaded Commerce using Softaculous","href":"/docs/loaded-commerce"},{"title":"Installing TomatoCart using Softaculous","href":"/docs/tomatocart"},{"title":"Installing WHMCS using Softaculous","href":"/docs/whmcs"},{"title":"Installing Blesta using Softaculous","href":"/docs/blesta"},{"title":"Installing Logic Invoice using Softaculous","href":"/docs/logic-invoice"}]},{"group":"CRMs","pages":[{"title":"Installing Tine using Softaculous","href":"/docs/tine"},{"title":"Installing FrontAccounting using Softaculous","href":"/docs/frontaccounting"},{"title":"Installing EGroupware using Softaculous","href":"/docs/egroupware"},{"title":"Installing SugarCRM using Softaculous","href":"/docs/sugarcrm1"},{"title":"Installing OrangeHRM using Softaculous","href":"/docs/orangehrm"},{"title":"Installing SuiteCRM using Softaculous","href":"/docs/suitecrm"},{"title":"Installing Dolibarr using Softaculous","href":"/docs/dolibarr"},{"title":"Installing Vtiger using Softaculous","href":"/docs/vtiger"},{"title":"Installing Group Office using Softaculous","href":"/docs/group-office"},{"title":"Installing YetiForce CRM using Softaculous","href":"/docs/yetiforce-crm"},{"title":"Installing Zurmo using Softaculous","href":"/docs/zurmo"}]},{"group":"Customer support","pages":[{"title":"Installing UVdesk using Softaculous","href":"/docs/uvdesk"},{"title":"Installing Live Helper Chat using Softaculous","href":"/docs/live-helper-chat"},{"title":"Installing HelpDeskZ using Softaculous","href":"/docs/helpdeskz"},{"title":"Installing Help Center Live using Softaculous","href":"/docs/help-center-live"},{"title":"Installing Vision Helpdesk using Softaculous","href":"/docs/vision-helpdesk"},{"title":"Installing HESK using Softaculous","href":"/docs/hesk"},{"title":"Installing Maian Support using Softaculous","href":"/docs/maian-support"},{"title":"Installing osTicket using Softaculous","href":"/docs/osticket"}]},{"group":"Frameworks","pages":[{"title":"Installing Webasyst using Softaculous","href":"/docs/webasyst"},{"title":"Installing Kohana using Softaculous","href":"/docs/kohana"},{"title":"Installing Yii using Softaculous","href":"/docs/yii"},{"title":"Installing FuelPHP using Softaculous","href":"/docs/fuelphp"},{"title":"Installing UIkit using Softaculous","href":"/docs/uikit"},{"title":"Installing Bootstrap using Softaculous","href":"/docs/bootstrap"},{"title":"Installing Smarty using Softaculous","href":"/docs/smarty"},{"title":"Installing CakePHP using Softaculous","href":"/docs/cakephp"},{"title":"Installing Zend Framework using Softaculous","href":"/docs/zend-framework"},{"title":"Installing Symfony using Softaculous","href":"/docs/symfony"},{"title":"Installing Laravel using Softaculous","href":"/docs/laravel"},{"title":"Installing CodeIgniter using Softaculous","href":"/docs/codeigniter"}]},{"group":"Education","pages":[{"title":"Installing Dokeos using Softaculous","href":"/docs/dokeos"},{"title":"Installing ATutor using Softaculous","href":"/docs/atutor"},{"title":"Installing Chamilo using Softaculous","href":"/docs/chamilo"},{"title":"Installing Omeka using Softaculous","href":"/docs/omeka"},{"title":"Installing Claroline using Softaculous","href":"/docs/claroline"},{"title":"Installing Moodle using Softaculous","href":"/docs/moodle1"},{"title":"Installing eFront using Softaculous","href":"/docs/efront"}]},{"group":"File management","pages":[{"title":"Installing Pydio using Softaculous","href":"/docs/pydio"},{"title":"Installing OpenDocMan using Softaculous","href":"/docs/opendocman"}]},{"group":"Database tools","pages":[{"title":"Installing Adminer using Softaculous","href":"/docs/adminer"}]},{"group":"Video","pages":[{"title":"Installing ClipBucket using Softaculous","href":"/docs/clipbucket"},{"title":"Installing CumulusClips using Softaculous","href":"/docs/cumulusclips"}]},{"group":"RSS","pages":[{"title":"Installing Gregarius using Softaculous","href":"/docs/gregarius"},{"title":"Installing Tiny Tiny RSS using Softaculous","href":"/docs/tiny-tiny-rss"}]},{"group":"Miscellaneous applications","pages":[{"title":"Installing SPIP using Softaculous","href":"/docs/spip"},{"title":"Installing phpFormGenerator using Softaculous","href":"/docs/phpformgenerator"},{"title":"Installing InfiniteWP using Softaculous","href":"/docs/infinitewp"},{"title":"Installing Open Journal Systems using Softaculous","href":"/docs/open-journal-systems"},{"title":"Installing WeBid using Softaculous","href":"/docs/webid"},{"title":"Installing GLPI using Softaculous","href":"/docs/glpi"},{"title":"Installing Mautic using Softaculous","href":"/docs/mautic"},{"title":"Installing YOURLS using Softaculous","href":"/docs/yourls"}]}]},{"title":"What is a Solid State Drive? What are SSD benefits?","href":"/docs/solid-state-drive-ssd-advantages"},{"group":"Databases","pages":[{"title":"cPanel database features","href":"/docs/cpanel-database-features"},{"title":"Managing MySQL databases and users","href":"/docs/managing-mysql-databases"},{"title":"Managing PostgreSQL databases and users in cPanel","href":"/docs/managing-postgresql-databases"},{"title":"Accessing phpMyAdmin and phpPgAdmin","href":"/docs/phpmyadmin-and-phppgadmin"},{"title":"Using phpMyAdmin to copy a MySQL database","href":"/docs/using-phpmyadmin-to-copy-a-mysql-database"},{"title":"Changing the MySQL collation settings in phpMyAdmin","href":"/docs/changing-the-mysql-collation-settings-in-phpmyadmin"},{"title":"Deleting MySQL database tables using phpMyAdmin","href":"/docs/deleting-mysql-database-tables-with-phpmyadmin"},{"title":"Optimizing and repairing MySQL databases using phpMyAdmin","href":"/docs/optimizing-and-repairing-mysql-databases-with-phpmyadmin"},{"title":"Configuring remote MySQL access in cPanel","href":"/docs/remote-mysql-access"},{"title":"Remote access for MySQL TCP/IP connections on cPanel","href":"/docs/remote-access-for-mysql-tcp-ip-connections-on-cpanel"},{"title":"MySQL passwords do not work after upgrade","href":"/docs/mysql-passwords-do-not-work-after-upgrade"}]}]},{"group":"Plesk","pages":[{"group":"Getting started with Plesk","pages":[{"title":"Getting started with Plesk","href":"/docs/getting-started-with-plesk"},{"title":"Logging in and out of Plesk","href":"/docs/logging-in-and-out-of-plesk"},{"title":"Changing your Plesk password","href":"/docs/changing-your-plesk-password"}]},{"group":"Files and backups","pages":[{"title":"Getting started with the Plesk File Manager","href":"/docs/getting-started-with-the-plesk-file-manager"},{"title":"Managing FTP accounts in Plesk","href":"/docs/managing-ftp-accounts-in-plesk"},{"title":"Backing up and restoring sites in Plesk","href":"/docs/backing-up-and-restoring-sites-in-plesk"}]},{"group":"Domains and DNS","pages":[{"title":"Adding new domains and subdomains in Plesk","href":"/docs/adding-new-domains-and-subdomains-in-plesk"},{"title":"Managing DNS zones in Plesk","href":"/docs/managing-dns-zones-in-plesk"}]},{"group":"Databases","pages":[{"title":"Managing databases and database users in Plesk","href":"/docs/managing-databases-and-database-users-in-plesk"},{"title":"Backing up and restoring databases in Plesk","href":"/docs/backing-up-and-restoring-databases-with-plesk"}]},{"group":"Security and SSL","pages":[{"title":"Generating a CSR and installing an SSL certificate in Plesk","href":"/docs/generating-a-csr-and-installing-an-ssl-certificate-in-plesk"},{"title":"Generating and renewing Let's Encrypt SSL certificates in Plesk","href":"/docs/generating-and-renewing-lets-encrypt-ssl-certificates-in-plesk"},{"title":"Installing a self-signed SSL certificate in Plesk","href":"/docs/how-to-install-a-self-signed-ssl-certificate-in-plesk"},{"title":"Redirecting users to SSL connections in Plesk","href":"/docs/redirecting-users-to-ssl-connections-in-plesk"},{"title":"Password-protected directories in Plesk","href":"/docs/password-protected-directories-in-plesk"},{"title":"Removing password protection from the site statistics page","href":"/docs/removing-password-protection-from-the-site-statistics-page"},{"title":"Activating and configuring Cloudflare ServerShield on Plesk","href":"/docs/activate-cloudflare-servershield-using-plesk"}]},{"group":"Users and access","pages":[{"title":"Managing users in Plesk","href":"/docs/managing-users-in-plesk"},{"title":"Managing user roles in Plesk","href":"/docs/managing-user-roles-in-plesk"},{"title":"Using SSH keys with Plesk","href":"/docs/using-ssh-keys-with-plesk"}]},{"group":"Logging and statistics","pages":[{"title":"Viewing and filtering logs in Plesk","href":"/docs/viewing-and-filtering-logs-in-plesk"},{"title":"Viewing resource usage information in Plesk","href":"/docs/viewing-resource-usage-in-plesk"}]},{"group":"Developer tools","pages":[{"title":"Switching PHP versions and settings on Plesk","href":"/docs/switching-php-versions-on-plesk"},{"title":"Using Git with Plesk","href":"/docs/using-git-with-plesk"},{"title":"Scheduling tasks in Plesk","href":"/docs/scheduling-tasks-in-plesk"}]},{"group":"WordPress","pages":[{"title":"Using the WP Toolkit in Plesk","href":"/docs/using-the-wordpress-toolkit-in-plesk"},{"title":"Using Plesk to stage websites","href":"/docs/website-staging-with-plesk"}]},{"group":"Email","pages":[{"title":"Plesk email features","href":"/docs/plesk-mail-features"},{"title":"Managing e-mail accounts in Plesk","href":"/docs/managing-e-mail-accounts-in-plesk"},{"title":"Configuring an e-mail alias in Plesk","href":"/docs/configuring-an-e-mail-alias-in-plesk"},{"title":"Using the Plesk spam filter","href":"/docs/plesk-spam-filter"},{"title":"Accessing webmail in Plesk","href":"/docs/accessing-webmail-in-plesk"},{"title":"Enabling auto-reply messages for an e-mail account in Plesk","href":"/docs/enabling-auto-reply-messages-for-an-e-mail-account-in-plesk"},{"title":"Managing e-mail deliverability settings in Plesk","href":"/docs/managing-e-mail-deliverability-settings-in-plesk"},{"title":"Configuring an e-mail forwarder in Plesk","href":"/docs/configuring-an-e-mail-forwarder-in-plesk"},{"title":"Setting up Gmail as the e-mail provider in Plesk","href":"/docs/setting-up-gmail-as-the-e-mail-provider-in-plesk"}]}]}]},{"group":"Using your software","pages":[{"group":"WordPress","pages":[{"group":"Site setup and administration","pages":[{"title":"Receiving PayPal payments on WordPress","href":"/docs/configuring-paypal-payments-for-wordpress"},{"title":"Enabling and disabling pingbacks and trackbacks in WordPress","href":"/docs/enabling-and-disabling-pingbacks-and-trackbacks-in-wordpress"},{"title":"Configuring WordPress date and time settings","href":"/docs/configuring-wordpress-date-and-time-settings"},{"title":"Logging in to WordPress","href":"/docs/log-in-to-wordpress"},{"title":"Optimizing WordPress trash settings","href":"/docs/optimizing-wordpress-trash-settings"},{"title":"Checking my current WordPress version","href":"/docs/determining-the-wordpress-version"},{"title":"Changing the WordPress language","href":"/docs/changing-the-wordpress-language"},{"title":"Changing the WordPress auto-save interval","href":"/docs/changing-the-wordpress-auto-save-interval"},{"title":"Adding Cookie compliance banner in WordPress","href":"/docs/cookie-compliance-banner-in-wordpress"},{"title":"Disabling auto save option in WordPress","href":"/docs/disabling-auto-save-option-in-wordpress"},{"title":"Removing WordPress version number","href":"/docs/remove-wordpress-version-number"},{"title":"Enabling and customizing maintenance mode in WordPress","href":"/docs/enabling-and-customizing-maintenance-mode-in-wordpress"},{"title":"Converting your WordPress site to a static site","href":"/docs/converting-your-wordpress-site-to-a-static-site"},{"title":"Changing the website URL in WordPress","href":"/docs/changing-the-website-url-in-wordpress"},{"title":"Adding Paypal shopping cart to WordPress","href":"/docs/adding-paypal-shopping-cart-to-wordpress"},{"title":"Configuring a WordPress multisite network","href":"/docs/configuring-a-wordpress-multisite-network"},{"title":"Enabling SVG file support in WordPress","href":"/docs/svg-support-in-wordpress"},{"title":"Enabling maintenance mode with the SeedProd plugin","sidebarTitle":"Maintenance mode with SeedProd","href":"/docs/enabling-maintenance-mode-in-wordpress"},{"title":"Disabling REST API endpoints in WordPress","href":"/docs/disabling-rest-api-endpoints-in-wordpress"},{"title":"Disabling REST API for JSON in WordPress","href":"/docs/disable-rest-api-in-wordpress"},{"title":"Administering WordPress from the command line","href":"/docs/administering-wordpress-from-the-command-line"},{"title":"Changing the WordPress memory limit","href":"/docs/wordpress-memory-limit"},{"title":"Configuring the WordPress heartbeat","href":"/docs/configuring-the-wordpress-heartbeat"},{"title":"Changing the domain in WordPress","href":"/docs/changing-the-domain-in-wordpress"},{"title":"Enabling file upload function for contributors using PHP function in WordPress","href":"/docs/enable-file-upload-using-php-function-for-wordpress-contributors"},{"title":"Detecting the visitor browser type on WordPress sites","href":"/docs/detecting-browsers-type-on-wordpress-site"},{"title":"Finding and replacing data in WordPress","href":"/docs/find-and-replace-data-in-wordpress"},{"title":"Configuring a WordPress testing sandbox","href":"/docs/configuring-a-wordpress-testing-sandbox"},{"title":"Changing the primary domain in a WordPress multisite installation","href":"/docs/changing-the-primary-domain-in-a-wordpress-multisite-installation"},{"title":"Updating WordPress manually","href":"/docs/updating-wordpress"},{"title":"Enabling the REST API in WordPress","href":"/docs/enabling-the-rest-api-in-wordpress"}]},{"group":"Themes and appearance","pages":[{"title":"Installing WordPress themes","href":"/docs/installing-wordpress-themes"},{"title":"Customizing WordPress administration menu and toolbar using WP Custom Admin Interface plugin","href":"/docs/customizing-wordpress-administration-menu-and-toolbar"},{"title":"Setting the default HTML editor in WordPress","href":"/docs/setting-default-text-editor-in-wordpress"},{"title":"Adding custom Adobe fonts in WordPress","href":"/docs/embed-adobe-fonts-in-wordpress-sites"},{"title":"Changing the favicon in WordPress","href":"/docs/how-to-change-your-favicon-in-wordpress"},{"title":"Adding a custom WordPress footer on the admin dashboard","href":"/docs/customising-wordpress-footer-for-admin-dashboard"},{"title":"Changing WordPress admin dashboard background color","href":"/docs/changing-wordpress-admin-dashboard-background-color"},{"title":"Adding a navigation menu in WordPress","href":"/docs/navigation-menu-in-wordpress"},{"title":"Adding a custom logo to WordPress","href":"/docs/adding-a-custom-logo-to-wordpress"},{"title":"Removing the welcome panel on WordPress dashboard","href":"/docs/configuring-wordpress-admin-dashboard"},{"title":"Removing WordPress title","href":"/docs/remove-wordpress-branding"},{"title":"Importing custom Google Fonts in WordPress","href":"/docs/import-custom-google-fonts-in-wordpress"},{"title":"Adding Google fonts and change the fonts in WordPress","href":"/docs/change-the-font-in-wordpress"},{"title":"Enabling dark mode for WordPress","href":"/docs/dark-mode-for-wordpress"},{"title":"Configuring sticky menus on WordPress sites","href":"/docs/how-configure-sticky-menu-on-wordpress-sites"},{"title":"Disabling and deleting WordPress themes","href":"/docs/disabling-and-deleting-wordpress-themes"},{"title":"Enabling the screen options custom fields on WordPress Editor","href":"/docs/enabling-the-screen-options-custom-fields-in-wordpress"},{"title":"Adding or changing background image in WordPress","href":"/docs/changing-background-image-in-wordpress"},{"title":"Adding custom CSS file to your WordPress site","href":"/docs/adding-custom-css-file-to-your-wordpress-site"},{"title":"Editing the WordPress footer","href":"/docs/editing-the-wordpress-footer"},{"title":"Changing Replace URL in WordPress Elementor","href":"/docs/replace-url-in-elementor-wordpress"},{"title":"Customizing the WordPress login page","href":"/docs/customize-wordpress-login-page"},{"title":"Changing font using WordPress Classic Editor","href":"/docs/changing-fonts-using-wordpress-classic-editor"},{"title":"Disabling Gutenberg in WordPress","href":"/docs/disabling-gutenberg-in-wordpress-5"},{"title":"Changing the WordPress theme manually","href":"/docs/changing-the-wordpress-theme-manually"}]},{"group":"Content and publishing","pages":[{"title":"Scheduling post publishing in WordPress","href":"/docs/scheduling-post-publishing-in-wordpress"},{"title":"Managing WordPress comments","href":"/docs/managing-wordpress-comments"},{"title":"Installing and configuring the Disqus Comment System plugin","href":"/docs/installing-and-configuring-the-disqus-comment-system-plugin"},{"title":"Adding external RSS feeds to your WordPress site","href":"/docs/adding-external-rss-feeds-to-your-wordpress-site"},{"title":"Adding copyright text for WordPress blogs and pages","href":"/docs/copyright-statement-in-wordpress"},{"title":"Adding a site review form on WordPress","href":"/docs/site-review-forms-for-wordpress-sites"},{"title":"Adding confirmation message while publishing content in WordPress","href":"/docs/configuring-confirmation-message-for-wordpress-classic-editor"},{"title":"Showing the current year in WordPress posts","href":"/docs/showing-the-current-year-in-wordpress-posts"},{"title":"Setting minimum word count for WordPress posts","href":"/docs/setting-minimum-word-count-for-wordpress-posts"},{"title":"Creating dynamic forms in WordPress","href":"/docs/creating-dynamic-forms-in-wordpress"},{"title":"Displaying a Twitter feed in WordPress","href":"/docs/display-a-twitter-feed-in-wordpress"},{"title":"Adding an appointment booking system in WordPress","href":"/docs/appointment-booking-system-for-wordpress"},{"title":"Creating categories in WordPress","href":"/docs/creating-new-post-categories-in-wordpress"},{"title":"Displaying content statistics on your WordPress site","href":"/docs/configuring-site-statistics-for-wordpress"},{"title":"Changing the author names on a WordPress blog","href":"/docs/changing-the-author-names-on-a-wordpress-blog"},{"title":"Adding a popup message in WordPress","href":"/docs/display-a-popup-message-in-wordpress"},{"title":"Adding a Carousel Slider for WordPress","href":"/docs/carousel-slider-for-wordpress"},{"title":"Creating a Legal Page on WordPress using the WP Auto Terms plugin","href":"/docs/creating-legal-pages-in-wordpress"},{"title":"Using a plugin to copy or clone content in WordPress","href":"/docs/clone-content-in-wordpress"},{"title":"Disabling URL in WordPress comment section","href":"/docs/disable-url-in-comments-from-wordpress"},{"title":"Disabling embedding of WordPress posts remotely on 3rd party sites","href":"/docs/disable-embedding-of-wordpress-posts-remotely-on-3rd-party-sites"},{"title":"Embedding video in WordPress post and pages","href":"/docs/embed-video-in-wordpress"},{"title":"Delaying the WordPress RSS feed publishing time","href":"/docs/delay-wordpress-rss-feed-publishing-time"},{"title":"Last Updated date in WordPress posts or pages","href":"/docs/last-updated-date-in-wordpress-posts-or-pages"},{"title":"Adding Privacy Policy page in WordPress","href":"/docs/privacy-policy-in-wordpress"},{"title":"Adding uploading file feature in WordPress posts or pages","href":"/docs/uploading-files-feature-in-wordpress-posts-or-pages"},{"title":"Removing the category prefix from the URL of a WordPress page","href":"/docs/removing-category-prefix-from-wordpress-page-url"},{"title":"Updating the copyright date in WordPress automatically","href":"/docs/how-update-the-copyright-date-in-wordpress-automatically"},{"title":"Adding CTA button shortcode on WordPress","href":"/docs/cta-button-shortcode-on-wordpress"},{"title":"Adding a Whatsapp chat link on WordPress","href":"/docs/whatsapp-link-on-wordpress"},{"title":"Creating default text on blog posts in WordPress using PHP","href":"/docs/creating-default-text-on-blog-posts-in-wordpress"},{"title":"Displaying related posts in WordPress using Yet Another Related Posts plugin","href":"/docs/displaying-related-posts-in-wordpress"},{"title":"Changing excerpt length in WordPress using PHP","href":"/docs/changing-the-excerpt-length-in-wordpress"},{"title":"Adding spam and delete button in WordPress comment section using PHP","href":"/docs/delete-and-spam-button-for-wordpress-comment-section"},{"title":"Displaying random post on WordPress","href":"/docs/display-random-posts-in-wordpress"},{"title":"Highlighting author comments in your WordPress site","href":"/docs/highlighting-author-comments-on-wordpress-blog-post"},{"title":"Setting the maximum word count for WordPress posts","href":"/docs/setting-maximum-word-count-for-wordpress-posts"},{"title":"Using widgets in WordPress","href":"/docs/using-widgets-in-wordpress"},{"title":"Duplicating pages and posts in WordPress","href":"/docs/duplicating-a-page-in-wordpress"},{"title":"Adding events calendar in WordPress","href":"/docs/display-events-calendar-in-wordpress"},{"title":"Locking posts in WordPress","href":"/docs/locking-posts-in-wordpress"},{"title":"Creating custom shortcodes in WordPress","href":"/docs/creating-custom-shortcodes-in-wordpress"},{"title":"Using Widget Block Editor to edit WordPress widget area","href":"/docs/widget-block-editor-in-wordpress"},{"title":"Linking Twitter usernames on WordPress posts automatically","href":"/docs/linking-twitter-username-automatically-in-wordpress-posts"},{"title":"Managing post tags in WordPress","href":"/docs/managing-post-tags-in-wordpress"},{"title":"Embedding JavaScript and HTML codes in WordPress","href":"/docs/embed-javascript-and-html-codes-in-wordpress"},{"title":"Adding an online guestbook on WordPress","href":"/docs/guestbook-page-for-wordpress"}]},{"group":"Email and notifications","pages":[{"title":"Changing comment notification settings in WordPress","href":"/docs/changing-comment-notification-settings-in-wordpress"},{"title":"Installing and configuring the Postie plugin","href":"/docs/installing-and-configuring-the-postie-plugin"},{"title":"Notifying only administrators about WordPress updates","href":"/docs/hide-wordpress-updates-to-non-admin-users-in-wordpress"},{"title":"Hiding WordPress update notifications","href":"/docs/hide-wordpress-update-notification"},{"title":"Sending e-mail in WordPress","href":"/docs/sending-e-mail-in-wordpress"},{"title":"Adding Mailchimp subscribers from WordPress","href":"/docs/adding-mailchimp-subscribers-from-wordpress"},{"title":"Sending test emails from WordPress","href":"/docs/test-email-for-wordpress"}]},{"group":"Performance and caching","pages":[{"title":"Using W3 Total Cache and GTmetrix to optimize WordPress","href":"/docs/using-w3-total-cache-and-gtmetrix-to-optimize-wordpress"},{"title":"Clearing the cache in WordPress","href":"/docs/clearing-the-cache-in-wordpress"},{"title":"Optimizing WordPress performance using WP Fastest Cache","href":"/docs/optimize-wordpress-sites-using-wp-fastest-cache"},{"title":"Improving speed and performance in WordPress","href":"/docs/improve-speed-and-performance-in-wordpress"},{"title":"Optimizing WordPress with the WP Rocket plugin","href":"/docs/optimizing-wordpress-with-wp-rocket"},{"title":"Optimizing images for WordPress with LiteSpeed Cache","href":"/docs/optimizing-images-for-wordpress-with-litespeed-cache"},{"title":"Adding thumbnails to blog posts in WordPress Theme","href":"/docs/adding-thumbnails-to-blog-posts-in-wordpress-theme"},{"title":"Configuring image compression in WordPress","href":"/docs/configure-image-compression-in-wordpress"},{"title":"Disabling automatic JPEG compression in WordPress using PHP","href":"/docs/disable-automatic-jpeg-compression-in-wordpress"},{"title":"Disabling thumbnail generation in WordPress","href":"/docs/disable-thumbnails-generation-in-wordpress"},{"title":"Adding infinite scroll on WordPress sites","href":"/docs/infinite-scroll-for-wordpress"},{"title":"Stopping WordPress from generating different image sizes without a plugin","href":"/docs/stop-wordpress-from-generating-different-image-sizes-without-plugin"}]},{"group":"SEO and search","pages":[{"title":"Using Google Analytics with WordPress","href":"/docs/using-google-analytics-with-wordpress"},{"title":"Installing and configuring the Google XML Sitemaps plugin for WordPress","href":"/docs/installing-and-configuring-the-google-xml-sitemaps-plugin"},{"title":"Creating short link in WordPress","href":"/docs/creating-short-link-in-wordpress"},{"title":"Disabling default search in WordPress using PHP","href":"/docs/disabling-default-search-in-wordpress"},{"title":"Excluding WordPress pages from search engine results using the PHP function","href":"/docs/exclude-wordpress-pages-in-search-result"},{"title":"Using Matomo with WordPress","href":"/docs/using-matomo-with-wordpress"},{"title":"Installing MonsterInsights Google Analytics plugin in WordPress","href":"/docs/monsterinsights-google-analytics-plugin-for-wordpress"},{"title":"Using Search Exclude plugin to exclude specific WordPress posts or pages from search","href":"/docs/using-search-exclude-plugin-to-exclude-wordpress-posts-pages-in-search"},{"title":"Creating XML sitemaps for WordPress using the XML Sitemaps plugin","href":"/docs/xml-sitemaps-generator-for-wordpress"},{"title":"Configuring the WordPress permalink structure","href":"/docs/configuring-wordpress-permalink-structure"},{"title":"Installing All in One (AISEO) plugin in WordPress for better SEO ranking","href":"/docs/all-in-one-aiseo-seo-ranking-wordpress-plugin"},{"title":"Customizing the number of search results displayed in WordPress","href":"/docs/customizing-the-number-of-search-results-displayed-in-wordpress"}]},{"group":"Database and backups","pages":[{"title":"Resetting the WordPress administrator password","href":"/docs/resetting-the-wordpress-administrator-password"},{"title":"Backing up your WordPress site","href":"/docs/backing-up-your-wordpress-site"},{"title":"Resetting a WordPress site","href":"/docs/reset-content-in-wordpress"},{"title":"Installing and configuring the UpdraftPlus plugin","href":"/docs/installing-and-configuring-the-updraftplus-plugin"},{"title":"Creating wordpress admin user in mysql using phpmyadmin","href":"/docs/creating-wordpress-admin-user-in-mysql-using-phpmyadmin"},{"title":"Backing up WordPress using All in One WP Migration plugin","href":"/docs/creating-wordpress-backup-using-all-in-one-wp-migration-plugin"},{"title":"Migrating from wordpress.com to wordpress.org","href":"/docs/migrating-from-wordpress-com-to-wordpress-org"},{"title":"Deleting your WordPress site","href":"/docs/deleting-wordpress"},{"title":"Using a plugin to optimize WordPress database","href":"/docs/optimize-your-database-for-wordpress"},{"title":"Updating WordPress database configuration settings","href":"/docs/updating-wordpress-database-configuration-settings"},{"title":"Optimizing WordPress database","href":"/docs/optimising-wordpress-database"},{"title":"Cleaning a WordPress database with the Advanced Database Cleaner plugin","href":"/docs/cleaning-a-wordpress-database-with-advanced-database-cleaner-plugin"},{"title":"Managing WordPress database using the WP Data Access plugin","href":"/docs/wordpress-database-administration-using-the-wp-data-access-plugin"},{"title":"Deleting unused WordPress tables in MySQL","href":"/docs/deleting-unused-wordpress-plugin-table-in-mysql"}]},{"group":"Users and roles","pages":[{"title":"Changing a WordPress account username","href":"/docs/changing-a-wordpress-account-username"},{"title":"Displaying online users on a WordPress Site","href":"/docs/installing-wp-online-users-stats-plugin"},{"title":"Displaying a gravatar using user email in WordPress posts and pages","href":"/docs/gravatar-hovercards-in-wordpress"},{"title":"Showing registered users on WordPress using PHP","href":"/docs/display-total-number-of-registers-users-on-wordpress-site-using-php"},{"title":"Hiding user profile fields in WordPress","href":"/docs/hiding-user-profile-fields-in-wordpress"},{"title":"Generating user activity history for WordPress using Simple History Plugin","href":"/docs/generating-user-activity-history-for-wordpress"},{"title":"Changing user password in WordPress using Account Management","href":"/docs/change-user-passwords-in-wordpress"},{"title":"Adding a custom form fields for user profiles in WordPress","href":"/docs/custom-field-forms-for-user-profile-in-wordpress"},{"title":"Creating temporary WordPress user logins Using Temporary Login Without Password plugin","href":"/docs/self-expiring-logins-for-wordpress"},{"title":"Adding additional user profile fields in WordPress","href":"/docs/adding-extra-user-profile-fields-in-wordpress"},{"title":"Enabling users to post using the WordPress frontend","href":"/docs/enable-users-to-post-using-the-wordpress-frontend"},{"title":"Using PHP to disable WordPress admin bar for all users","href":"/docs/using-php-to-disable-wordpress-admin-bar-for-all-users"},{"title":"Switching users automatically on WordPress","href":"/docs/user-switching-for-wordpress"},{"title":"Displaying the user count in WordPress","href":"/docs/displaying-the-user-count-in-wordpress"},{"title":"Importing users from a CSV file to WordPress","href":"/docs/import-users-from-csv-file-in-wordpress"},{"title":"Adding a default gravatar on WordPress","href":"/docs/default-gravatar-on-wordpress"},{"title":"Redirecting new users to a default page on WordPress","href":"/docs/redirecting-new-users-to-a-default-page-in-wordpress"},{"title":"Adding custom permissions for WordPress roles","href":"/docs/configuring-custom-permissions-for-wordpress-roles"},{"title":"Extending user login sessions on WordPress","href":"/docs/extending-login-session-on-wordpress-site"}]},{"group":"Plugins","pages":[{"title":"Installing and configuring the 2Checkout plugin for WordPress","href":"/docs/installing-and-configuring-2checkout"},{"title":"Disabling plugins in WordPress","href":"/docs/disabling-plugins-in-wordpress"},{"title":"Installing and configuring a bbPress forum on WordPress","href":"/docs/installing-and-configuring-a-bbpress-forum-on-wordpress"},{"title":"Updating WordPress plugins","href":"/docs/updating-wordpress-plugin"},{"title":"Enabling automatic updates for WordPress plugins","href":"/docs/enabling-automatic-updates-for-wordpress-plugins"},{"title":"Installing and configuring the WooCommerce plugin for WordPress","href":"/docs/installing-and-configuring-woocommerce"},{"title":"Installing BoldGrid Impression plugin for WordPress","href":"/docs/installing-boldgrid-impression-plugin-for-wordpress"},{"title":"Installing and configuring the EWWW Image Optimizer plugin","href":"/docs/installing-and-configuring-the-ewww-image-optimizer-plugin"},{"title":"Installing WP-CLI manually","href":"/docs/installing-wp-cli-manually"},{"title":"Translating a WordPress site with the GTranslate plugin","href":"/docs/translating-a-wordpress-site-with-the-gtranslate-plugin"},{"title":"Disabling WordPress plugin updates using PHP","href":"/docs/disabling-plugin-updates"},{"title":"Installing and configuring WooCommerce Shipping and Tax plugin","href":"/docs/installing-woocommerce-shipping-feature-extension-plugin"},{"title":"Installing the Auto Image Alt Attribute plugin in WordPress","href":"/docs/installing-the-auto-image-alt-attribute-plugin-in-wordpress"},{"title":"Installing and configuring the TinyMCE Advanced editor plugin","href":"/docs/installing-and-configuring-the-tinymce-advanced-editor-plugin"}]},{"group":"Security","pages":[{"title":"Installing the Wordfence Security plugin","href":"/docs/optimizing-the-wordfence-security-plugin"},{"title":"Password-protecting WordPress pages","href":"/docs/password-protected-pages-in-wordpress"},{"title":"Adding CAPTCHA protection to a WordPress site","href":"/docs/adding-captcha-protection-to-a-wordpress-site"},{"title":"Implementing Google Authentication for WordPress","href":"/docs/installing-google-authenticator-for-wordpress"},{"title":"Restricting users from deactivating specific plugins in WordPress","href":"/docs/restricting-users-from-deactivating-specific-plugins-in-wordpress"},{"title":"Adding HTTP security headers in WordPress","href":"/docs/http-security-headers-in-wordpress"},{"title":"Reasons to avoid WordPress nulled themes and plugins","href":"/docs/reasons-to-avoid-wordpress-nulled-themes-and-plugins"},{"title":"Adding user registration verification for WordPress","href":"/docs/user-registration-verification-for-wordpress"},{"title":"Preventing cross-site scripting (XSS) vulnerabilities in WordPress","href":"/docs/prevent-xss-vulnerabilities-in-wordpress"},{"title":"Implementing content copy protection in WordPress","href":"/docs/content-copy-protection-in-wordpress"},{"title":"Configuring password policies in WordPress","href":"/docs/configuring-password-policies-for-wordpress"},{"title":"Disabling WordPress login hints for better security","href":"/docs/disabling-login-error-hints-for-wordpress"},{"title":"Using PHP code to prevent malicious URL requests on a WordPress site","href":"/docs/protecting-wordpress-site-from-malicious-url-requests"},{"title":"Implementing two factor authentication (2FA) in WordPress","href":"/docs/two-factor-authentication-2fa-for-wordpress"},{"title":"Installing the Akismet WordPress plugin","href":"/docs/akismet"},{"title":"Installing and configuring Really Simple SSL WordPress plugin","href":"/docs/really-simple-ssl-wordpress-plugin"},{"title":"Enabling HTTPS and SSL for WordPress sites","href":"/docs/enabling-https-and-ssl-for-wordpress-sites"},{"title":"Limiting login attempts on WordPress using a plugin","href":"/docs/limit-login-attempts-on-wordpress"},{"title":"Configuring WordPress to always use SSL","href":"/docs/configuring-wordpress-to-always-use-ssl"},{"title":"Disabling XML-RPC with the A2 Optimized for WordPress plugin","href":"/docs/disabling-xml-rpc-with-the-a2-optimized-for-wordpress-plugin"},{"title":"Changing WordPress admin login page default URL","href":"/docs/changing-wordpress-admin-login-page-default-url"}]},{"group":"Troubleshooting","pages":[{"title":"Fixing broken image links in WordPress","href":"/docs/broken-image-links-in-wordpress"},{"title":"Debugging WordPress issues","href":"/docs/debugging-wordpress"},{"title":"Troubleshooting blank pages in WordPress","href":"/docs/troubleshooting-blank-pages-in-wordpress"},{"title":"Fixing the 'Scheduled Maintenance' message in WordPress","href":"/docs/scheduled-maintenance-message-in-wordpress"},{"title":"Installing and using the Query Monitor plugin","href":"/docs/installing-and-using-the-query-monitor-plugin"},{"title":"Stopping WordPress plugins disappearing from the admin page","href":"/docs/disappearing-wordpress-plugins"},{"title":"Fixing database table problems in WordPress","href":"/docs/fixing-database-table-problems-in-wordpress"},{"title":"Enabling debugging and error log in WordPress","href":"/docs/enable-debugging-in-wordpress"},{"title":"Performing a site health check for WordPress","href":"/docs/performing-wordpress-site-health-check"},{"title":"Installing and configuring Error Log Monitor plugin for WordPress","href":"/docs/monitor-wordpress-error"},{"title":"Monitoring the MySQL database for WordPress using Query Monitor","href":"/docs/monitor-mysql-database-performance-in-wordpress"},{"title":"Troubleshooting WordPress issues","href":"/docs/troubleshooting-wordpress"},{"title":"Using the Broken Link Checker plugin to check for broken links in WordPress","href":"/docs/broken-link-checker-for-wordpress"}]},{"title":"Install WordPress","href":"/docs/install-wordpress"}]},{"group":"Drupal","pages":[{"title":"Drupal","href":"/docs/drupal"},{"title":"Installing Drush manually","href":"/docs/installing-drush-manually"},{"title":"Managing URL redirects in Drupal","href":"/docs/managing-url-redirections-in-drupal"},{"title":"Changing the absolute path (base URL) in Drupal 8 and 9","href":"/docs/changing-the-absolute-path-base-url-in-drupal-8-and-9"},{"title":"Identifying and avoiding harmful Drupal modules","href":"/docs/identifying-and-avoiding-harmful-drupal-modules"},{"title":"Configuring Drupal to use Redis","href":"/docs/configuring-drupal-to-use-redis"},{"title":"Introduction to Drupal modules","href":"/docs/introduction-to-drupal-modules"},{"title":"Adding CAPTCHA protection to a Drupal site","href":"/docs/adding-captcha-protection-to-a-drupal-site"},{"title":"Using Google Analytics with Drupal","href":"/docs/using-google-analytics-with-drupal"},{"title":"Optimizing Drupal for performance","href":"/docs/optimizing-drupal"},{"title":"Using APC or OPcache with Drupal","href":"/docs/using-apc-or-opcache-with-drupal"},{"title":"Using GTMetrix to improve Drupal performance","href":"/docs/using-gtmetrix-to-improve-drupal-performance"},{"title":"Drupal performance and MySQL transaction isolation levels","href":"/docs/drupal-performance-and-mysql-transaction-isolation-levels"},{"title":"Troubleshooting Drupal issues","href":"/docs/troubleshooting-drupal"},{"title":"Configuring Drush site aliases for Drupal","href":"/docs/configuring-drush-site-aliases-for-drupal"},{"title":"Optimizing Drupal database usage","href":"/docs/optimizing-drupal-database-usage"},{"title":"Resetting the Drupal administrator password","href":"/docs/resetting-the-drupal-administrator-password"},{"title":"Installing Drupal Console","href":"/docs/installing-drupal-console"},{"title":"Using Matomo with Drupal","href":"/docs/using-matomo-with-drupal"},{"title":"Using Drush for your Drupal site","href":"/docs/using-drush-for-drupal"},{"title":"Speeding up slow Drupal administration pages","href":"/docs/slow-administration-pages-in-drupal"},{"title":"Configuring Drupal to use memcached","href":"/docs/configuring-drupal-to-use-memcached"},{"title":"Enabling SSL for Drupal","href":"/docs/enabling-ssl-for-drupal"},{"title":"Configuring the Drupal cron routine","href":"/docs/configuring-the-drupal-cron-routine"},{"title":"Updating Drupal","href":"/docs/updating-drupal"}]},{"group":"PrestaShop","pages":[{"title":"PrestaShop","href":"/docs/prestashop"},{"title":"Resetting the PrestaShop administrator password","href":"/docs/resetting-the-prestashop-administrator-password"},{"title":"Updating PrestaShop","href":"/docs/updating-prestashop"},{"title":"Enabling PrestaShop maintenance mode","href":"/docs/enabling-prestashop-maintenance-mode"},{"title":"Clearing the Smarty cache in PrestaShop","href":"/docs/clearing-the-smarty-cache-in-prestashop"},{"title":"Installing and configuring languages in PrestaShop","href":"/docs/working-with-languages-in-prestashop"},{"title":"Using Google Analytics with PrestaShop","href":"/docs/using-google-analytics-with-prestashop"},{"title":"Using Matomo with PrestaShop","href":"/docs/using-matomo-with-prestashop"},{"title":"Changing the PrestaShop URL settings","href":"/docs/changing-the-prestashop-url-settings"},{"title":"Enabling error reporting in PrestaShop","href":"/docs/enabling-error-reporting-in-prestashop"},{"title":"Identifying and avoiding harmful PrestaShop modules","href":"/docs/identifying-and-avoiding-harmful-prestashop-modules"},{"title":"Troubleshooting blank pages in PrestaShop","href":"/docs/troubleshooting-blank-pages-in-prestashop"},{"title":"Managing multiple shops in PrestaShop","href":"/docs/managing-multiple-shops-in-prestashop"},{"title":"Optimizing PrestaShop performance settings","href":"/docs/optimizing-prestashop-performance-settings"},{"title":"Enabling SSL for PrestaShop","href":"/docs/enabling-ssl-for-prestashop"},{"title":"Adding CAPTCHA protection to a PrestaShop site","href":"/docs/adding-captcha-protection-to-a-prestashop-site"},{"title":"Configuring PrestaShop to use memcached","href":"/docs/configuring-prestashop-to-use-memcached"},{"title":"Configuring PrestaShop to use Redis","href":"/docs/configuring-prestashop-to-use-redis"},{"title":"Using APC or OPcache with PrestaShop","href":"/docs/using-apc-or-opcache-with-prestashop"},{"title":"Using GTMetrix to improve PrestaShop performance","href":"/docs/using-gtmetrix-to-improve-prestashop-performance"}]},{"group":"Magento","pages":[{"title":"Magento","href":"/docs/magento"},{"title":"Using GTMetrix to improve Magento performance","href":"/docs/using-gtmetrix-to-improve-magento-performance"},{"title":"Managing Magento Connect extensions from the command line","href":"/docs/managing-magento-connect-extensions-from-the-command-line"},{"title":"Using Google Analytics with Magento","href":"/docs/using-google-analytics-with-magento"},{"title":"Enabling SSL for Magento","href":"/docs/enabling-ssl-for-magento"},{"title":"Using APC or OPcache with Magento","href":"/docs/using-apc-or-opcache-with-magento"},{"title":"Using the Magento command-line interface (CLI)","href":"/docs/using-the-magento-command-line-interface-cli"},{"title":"Identifying and avoiding harmful Magento extensions","href":"/docs/identifying-and-avoiding-harmful-magento-extensions"},{"title":"Configuring Magento to use Redis","href":"/docs/configuring-magento-to-use-redis"},{"title":"Changing the Magento administrative session timeout interval","href":"/docs/changing-the-magento-administrative-session-timeout-interval"},{"title":"Installing and configuring LiteMage","href":"/docs/installing-and-configuring-litemage"},{"title":"Adding CAPTCHA protection to a Magento site","href":"/docs/adding-captcha-protection-to-a-magento-site"},{"title":"Updating Magento","href":"/docs/updating-magento"},{"title":"Magento error message: ''Your web server is configured incorrectly","href":"/docs/magento-error-message-your-web-server-is-configured-incorrectly"},{"title":"Enabling Magento maintenance mode","href":"/docs/enabling-magento-maintenance-mode"},{"title":"Optimizing Magento for performance","href":"/docs/optimizing-magento"},{"title":"Optimizing Magento log settings","href":"/docs/optimizing-magento-log-settings"},{"title":"Resetting the Magento administrator password","href":"/docs/resetting-the-magento-administrator-password"},{"title":"Managing multiple Magento stores","href":"/docs/managing-multiple-stores-in-magento"},{"title":"Configuring Magento to use memcached","href":"/docs/configuring-magento-to-use-memcached"},{"title":"Using Elasticsearch with Magento","href":"/docs/using-elasticsearch-with-magento"},{"title":"Cron jobs do not run on Magento 1.8 after upgrade","href":"/docs/cron-jobs-do-not-run-on-magento-18-after-upgrade"},{"title":"Setting up Magento cron jobs on managed hosting","href":"/docs/optimizing-magento-cron-jobs-on-shared-hosting-accounts"}]},{"group":"Joomla","pages":[{"title":"Joomla","href":"/docs/joomla"},{"title":"Changing database settings in Joomla","href":"/docs/change-database-settings-in-joomla"},{"title":"Updating Joomla","href":"/docs/updating-joomla"},{"title":"Configuring Joomla to use Redis","href":"/docs/configuring-joomla-to-use-redis"},{"title":"Configuring Joomla to use memcached","href":"/docs/configuring-joomla-to-use-memcached"},{"title":"Changing the website URL in Joomla","href":"/docs/changing-the-website-url-in-joomla"},{"title":"Enabling SSL for Joomla","href":"/docs/enabling-ssl-for-joomla"},{"title":"Creating content directory in Joomla using SobiPro","href":"/docs/create-a-content-directory-in-joomla"},{"title":"Adding a heading menu item in Joomla","href":"/docs/menu-item-heading-in-joomla"},{"title":"Administering Joomla from the command line","href":"/docs/administering-joomla-from-the-command-line"},{"title":"Limiting active logins for a user account in Joomla","href":"/docs/limit-active-logins-in-joomla"},{"title":"Using Matomo with Joomla","href":"/docs/using-matomo-with-joomla"},{"title":"Optimizing Joomla for performance","href":"/docs/optimizing-joomla"},{"title":"Viewing PHP error log in Joomla","href":"/docs/view-php-error-log-in-joomla"},{"title":"Adding an article slider in Joomla","href":"/docs/article-slider-in-joomla"},{"title":"Using APC or OPcache with Joomla","href":"/docs/using-apc-or-opcache-with-joomla"},{"title":"Creating control panel icons on Joomla administration dashboard","href":"/docs/quick-access-icons-in-joomla-dashboard"},{"title":"Using GTMetrix to improve Joomla performance","href":"/docs/using-gtmetrix-to-improve-joomla-performance"},{"title":"Disabling plugins in Joomla","href":"/docs/disabling-plugins-in-joomla"},{"title":"Changing the Joomla database password","href":"/docs/changing-joomla-database-password"},{"title":"Troubleshooting database connection errors in Joomla 3.0","href":"/docs/troubleshooting-database-connection-errors-in-joomla-30"},{"title":"Configuring Joomla Search Options","href":"/docs/configure-the-search-options-in-joomla"},{"title":"Installing Google Structured Data to Improve SEO for Joomla sites","href":"/docs/google-structured-data-for-joomla"},{"title":"Using Google Analytics with Joomla","href":"/docs/using-google-analytics-with-joomla"},{"title":"Displaying and downloading log files in Joomla","href":"/docs/display-log-files-in-joomla"},{"title":"Identifying and avoiding harmful Joomla extensions","href":"/docs/identifying-and-avoiding-harmful-joomla-extensions"},{"title":"Resetting the Joomla administrator password","href":"/docs/resetting-the-joomla-administrator-password"},{"title":"Adding CAPTCHA protection to a Joomla site","href":"/docs/adding-captcha-protection-to-a-joomla-site"},{"title":"Adding keyboard shortcuts to Joomla","href":"/docs/keyboard-shortcuts-in-joomla"},{"title":"Configuring Joomla slideshows using the Beautiful Slideshow extension","href":"/docs/installing-joomla-slideshow-extension"},{"title":"Changing control panel template in Joomla","href":"/docs/changing-the-control-panel-template-in-joomla"}]},{"group":"OpenCart","pages":[{"title":"OpenCart","href":"/docs/opencart"},{"title":"Disabling product reviews in OpenCart","href":"/docs/disable-product-reviews-in-opencart"},{"title":"Filtering products by price in OpenCart","href":"/docs/filtering-products-by-price-in-opencart"},{"title":"Setting file download permission for user groups in OpenCart","href":"/docs/file-download-permissions-for-user-groups-in-opencart"},{"title":"Adding Privacy Policy in OpenCart","href":"/docs/adding-privacy-policy-in-opencart"},{"title":"Adding CAPTCHA protection to an OpenCart site","href":"/docs/adding-captcha-protection-to-an-opencart-site"},{"title":"Changing OpenCart administration dashboard language","href":"/docs/setting-the-opencarts-administration-dashboard-language"},{"title":"Using Google Analytics with OpenCart","href":"/docs/using-google-analytics-with-opencart"},{"title":"Cancelling orders in OpenCart","href":"/docs/cancel-orders-in-opencart"},{"title":"Adding a language pack in OpenCart","href":"/docs/adding-a-language-pack-in-opencart"},{"title":"Generating invoices in OpenCart","href":"/docs/generating-invoices-in-opencart"},{"title":"Adding custom fields in OpenCart registration form","href":"/docs/adding-custom-fields-in-opencart-registration-forms"},{"title":"Restricting product pricing to logged-in customers in OpenCart","href":"/docs/setting-up-price-visibility-in-opencart"},{"title":"Optimizing OpenCart","href":"/docs/optimizing-opencart"},{"title":"Setting custom timezone in OpenCart","href":"/docs/setting-a-custom-timezone-in-opencart"},{"title":"Managing return reasons in OpenCart","href":"/docs/manage-return-reasons-in-opencart"},{"title":"Displaying store hours in OpenCart","href":"/docs/display-store-hours-in-opencart"},{"title":"Adding calls to action on mobile display in OpenCart","href":"/docs/adding-call-to-action-to-opencart-mobile-display"},{"title":"Installing an OpenCart theme","href":"/docs/installing-an-opencart-theme"},{"title":"Sending marketing emails in OpenCart","href":"/docs/configuring-marketing-emails-in-opencart"}]}]},{"group":"Unmanaged cloud servers","pages":[{"title":"Managed vs. Unmanaged VPS","href":"/docs/managed-vs-unmanaged-vps"},{"group":"Server security","pages":[{"title":"Securing an unmanaged server","href":"/docs/securing-an-unmanaged-server"},{"title":"Installing server updates","href":"/docs/installing-updates-on-your-server"},{"title":"Hardening a server with fail2ban","href":"/docs/hardening-a-server-with-fail2ban"},{"title":"KernelCare security extension","href":"/docs/kernelcare"},{"title":"How to reset the root password for your Self-Managed server","href":"/docs/how-to-reset-the-root-password-for-your-self-managed-server"}]}]},{"group":"Resellers","pages":[{"group":"WHM","pages":[{"title":"Accessing WebHost Manager","href":"/docs/accessing-webhost-manager"},{"group":"Packages and accounts","pages":[{"title":"WebHost Manager packages and accounts","href":"/docs/whm-packages-and-accounts"},{"title":"Managing web hosting accounts with WHM","href":"/docs/managing-whm-accounts"},{"title":"Managing WebHost Manager packages","href":"/docs/managing-whm-packages"},{"title":"Using skeleton files for customer account default content","href":"/docs/using-skeleton-files-to-provide-default-content-for-customer-accounts"},{"title":"Migrating an addon domain to its own cPanel account","href":"/docs/migrating-an-addon-domain-to-its-own-cpanel-account"},{"title":"Managing account passwords in WHM","href":"/docs/password-management"},{"title":"Connecting WHM to WHMCS","href":"/docs/connecting-whm-to-whmcs"},{"title":"Suspending and unsuspending accounts in WHM","href":"/docs/account-suspension"},{"title":"Using a subdomain as an account's primary domain","href":"/docs/using-a-subdomain-as-an-accounts-primary-domain"}]},{"group":"Branding and customization","pages":[{"title":"Site branding and configuration","href":"/docs/using-webhost-manager-for-site-branding-and-configuration"},{"title":"Branding and customizing customer accounts in WHM","href":"/docs/branding-customer-cpanel-accounts-in-whm"},{"title":"Configuring customer support requests in WHM","href":"/docs/configuring-customer-support-requests-in-whm"},{"title":"Using the WHM Feature Manager","href":"/docs/using-the-whm-feature-manager"}]},{"group":"Security","pages":[{"title":"Managing and securing the CSF firewall","href":"/docs/managing-the-csf-firewall"},{"title":"Managing two-factor authentication for resellers in WHM","href":"/docs/two-factor-authentication-for-resellers-in-whm"},{"title":"Resetting the MySQL root password in WebHost Manager (WHM)","href":"/docs/resetting-the-mysql-root-password-in-whm"}]},{"group":"Monitoring and backups","pages":[{"title":"Reviewing a reseller's total resource usage","href":"/docs/how-to-review-a-resellers-total-resource-usage"},{"title":"Managing bandwidth and disk usage with WHM","href":"/docs/managing-account-bandwidth-and-disk-usage"},{"title":"Backing up and restoring data with WebHost Manager","href":"/docs/backing-up-and-restoring-data-with-webhost-manager"}]}]},{"group":"Enhance","pages":[{"title":"From cPanel to Enhance. Everything you need to know.","href":"/docs/from-cpanel-to-enhance-everything-you-need-to-know"},{"title":"Enhance Reseller Hosting — Frequently Asked Questions","href":"/docs/enhance-reseller-hosting-frequently-asked-questions"},{"title":"Adding a new customer to your Enhance Resellers account","href":"/docs/adding-a-new-customer-to-your-enhance-resellers-account"},{"title":"Managing your website, databases, and backups in Enhance","href":"/docs/managing-your-website-in-the-enhance-control-panel"},{"title":"Using the file manager in Enhance","href":"/docs/managing-your-website-files-in-the-enhance-control-panel"},{"title":"Managing your MySQL databases in Enhance","href":"/docs/managing-your-mysql-databases-in-the-enhance-control-panel"},{"title":"Managing your email in Enhance","href":"/docs/managing-your-email-in-the-enhance-control-panel"},{"title":"Managing your WordPress site in Enhance","href":"/docs/managing-your-wordpress-site-in-the-enhance-control-panel"},{"title":"Installing an SSL certificate in Enhance","href":"/docs/installing-an-ssl-certificate-in-the-enhance-control-panel"},{"title":"How to Deploy a Node.js Application on Enhance","href":"/docs/how-to-deploy-a-nodejs-application-on-enhance"},{"title":"Creating Unlimited Websites on Your Enhance Reseller Plan","href":"/docs/creating-unlimited-websites-on-your-enhance-reseller-plan"},{"title":"Importing and Restoring a cPanel Account into Enhance","href":"/docs/importing-and-restoring-a-cpanel-account-into-enhance"}]},{"group":"Billing software (WHMCS and Blesta)","pages":[{"title":"WHMCS hosting","href":"/docs/whmcs-hosting"},{"title":"Ordering a WHMCS license","href":"/docs/ordering-a-whmcs-license"},{"title":"Ordering a Blesta license","href":"/docs/ordering-a-blesta-license"},{"title":"Configuring OpenSRS access for WHMCS","href":"/docs/configuring-opensrs-access-for-whmcs"},{"title":"Resetting the administrator password in WHMCS","href":"/docs/resetting-the-administrator-password-in-whmcs"},{"title":"Removing a banned IP address in WHMCS","href":"/docs/removing-a-banned-ip-address-in-whmcs"}]},{"title":"AI Tutorial for Resellers","href":"/docs/ai-tutorial-for-resellers"}]},{"group":"Developers","pages":[{"group":"API and MCP","pages":[{"title":"The hosting.com API and MCP server","sidebarTitle":"API and MCP overview","href":"/docs/hosting-api-and-mcp"},{"title":"Connecting Claude and other AI assistants to your account","sidebarTitle":"Connecting AI assistants","href":"/docs/connecting-ai-assistants-to-your-hosting-account"},{"title":"Signing in to the API","sidebarTitle":"Signing in to the API","href":"/docs/signing-in-to-the-api"}]},{"group":"Publish your website","pages":[{"title":"Publishing your web site","href":"/docs/publishing-your-web-site"},{"title":"Publishing your web site with RapidWeaver","href":"/docs/publishing-your-web-site-with-rapidweaver"},{"title":"Publishing your web site with Freeway","href":"/docs/publishing-your-web-site-with-freeway"},{"title":"Publishing your web site with Dreamweaver","href":"/docs/publishing-your-web-site-with-dreamweaver"},{"title":"Publishing your web site with 90 Second Website Builder","href":"/docs/publishing-your-web-site-with-90-second-website-builder"},{"title":"Publishing your web site with HTML-Kit","href":"/docs/publishing-your-web-site-with-html-kit"},{"title":"Publishing your web site with NetObjects Fusion","href":"/docs/publishing-your-web-site-with-netobjects-fusion"},{"title":"Publishing your web site with PageBreeze","href":"/docs/publishing-your-web-site-with-pagebreeze"},{"title":"Publishing your web site with Web Easy Professional","href":"/docs/publishing-your-web-site-with-web-easy-professional"},{"title":"Publishing your web pages with Google Web Designer","href":"/docs/publishing-your-web-pages-with-google-web-designer"},{"title":"Publishing your web site with Sandvox","href":"/docs/publishing-your-web-site-with-sandvox"},{"title":"Publishing your website with WebSite X5","href":"/docs/publishing-your-website-with-websitex5"},{"title":"Publishing your web site with Muse","href":"/docs/publishing-your-web-site-with-muse"},{"title":"Publishing your web site with iWeb","href":"/docs/publishing-your-web-site-with-iweb"},{"title":"Publishing your web site with Web Architect","href":"/docs/publishing-your-web-site-with-web-architect"},{"title":"Publishing your web site with Microsoft FrontPage","href":"/docs/publishing-your-web-site-with-microsoft-frontpage"},{"title":"Publishing and editing files with UltraEdit","href":"/docs/publishing-and-editing-files-with-ultraedit"},{"title":"Publishing and editing files with Sublime Text","href":"/docs/publishing-and-editing-files-with-sublime-text"},{"title":"Publishing your web site with Seamonkey","href":"/docs/publishing-your-web-site-with-seamonkey"}]},{"group":"Internet and networking","pages":[{"title":"Internet and networking","href":"/docs/internet-and-networking"},{"title":"Google Chrome error message: \"ERR_QUIC_PROTOCOL_ERROR","href":"/docs/google-chrome-error-message-err-quic-protocol-error"},{"title":"Why does my IP address show inaccurate geolocation?","href":"/docs/off-shore-ip-addresses"},{"title":"Troubleshooting network connectivity using ping and traceroute","href":"/docs/troubleshooting-network-connectivity-with-ping-and-traceroute"},{"title":"Clearing a web browser's cache and cookies","href":"/docs/clearing-a-web-browsers-cache-and-cookies"},{"title":"Setting up a Wi-Fi hotspot on your mobile device","href":"/docs/setting-up-a-wi-fi-hotspot-on-your-mobile-device"},{"title":"Troubleshooting and fixing network issues","href":"/docs/introduction-to-network-troubleshooting"},{"title":"Troubleshooting nameserver errors","href":"/docs/troubleshooting-nameserver-errors"},{"title":"Clearing the SSL state in a browser","href":"/docs/clearing-a-web-browsers-ssl-state"},{"title":"Making web pages display correctly on mobile devices","href":"/docs/web-pages-display-incorrectly-on-mobile-devices"},{"title":"Troubleshooting network applications with PowerShell and tnc","href":"/docs/troubleshooting-network-applications-with-powershell-and-tnc"},{"title":"Troubleshooting DNS with dig and nslookup","href":"/docs/troubleshooting-dns-with-dig-and-nslookup"},{"title":"Checking your website for broken links","href":"/docs/checking-your-website-for-broken-links"},{"title":"Troubleshooting network applications with curl","href":"/docs/troubleshooting-network-applications-with-curl"},{"title":"Troubleshooting network applications with telnet","href":"/docs/troubleshooting-network-applications-with-telnet"},{"title":"Troubleshoot SSL connections with the openssl program","href":"/docs/troubleshooting-ssl-connections-with-the-openssl-program"},{"title":"Reducing backscatter and spam","href":"/docs/backscatter-and-spam"},{"title":"Clearing the DNS cache on your computer","href":"/docs/clearing-the-dns-cache-on-your-computer"},{"title":"Changing your DNS provider to reduce DNS propagation delays","href":"/docs/changing-your-dns-provider-to-avoid-dns-propagation-delays"},{"title":"How to Generate and Share an MTR Report","href":"/docs/how-to-generate-and-share-an-mtr-report"},{"title":"Editing the hosts file on Windows, macOS, and Linux","href":"/docs/editing-the-hosts-file-on-windows-macos-linux"},{"title":"Configuring and using WebSocket connections","href":"/docs/configuring-and-using-websocket-connections"}]},{"group":"MySQL","pages":[{"title":"MySQL","href":"/docs/mysql"},{"title":"Connecting to MySQL from the command line","href":"/docs/connect-to-mysql-from-the-command-line"},{"title":"Connecting to MySQL using PHP","href":"/docs/connect-to-mysql-using-php"},{"title":"Connecting to MySQL using Python","href":"/docs/connecting-to-mysql-using-python"},{"title":"Connecting to MySQL using Node.js","href":"/docs/connecting-to-mysql-using-node-js"},{"title":"Connecting to MySQL using Microsoft .NET","href":"/docs/connecting-to-mysql-using-microsoft-net"},{"title":"Connecting to MySQL using Perl","href":"/docs/connect-to-mysql-using-perl"},{"title":"Renaming a MySQL database","href":"/docs/renaming-a-mysql-database"},{"title":"Backing up MySQL databases using AutoMySQLBackup","href":"/docs/mysql-database-backups-using-automysqlbackup"},{"title":"Installing phpMyAdmin on managed hosting accounts","href":"/docs/installing-phpmyadmin-on-managed-hosting-accounts"},{"title":"MySQL user privileges on shared servers","href":"/docs/mysql-user-privileges-on-shared-servers"},{"title":"Enabling the slow query log in MySQL","href":"/docs/enabling-the-slow-query-log-in-mysql"},{"title":"Determining the size of MySQL databases and tables","href":"/docs/determining-the-size-of-mysql-databases-and-tables"},{"title":"Creating and running MySQL stored functions and procedures","href":"/docs/mysql-stored-functions-and-procedures"},{"title":"Determining the MySQL version","href":"/docs/determining-the-mysql-version"},{"title":"Repairing MySQL databases and tables","href":"/docs/repairing-mysql-databases-and-tables"},{"title":"Setting up a remote MySQL connection","href":"/docs/remote-mysql-connections"},{"title":"Managing MySQL databases, users, and tables from the command line","href":"/docs/managing-mysql-databases-and-users-from-the-command-line"},{"title":"Using MySQL client applications","href":"/docs/mysql-client-applications"},{"title":"Understanding MySQL Error 1064","href":"/docs/handling-mysql-error-1064"},{"title":"Using SELECT INTO OUTFILE in MySQL","href":"/docs/using-select-into-outfile-in-mysql"},{"title":"Creating a MySQL installation for local testing","href":"/docs/creating-a-mysql-installation-for-local-testing"},{"title":"Converting the MySQL time zone","href":"/docs/convert-the-mysql-time-zone"},{"title":"MySQL server runs out of memory or does not start","href":"/docs/mysql-runs-out-of-memory-or-does-not-start"},{"title":"Converting a MySQL database to UTF-8","href":"/docs/convert-mysql-database-utf-8"},{"title":"Using indexes to improve MySQL query performance","href":"/docs/using-indexes-to-improve-mysql-query-performance"},{"title":"Resetting the MySQL root password","href":"/docs/reset-mysql-root-password"},{"title":"Working with MySQL database engines","href":"/docs/working-with-mysql-database-engines"},{"title":"Using MySQL triggers","href":"/docs/mysql-triggers"},{"title":"Restricting MySQL port access","href":"/docs/restricting-mysql-port-access"},{"title":"The information_schema database in MySQL","href":"/docs/the-information-schema-database"},{"title":"Importing and exporting a MySQL database","href":"/docs/import-and-export-a-mysql-database"},{"title":"Backing up MySQL databases using cron jobs","href":"/docs/mysql-database-backups-using-cron-jobs"},{"title":"Troubleshooting MySQL definer issues","href":"/docs/troubleshooting-mysql-definer-issues"},{"title":"Using MySQL views","href":"/docs/mysql-views"},{"title":"Importing large amounts of CSV data into a web application","href":"/docs/importing-large-amounts-of-csv-data"}]},{"group":"PostgreSQL","pages":[{"title":"PostgreSQL","href":"/docs/postgresql"},{"title":"Connecting to PostgreSQL using the command line","href":"/docs/connect-to-postgresql-from-the-command-line"},{"title":"Connecting to PostgreSQL using PHP","href":"/docs/connect-to-postgresql-using-php"},{"title":"Connecting to PostgreSQL using Python","href":"/docs/connecting-to-postgresql-using-python"},{"title":"Connecting to PostgreSQL using Perl","href":"/docs/connect-to-postgresql-using-perl"},{"title":"Connecting to PostgreSQL using Node.js","href":"/docs/connecting-to-postgresql-using-node-js"},{"title":"Importing and exporting PostgreSQL databases","href":"/docs/import-and-export-a-postgresql-database"},{"title":"ECCN and HTS numbers for PostgreSQL","href":"/docs/eccn-and-hts-numbers-for-postgresql"},{"title":"Renaming a PostgreSQL database","href":"/docs/renaming-a-postgresql-database"},{"title":"Determining the PostgreSQL and PostGIS versions","href":"/docs/determining-the-postgresql-and-postgis-versions"},{"title":"Determining the size of PostgreSQL databases and tables","href":"/docs/determining-the-size-of-postgresql-databases-and-tables"},{"title":"Managing PostgreSQL databases and users from the command line","href":"/docs/managing-postgresql-databases-and-users-from-the-command-line"},{"title":"Setting up a remote PostgreSQL connection","href":"/docs/remote-postgresql-connections"},{"title":"Postgresql database backups using cron jobs","href":"/docs/postgresql-database-backups-using-cron-jobs"},{"title":"Using PostgreSQL client applications","href":"/docs/postgresql-client-applications"}]},{"group":"SQLite","pages":[{"title":"SQLite","href":"/docs/sqlite"},{"title":"Connecting to SQLite from the command line","href":"/docs/connect-to-sqlite-from-the-command-line"},{"title":"Connecting to SQLite using Python","href":"/docs/connecting-to-sqlite-using-python"},{"title":"Connecting to SQLite using PHP","href":"/docs/connect-to-sqlite-using-php"},{"title":"Connecting to SQLite using Node.js","href":"/docs/connecting-to-sqlite-using-node-js"}]},{"group":"Apache web server","pages":[{"title":"Apache web server","href":"/docs/apache-web-server"},{"title":"Using .htaccess files","href":"/docs/using-htaccess-files"},{"title":"Enabling data compression using the mod_deflate module","href":"/docs/data-compression-using-the-mod-deflate-module"},{"title":"Disabling entity tags (ETags)","href":"/docs/disabling-entity-tags-etags"},{"title":"Installing Apache Tomcat","href":"/docs/installing-apache-tomcat"},{"title":"Viewing the Apache access log and error log","href":"/docs/viewing-apache-log-files"},{"title":"Using Server-Side Includes (SSI)","href":"/docs/using-server-side-includes-ssi"},{"title":"Turning off caching using .htaccess","href":"/docs/turning-off-caching-using-htaccess"},{"title":"Using the mod_speling Apache module","href":"/docs/using-the-mod-speling-apache-module"},{"title":"Controlling site access based on a visitor's country","href":"/docs/controlling-site-access-by-country"},{"title":"Enabling and disabling directory index listings via .htaccess","href":"/docs/directory-index-listings"},{"title":"About the '403 Forbidden' error message","href":"/docs/403-forbidden-error-message"},{"title":"Adding or removing the www prefix in domain URLs","href":"/docs/adding-or-removing-the-www-prefix-in-domain-urls"},{"title":"Using keep-alive connections to improve performance","href":"/docs/using-keep-alive-connections-to-improve-performance"},{"title":"Configuring caching with the mod_expires module","href":"/docs/configuring-caching-with-the-mod-expires-module"},{"title":"Changing the default directory index via .htaccess","href":"/docs/default-directory-index-page"},{"title":"Changing the document root directory","href":"/docs/changing-the-document-root-directory"},{"title":"Rewriting URLs with the mod_rewrite module","href":"/docs/rewriting-urls-with-the-mod-rewrite-module"},{"title":"Protecting website folders using .htaccess","href":"/docs/code-to-protect-web-directories-in-htaccess"},{"title":"Modifying HTTP headers using .htaccess files","href":"/docs/modifying-http-headers"},{"title":"Pathname information and the AcceptPathInfo directive","href":"/docs/pathname-information-and-acceptpathinfo-directive"},{"title":"Troubleshooting CGI scripts","href":"/docs/troubleshooting-cgi-scripts"}]},{"group":"NGINX web server","pages":[{"title":"Nginx web server","href":"/docs/nginx-web-server"},{"title":"Installing the Nginx web server","href":"/docs/installing-the-nginx-web-server"}]},{"group":"Linux","pages":[{"title":"Linux","href":"/docs/linux"},{"title":"Changing the time zone in the Linux shell","href":"/docs/changing-the-time-zone-in-the-linux-shell"},{"title":"Managing the inode count","href":"/docs/inode-count"},{"title":"Generating and verifying file checksums on Linux","href":"/docs/working-with-file-checksums"},{"title":"Installing and configuring UFW (Uncomplicated Firewall)","href":"/docs/installing-and-configuring-ufw-uncomplicated-firewall"},{"title":"Installing and configuring Advanced Policy Firewall","href":"/docs/installing-and-configuring-advanced-policy-firewall"},{"title":"Using cURL","href":"/docs/using-curl"},{"title":"Cron jobs reset to 15-minute intervals","href":"/docs/cron-jobs-reset-to-15-minute-intervals"},{"title":"Using rsync","href":"/docs/using-rsync"},{"title":"Installing the EPEL repository on AlmaLinux","href":"/docs/installing-the-epel-repository-on-almalinux"},{"title":"Determining a server's memory usage","href":"/docs/determining-a-servers-memory-usage"},{"title":"Running a cron job after a server reboot","href":"/docs/running-a-cron-job-after-a-server-reboot"},{"title":"Determining high disk usage locations","href":"/docs/determining-high-disk-usage-locations"},{"title":"Configuring a firewall using iptables","href":"/docs/configuring-a-firewall-using-iptables"},{"title":"Monitoring resource usage","href":"/docs/monitoring-resource-usage"},{"title":"Using the shebang","href":"/docs/using-the-shebang"},{"title":"Disabling e-mail notifications from cron jobs","href":"/docs/disabling-e-mail-notifications-from-cron-jobs"},{"title":"Using the screen program","href":"/docs/using-screen"},{"title":"Understanding system load averages","href":"/docs/understanding-system-load-averages"},{"title":"Conntrack sessions","href":"/docs/conntrack-sessions"},{"title":"Using ImageMagick","href":"/docs/using-imagemagick"},{"title":"Setting the default text editor in Linux","href":"/docs/setting-the-default-text-editor-in-linux"},{"title":"Is Your Hosting Account Full? A Simple Guide to Disk Space and File Limits","href":"/docs/is-your-hosting-account-full-a-simple-guide-to-disk-space-and-file-limits"}]},{"group":"PHP","pages":[{"title":"PHP","href":"/docs/php"},{"title":"What is PHP?","href":"/docs/what-is-php"},{"title":"PHP script basics","href":"/docs/php-script-basics"},{"title":"Viewing PHP settings with the phpinfo() function","href":"/docs/view-php-settings"},{"title":"Using PHP sessions","href":"/docs/using-php-sessions"},{"title":"Using a custom php.ini file for cPanel cron jobs","href":"/docs/using-a-custom-php-ini-file-for-cpanel-cron-jobs"},{"title":"Using the Mailchimp API with PHP","href":"/docs/using-the-mailchimp-api-with-php"},{"title":"Hardening PHP 7 and below using cPanel","href":"/docs/hardening-php-7-and-earlier-versions"},{"title":"Specifying the MySQL character set in PHP","href":"/docs/specifying-the-mysql-character-set-in-php"},{"title":"Enabling PHP opcode caching","href":"/docs/enabling-php-opcode-caching"},{"title":"Determining if a PHP function is available","href":"/docs/determine-if-a-php-function-is-available"},{"title":"Resolving common PHP upgrade issues","href":"/docs/common-issues-after-php-upgrade"},{"title":"Fixing the \"String could not be parsed as XML\" PHP error message","href":"/docs/string-could-not-be-parsed-as-xml-error-message-in-php"},{"title":"Setting the PHP include path","href":"/docs/php-include-paths"},{"title":"Using the Exif extension in PHP","href":"/docs/using-the-exif-extension-in-php"},{"title":"Custom PHP settings per directory with .user.ini files","href":"/docs/custom-php-settings-per-directory-with-user-ini-files"},{"title":"Installing composer","href":"/docs/installing-composer"},{"title":"Using the ionCube PHP Loader","href":"/docs/ioncube-php-loader-support"},{"title":"Using the internationalization (intl) extension in PHP","href":"/docs/using-the-internationalization-extension-in-php"},{"title":"Determining if APC is installed on a server","href":"/docs/determining-if-apc-is-installed-on-a-server"},{"title":"Fixing the '500 Internal Server Error' message while running PHP","href":"/docs/500-internal-server-error-while-running-php"},{"title":"Optimizing Symfony using APC","href":"/docs/optimizing-symfony-using-apc"},{"title":"Running PHP scripts from cron jobs","href":"/docs/run-php-scripts-from-cron-jobs"},{"title":"Changing the PHP version for a specific directory","href":"/docs/changing-the-php-version-for-a-specific-directory"},{"title":"ionCube PHP Loader unavailable on PHP 8.0","href":"/docs/ioncube-php-loader-unavailable-on-php-8"},{"title":"Resolving the 'Allowed memory size exhausted' PHP error message","href":"/docs/allowed-memory-size-exhausted-error-message-in-php"},{"title":"Sending e-mail messages using PHP","href":"/docs/using-php-to-send-e-mail-messages"},{"title":"Sending e-mail using PHPMailer","href":"/docs/sending-e-mail-with-phpmailer"},{"title":"Changing managed hosting PHP settings and versions","href":"/docs/changing-php-settings-and-versions"},{"title":"Installing and configuring PEAR packages","href":"/docs/pear-packages"},{"title":"Fixing the 'Unable to allocate memory for pool' PHP error message","href":"/docs/unable-to-allocate-memory-for-pool-error-message-in-php"},{"title":"Using the ionCube Loader with different PHP versions","href":"/docs/using-ioncube-loader-with-different-php-versions"},{"title":"Custom php.ini files","href":"/docs/custom-php-ini-files"},{"group":"php.ini directives","pages":[{"title":"Using php.ini directives","href":"/docs/using-php-ini-directives"},{"title":"Changing the max_input_vars directive in PHP scripts","href":"/docs/php-max-input-vars-directive"},{"title":"Enabling PHP error logging","href":"/docs/php-error-log"},{"title":"Disabling functions using the PHP disable_functions directive","href":"/docs/php-disable_functions-directive"},{"title":"Managing PHP error messages with the display_errors directive","href":"/docs/php-error-messages"},{"title":"Enabling and disabling the PHP output_buffering directive","href":"/docs/php-output_buffering-directive"},{"title":"Changing the PHP time zone setting","href":"/docs/php-time-zones"},{"title":"Changing the PHP max_execution_time directive","href":"/docs/php-maximum-execution-time"},{"title":"Setting the PHP maximum upload file size","href":"/docs/php-maximum-upload-file-size"},{"title":"Enabling and disabling the PHP register_globals directive","href":"/docs/php-register-globals-directive"},{"title":"Enabling and disabling the expose_php directive","href":"/docs/php-expose-php-directive"},{"title":"Enabling and disabling the PHP allow_url_fopen directive","href":"/docs/php-allow-url-fopen-directive"},{"title":"Changing the PHP memory limit for scripts","href":"/docs/php-script-memory-limit"},{"title":"Enabling and disabling the PHP magic quotes directive","href":"/docs/php-magic-quotes-directive"}]},{"title":"Setting up custom .htaccess files for PHP settings","href":"/docs/custom-htaccess-files-for-php-settings"},{"group":"PHP directives in .htaccess files","pages":[{"title":"Using PHP directives in custom .htaccess files","href":"/docs/using-php-directives-in-custom-htaccess-files"},{"title":"Setting the PHP script memory limit in an .htaccess file","href":"/docs/setting-the-php-script-memory-limit-in-an-htaccess-file"},{"title":"Setting the max_input_vars directive in .htaccess","href":"/docs/setting-the-max-input-vars-directive-in-an-htaccess-file"},{"title":"Setting the PHP maximum upload file size in an .htaccess file","href":"/docs/setting-the-php-maximum-upload-file-size-in-an-htaccess-file"},{"title":"Setting the output_buffering directive in an .htaccess file","href":"/docs/setting-the-output_buffering-directive-in-an-htaccess-file"},{"title":"Setting the PHP maximum execution time in .htaccess","href":"/docs/setting-the-php-maximum-execution-time-in-an-htaccess-file"},{"title":"Enabling and disabling PHP error logging using an .htaccess file","href":"/docs/php-error-log-settings-in-an-htaccess-file"},{"title":"Setting the PHP register_globals directive in an .htaccess file","href":"/docs/setting-the-register-globals-directive-in-an-htaccess-file"},{"title":"Setting the PHP time zone in an .htaccess file","href":"/docs/setting-the-php-time-zone-in-an-htaccess-file"},{"title":"Setting the PHP magic quotes directive in an .htaccess file","href":"/docs/setting-the-magic-quotes-directive-in-an-htaccess-file"},{"title":"Enabling and disabling PHP error messages in .htaccess","href":"/docs/php-error-message-settings-in-an-htaccess-file"},{"title":"Setting the allow_url_fopen PHP directive","href":"/docs/setting-the-allow-url-fopen-php-directive"}]}]},{"group":"Python","pages":[{"title":"Python","href":"/docs/python"},{"title":"Python script basics","href":"/docs/python-script-basics"},{"title":"Installing FastAPI on unmanaged servers","href":"/docs/installing-fastapi-on-unmanaged-servers"},{"title":"Using virtualenv and pip","href":"/docs/using-virtualenv-and-pip"},{"title":"Installing and configuring Flask on a Linux shared hosting account","href":"/docs/installing-and-configuring-flask-on-linux-shared-hosting"},{"title":"Sending e-mail messages with Python","href":"/docs/using-python-to-send-e-mail-messages"},{"title":"Installing and configuring Django on unmanaged servers","href":"/docs/installing-and-configuring-django-on-unmanaged-servers"},{"title":"Installing and configuring Django on Linux shared hosting","href":"/docs/installing-and-configuring-django-on-linux-shared-hosting"},{"title":"Activating a Python virtual environment from a script file","href":"/docs/activating-a-python-virtual-environment-from-a-script-file"},{"title":"Configuring and using a newer version of Python","href":"/docs/using-a-newer-version-of-python"}]},{"group":"Perl","pages":[{"title":"Perl","href":"/docs/perl"},{"title":"Perl script basics","href":"/docs/perl-script-basics"},{"title":"Troubleshooting Perl scripts","href":"/docs/troubleshooting-perl-scripts"}]},{"group":"Ruby","pages":[{"title":"Ruby","href":"/docs/ruby"},{"title":"Setting up multiple versions of Ruby with the cPanel Ruby Selector","href":"/docs/setting-up-multiple-versions-of-ruby"},{"title":"Using the Interactive Ruby Shell to troubleshoot gems","href":"/docs/using-the-interactive-ruby-shell-to-troubleshoot-gems"},{"title":"Installing Ruby Gems","href":"/docs/ruby-gems"},{"title":"Configuring a Ruby on Rails application on a shared hosting account","href":"/docs/configuring-a-ruby-on-rails-application-on-a-shared-hosting-account"}]},{"group":"Version control","pages":[{"title":"Version control systems","href":"/docs/version-control-systems"},{"title":"Using Git","href":"/docs/using-git"},{"title":"Configuring a Git client","href":"/docs/configuring-a-git-client"},{"title":"Using a newer version of Git","href":"/docs/using-a-newer-version-of-git"},{"title":"403 Forbidden'' error message when pushing to a GitHub repository","href":"/docs/403-forbidden-error-message-when-you-try-to-push-to-a-github-repository"},{"title":"Using the Subversion (SVN) client","sidebarTitle":"Subversion (SVN)","href":"/docs/configuring-subversion"},{"title":"Giving several people access to a Subversion repository","sidebarTitle":"SVN access for several users","href":"/docs/setting-up-subversion-access-for-multiple-users"},{"title":"Using the Mercurial version control system","href":"/docs/using-mercurial"},{"title":"Configuring Concurrent Versions System (CVS)","href":"/docs/configuring-cvs"}]},{"group":"Client-side technology","pages":[{"title":"Client Side Technologies","href":"/docs/client-side-technologies"},{"title":"Using the jQuery JavaScript library","href":"/docs/jquery"},{"title":"Using the markItUp JavaScript plugin","href":"/docs/using-the-markitup-javascript-plugin"},{"title":"Using Flash on your website","href":"/docs/flash"},{"title":"Installing Ember.js on managed hosting accounts","href":"/docs/installing-ember-js-on-managed-hosting-accounts"},{"title":"MP3 hosting file storage","href":"/docs/mp3"},{"title":"MIDI (Musical Instrument Digital Interface) support","href":"/docs/midi"},{"title":"Using React on your hosting account","href":"/docs/react"}]},{"group":"Application deployment","pages":[{"title":"Application deployment","href":"/docs/application-deployment"},{"title":"Installing the Docker application deployment environment","href":"/docs/installing-docker"},{"title":"Installing a LAMP stack on an Ubuntu server","href":"/docs/installing-a-lamp-stack-on-an-ubuntu-server"},{"title":"Installing and configuring the AWS Command Line Interface (CLI)","href":"/docs/installing-and-configuring-the-aws-command-line-interface-cli"}]},{"group":"Testing and development","pages":[{"title":"Web testing and development","href":"/docs/testing-and-development"},{"title":"Installing development tools on an unmanaged server","href":"/docs/installing-development-tools-on-an-unmanaged-server"},{"title":"Setting up a virtual machine with VirtualBox for local testing","href":"/docs/configuring-a-virtual-machine-for-local-testing"},{"title":"Creating an Apache installation for local testing","href":"/docs/creating-an-apache-installation-for-local-testing"},{"title":"Creating a PostgreSQL installation for local testing","href":"/docs/creating-a-postgresql-installation-for-local-testing"}]},{"title":"Using Lua on hosting.com servers","href":"/docs/lua"},{"group":"Node.js","pages":[{"title":"Creating persistent Node.js applications","href":"/docs/making-persistent-node-js-applications"},{"title":"Using an SSL certificate in a Node.js app","href":"/docs/using-an-ssl-certificate-in-a-node-js-app"}]},{"group":"Search engines and crawlers","pages":[{"title":"Controlling search engines and web crawlers using the robots.txt file","href":"/docs/controlling-search-engines-and-web-crawlers-using-the-robots-txt-file"},{"title":"Disabling automatic creation of the robots.txt file","href":"/docs/disabling-automatic-creation-of-the-robots-txt-file"},{"title":"Do you support IP canonicalization?","href":"/docs/do-you-support-ip-canonicalization"}]},{"group":"Web standards and browser policy","pages":[{"title":"Enabling Cross-Origin Resource Sharing (CORS)","href":"/docs/enabling-cross-origin-resource-sharing"},{"title":"Configuring frames with the X-Frame-Options header","href":"/docs/configuring-frames-with-the-x-frame-options-header"},{"title":"Setting up URL frame forwarding","href":"/docs/setting-up-url-frame-forwarding"},{"title":"Developing ADA-compliant web sites","href":"/docs/developing-ada-compliant-web-sites"}]},{"group":"Supported software","pages":[{"title":"Do you support Ruby on Rails?","href":"/docs/do-you-support-ruby-on-rails"},{"title":"Do you support Java?","href":"/docs/do-you-support-java"},{"title":"Do you support MongoDB?","href":"/docs/do-you-support-mongodb"},{"title":"Do you support Apache Solr?","href":"/docs/do-you-support-apache-solr"},{"title":"Do you support HTTP/2?","href":"/docs/do-you-support-http-2"},{"title":"Can I run ColdFusion?","sidebarTitle":"ColdFusion","href":"/docs/do-you-support-coldfusion"}]}]},{"group":"Add-on services","pages":[{"group":"Business email","pages":[{"title":"Email hosting","href":"/docs/email-hosting"},{"group":"Professional Email","pages":[{"title":"Professional Email","sidebarTitle":"Professional Email","href":"/docs/titan-mail"},{"title":"Setting up your domain's DNS records for Professional Email","sidebarTitle":"Setting up your domain's DNS records for Professional Email","href":"/docs/setting-up-dns-records-for-titan-mail"},{"title":"Managing Professional Email accounts","sidebarTitle":"Managing Professional Email accounts","href":"/docs/managing-titan-mail-accounts"},{"title":"Managing your email in Professional Email webmail","sidebarTitle":"Managing your email in Professional Email webmail","href":"/docs/managing-your-email-in-titan-mail-webmail"},{"title":"Comparison of Professional Email and Barracuda email","sidebarTitle":"Comparison of Professional Email and Barracuda email","href":"/docs/comparison-of-titan-mail-and-barracuda-email"},{"title":"Setting up Professional Email on Android devices","sidebarTitle":"Setting up Professional Email on Android devices","href":"/docs/setting-up-titan-mail-on-android-devices"},{"title":"Setting up Professional Email on Apple iOS devices","sidebarTitle":"Setting up Professional Email on Apple iOS devices","href":"/docs/setting-up-titan-mail-on-apple-ios-devices"},{"title":"Setting up Professional Email on Microsoft Mail","sidebarTitle":"Setting up Professional Email on Microsoft Mail","href":"/docs/setting-up-titan-mail-on-microsoft-mail"},{"title":"Setting up Professional Email on Microsoft Outlook","sidebarTitle":"Setting up Professional Email on Microsoft Outlook","href":"/docs/setting-up-titan-mail-on-microsoft-outlook"},{"title":"Setting up Professional Email on an email client application","sidebarTitle":"Setting up Professional Email on an email client application","href":"/docs/setting-up-titan-mail-on-an-email-client-application"},{"title":"Clearing the webmail cache on Professional Email accounts","sidebarTitle":"Clearing the webmail cache on Professional Email accounts","href":"/docs/clearing-the-webmail-cache-on-titan-mail-accounts"},{"title":"Enabling two-factor authentication for Professional Email accounts","sidebarTitle":"Enabling two-factor authentication for Professional Email accounts","href":"/docs/enabling-two-factor-authentication-for-titan-mail-accounts"},{"title":"Importing email data into Professional Email accounts","sidebarTitle":"Importing email data into Professional Email accounts","href":"/docs/importing-email-data-into-titan-mail-accounts"},{"title":"Importing contacts into Professional Email accounts","sidebarTitle":"Importing contacts into Professional Email accounts","href":"/docs/importing-contacts-into-titan-mail-accounts"},{"title":"Changing your password for Professional Email accounts","sidebarTitle":"Changing your password for Professional Email accounts","href":"/docs/changing-your-password-for-titan-mail-accounts"},{"title":"Managing email signatures for Professional Email accounts","sidebarTitle":"Managing email signatures for Professional Email accounts","href":"/docs/managing-email-signatures-for-titan-mail-accounts"},{"title":"Managing external email forwarders in Professional Email","sidebarTitle":"Managing external email forwarders in Professional Email","href":"/docs/managing-external-email-forwarders-in-titan-mail"},{"title":"Integrating Professional Email accounts with Gmail","sidebarTitle":"Integrating Professional Email accounts with Gmail","href":"/docs/integrating-titan-mail-accounts-with-gmail"},{"title":"Reducing the number of accounts for Professional Email plans","sidebarTitle":"Reducing the number of accounts for Professional Email plans","href":"/docs/reducing-the-number-of-accounts-for-titan-mail-plans"},{"title":"Setting up DKIM (DomainKeys Identified Mail) for Professional Email accounts","sidebarTitle":"Setting up DKIM (DomainKeys Identified Mail) for Professional Email accounts","href":"/docs/setting-up-dkim-for-titan-mail-accounts"},{"title":"Ensuring high email deliverability for Professional Email accounts","sidebarTitle":"Ensuring high email deliverability for Professional Email accounts","href":"/docs/ensuring-high-email-deliverability-for-titan-mail-accounts"},{"title":"How many emails can i send and receive","href":"/docs/how-many-emails-can-i-send-and-receive"}]},{"group":"SmarterMail (older email plans)","pages":[{"title":"Professional and Business Mail","href":"/docs/professional-and-business-mail"},{"title":"Setting up Professional and Business Email in SmarterMail","sidebarTitle":"Setting up your mailbox","href":"/docs/setting-up-professional-and-business-email"},{"title":"Using the Mail Migration Tool","href":"/docs/using-the-mail-migration-tool"},{"title":"Resetting your SmarterMail password","sidebarTitle":"Resetting your password","href":"/docs/resetting-the-password-in-professional-and-business-email"},{"title":"Enabling catch all emails on Business/Professional packages","href":"/docs/enable-catch-all-emails-on-businessprofessional-packages"},{"title":"Viewing the DNS settings for Professional and Business Email","href":"/docs/dns-settings-for-professional-and-business-email"}]},{"title":"Imapsync: Web-Based Mailbox Migration Guide","href":"/docs/imapsync-web-based-mailbox-migration-guide"}]},{"group":"SSL certificates","pages":[{"title":"Secure Sockets Layer (SSL) certificates information","href":"/docs/ssl-certificates"}]},{"title":"Marketing Suite","href":"/docs/marketing-suite"},{"group":"Security \u0026 Dark Web Monitoring","pages":[{"title":"Security \u0026 Dark Web Monitoring","href":"/docs/security-and-dark-web-monitoring"},{"title":"Set Up Security \u0026 Dark Web Monitoring","href":"/docs/set-up-security-and-dark-web-monitoring"},{"title":"I Received a Security Alert — What Should I Do?","href":"/docs/i-received-a-security-alert-what-should-i-do"},{"title":"How to Read Your Security \u0026 Dark Web Monitoring Report","href":"/docs/how-to-read-your-security-and-dark-web-monitoring-report"}]},{"title":"AI Sitebuilder and AI Sitebuilder Store","href":"/docs/ai-sitebuilder-and-ai-sitebuilder-store"},{"title":"AI Application Studio quick start guide","href":"/docs/hostingcom-ai-application-hosting-quick-start-guide"},{"group":"WordPress care and support","pages":[{"title":"Expert website support services from hosting.com","href":"/docs/expert-website-support-services-from-hostingcom"}]},{"group":"Third-party integrations","pages":[{"group":"Cloudflare","pages":[{"title":"Cloudflare","href":"/docs/cloudflare"},{"title":"Cloudflare Content Delivery Network (CDN)","href":"/docs/what-is-cloudflare"},{"title":"Activating Cloudflare","href":"/docs/how-to-activate-cloudflare"},{"title":"Using Cloudflare to defend against DDoS attacks","href":"/docs/using-cloudflare-to-defend-against-ddos-attacks"},{"title":"Troubleshooting Cloudflare connections","href":"/docs/troubleshooting-cloudflare-connections"},{"title":"Using SSL with Cloudflare","href":"/docs/using-ssl-with-cloudflare"},{"title":"Clearing the Cloudflare cache","href":"/docs/clearing-the-cloudflare-cache"},{"title":"Turning off Cloudflare temporarily for maintenance or development","href":"/docs/turning-off-cloudflare"},{"title":"End-to-end encryption for Let's Encrypt and Cloudflare SSL","href":"/docs/lets-encrypt-and-cloudflare-universal-ssl"},{"title":"Configuring DNS records for email in Cloudflare","href":"/docs/configuring-dns-records-for-email-in-cloudflare"},{"title":"Discontinuation of Cloudflare CDN cPanel and Plesk plugins","href":"/docs/discontinuation-of-cloudflare-cdn-cpanel-and-plesk-plugins"},{"title":"Troubleshooting SSL certificate renewals for Cloudflare-enabled domains","href":"/docs/troubleshooting-ssl-certificate-renewals-for-cloudflare-enabled-domains"}]},{"title":"Using the QUIC.cloud CDN with WordPress","href":"/docs/using-the-quic-cloud-cdn-with-wordpress"},{"title":"Configuring your domain to use Ezoic","href":"/docs/configuring-your-domain-to-use-ezoic"},{"title":"Signing up for a Mailchimp account","href":"/docs/signing-up-for-a-mailchimp-account"}]},{"group":"Referral programs","pages":[{"title":"Affiliate program","href":"/docs/affiliate-program"},{"title":"Refer-a-friend program","href":"/docs/refer-a-friend-program"}]}]},{"group":"Hosting.com products","pages":[{"title":"Determining which data center hosts your account","href":"/docs/determining-which-data-center-hosts-your-account"},{"group":"Managed hosting for WordPress powered by Rocket.net","hidden":true,"pages":[]},{"title":"Managing local backups on Dedicated servers","href":"/docs/managing-local-backups-on-dedicated-servers"},{"title":"Managed Dedicated and VPS server customizations","href":"/docs/server-customizations-for-managed-vps-and-managed-dedicated-servers"},{"title":"Differences between OpenVZ 6 and Virtuozzo 7","href":"/docs/differences-between-openvz-6-and-virtuozzo-7"},{"title":"Changing the time zone on a managed hosting account","href":"/docs/changing-the-time-zone-on-a-managed-hosting-account"},{"title":"Changing the time zone on an unmanaged hosting account","href":"/docs/changing-the-time-zone-on-an-unmanaged-hosting-account"},{"title":"Accessing and using Webuzo on an unmanaged server","href":"/docs/accessing-and-using-webuzo-on-an-unmanaged-server"},{"title":"Determining if your hosting account uses CloudLinux","href":"/docs/determining-if-your-hosting-account-uses-cloudlinux"},{"title":"CPU configurations in VPS products","href":"/docs/cpu-configurations-in-vps-products"},{"title":"Automatic updates for unmanaged VPS","href":"/docs/automatic-updates-for-unmanaged-vps"},{"title":"Identifying and reducing high disk usage on shared hosting accounts","href":"/docs/identifying-and-reducing-high-disk-usage-on-shared-hosting-accounts"},{"title":"CloudLinux monitoring and limits","href":"/docs/cloudlinux-monitoring-and-limits"},{"title":"Setting up New Relic on a managed VPS","href":"/docs/setting-up-new-relic"},{"title":"Why should I choose hosting.com?","href":"/docs/why-should-i-choose-hosting-com"}]},{"group":"Does hosting.com support...","hidden":true,"pages":[]},{"group":"Retired — pending deletion","hidden":true,"pages":[{"title":"Discontinuation of Barracuda Spam Protection","href":"/docs/discontinuation-of-barracuda-spam-protection"},{"title":"How to Manage DNS zones in Enhance","href":"/docs/copy-of-how-to-manage-dns-zones-1"},{"title":"Changing PHP versions and settings in Enhance","href":"/docs/copy-of-changing-php-versions-and-settings-in-the-hosting-panel"},{"title":"Managing your MySQL databases in Enhance","href":"/docs/copy-of-managing-your-mysql-databases-in-the-hosting-panel"},{"title":"Managing FTP accounts in Enhance","href":"/docs/copy-of-managing-ftp-accounts-in-the-hosting-panel"},{"title":"TLS and cipher suites update for December 2019","href":"/docs/tls-and-cipher-suites-update-december-2019"},{"title":"Fixing the Heartbleed vulnerability on unmanaged servers","href":"/docs/fixing-the-heartbleed-vulnerability-on-unmanaged-servers"},{"title":"Manual installations","href":"/docs/manual-installations"},{"title":"WordPress","href":"/docs/wordpress"},{"title":"Installing and using the P3 plugin for WordPress","href":"/docs/installing-and-using-the-p3-plugin"},{"title":"Ghost","href":"/docs/ghost"},{"title":"Adding comments to ghost","href":"/docs/adding-comments-to-ghost"},{"title":"Updating a Ghost website","href":"/docs/updating-ghost"},{"title":"Migrating WordPress content to Ghost","href":"/docs/migrating-wordpress-content-to-ghost"},{"title":"Using Google Analytics with Ghost","href":"/docs/using-google-analytics-with-ghost"},{"title":"Installing Ghost themes","href":"/docs/installing-ghost-themes"},{"title":"Elgg","href":"/docs/elgg"},{"title":"Adding CAPTCHA protection to an Elgg site","href":"/docs/adding-captcha-protection-to-an-elgg-site"},{"title":"Disabling plugins in Elgg","href":"/docs/disabling-plugins-in-elgg"},{"title":"SugarCRM","href":"/docs/sugarcrm"},{"title":"Configuring the SugarCRM cron routine","href":"/docs/configuring-the-sugarcrm-cron-routine"},{"title":"Roundcube","href":"/docs/roundcube"},{"title":"Configuring a shared address book in Roundcube webmail","href":"/docs/configuring-a-shared-address-book-in-roundcube-webmail"},{"title":"Branding Roundcube webmail","href":"/docs/branding-roundcube-webmail"},{"title":"Moodle","href":"/docs/moodle-configuration"},{"title":"Changing the Moodle site URL","href":"/docs/changing-the-moodle-site-url"},{"title":"How to use our web hosting Knowledge Base","href":"/docs/how-to-use-the-knowledge-base"},{"title":"Do you support cPanel SSL certificates?","href":"/docs/do-you-support-cpanel-ssl"},{"title":"Do you support TLS for e-mail?","href":"/docs/do-you-support-tls-for-e-mail"},{"title":"Do you support cURL?","href":"/docs/do-you-support-curl"},{"title":"Hosting.com developer support guidelines","href":"/docs/developer-support-guidelines"},{"title":"Do you support GitLab?","href":"/docs/do-you-support-gitlab"},{"title":"Do you support TeX and LaTeX?","href":"/docs/do-you-support-tex-and-latex"},{"title":"Do you support the Symfony PHP framework?","href":"/docs/do-you-support-the-symfony-php-framework"},{"title":"Do you support SourceGuardian?","href":"/docs/do-you-support-sourceguardian"},{"title":"Do you support web service protocols for PHP?","href":"/docs/do-you-support-web-service-protocols-for-php"},{"title":"Do you support telnet?","href":"/docs/do-you-support-telnet"},{"title":"Do you support Meteor.js?","href":"/docs/do-you-support-meteorjs"},{"title":"Do you support InnoDB for MySQL?","href":"/docs/do-you-support-innodb-for-mysql"},{"title":"Do you support the Git version control system?","href":"/docs/do-you-support-git"},{"title":"Do you support Midnight Commander?","href":"/docs/do-you-support-midnight-commander"},{"title":"Do you support mod_passenger?","href":"/docs/do-you-support-mod-passenger"},{"title":"Do you support the IMAP IDLE feature?","href":"/docs/do-you-support-the-imap-idle-feature"},{"title":"Do you support PECL?","href":"/docs/do-you-support-pecl"},{"title":"Do you support the pgcrypto module for PostgreSQL?","href":"/docs/do-you-support-the-pgcrypto-module"},{"title":"Do you support the SimpleXML extension for PHP?","href":"/docs/do-you-support-the-simplexml-extension-for-php"},{"title":"Do you support the RMagick gem?","href":"/docs/do-you-support-the-rmagick-gem"},{"title":"Do you support DNSSEC?","href":"/docs/do-you-support-dnssec"},{"title":"Do you support JSON with PHP?","href":"/docs/do-you-support-json-with-php"},{"title":"Do you support TLS 1.2?","href":"/docs/do-you-support-tls-1-2"},{"title":"Do you support Drush for Drupal?","href":"/docs/do-you-support-drush-for-drupal"},{"title":"Do you support MapServer?","href":"/docs/do-you-support-mapserver"},{"title":"Do you support Google Checkout?","href":"/docs/do-you-support-google-checkout"},{"title":"Do you support the Xdebug PECL package?","href":"/docs/do-you-support-the-xdebug-pecl-package"},{"title":"Do you support Spree Commerce?","href":"/docs/do-you-support-spree-commerce"},{"title":"Do you support SPDY?","href":"/docs/do-you-support-spdy"},{"title":"Do you support WHMCS hosting?","href":"/docs/do-you-support-whmcs-hosting"},{"title":"Do you support Sender Policy Framework (SPF)?","href":"/docs/do-you-support-sender-policy-framework-spf"},{"title":"Do you support PHP Tidy functions?","href":"/docs/do-you-support-php-tidy-functions"},{"title":"Do you support Emacs?","href":"/docs/do-you-support-emacs"},{"title":"Do you support Outlook Express?","href":"/docs/do-you-support-outlook-express"},{"title":"Do you support rsync?","href":"/docs/do-you-support-rsync"},{"title":"Do you support PyGreSQL?","href":"/docs/do-you-support-pygresql"},{"title":"Do you support phar (PHP Archive) files?","href":"/docs/do-you-support-phar-php-archive-files"},{"title":"Do you support PHP on Trax?","href":"/docs/do-you-support-php-on-trax"},{"title":"Do you support WebSocket connections?","href":"/docs/do-you-support-websockets"},{"title":"Do you support ionCube PHP Encoder?","href":"/docs/do-you-support-ioncube"},{"title":"Do you support the mod_status module?","href":"/docs/do-you-support-the-mod_status-module"},{"title":"Do you support MIDI files?","href":"/docs/do-you-support-midi-files"},{"title":"Do you support Squirrelmail?","href":"/docs/do-you-support-squirrelmail"},{"title":"Do you support APNS?","href":"/docs/do-you-support-apns"},{"title":"Do you support sockets with PHP?","href":"/docs/do-you-support-sockets-with-php"},{"title":"Do you support the Smarty PHP template engine?","href":"/docs/do-you-support-the-smarty-php-template-engine"},{"title":"Do you support VirtualBox?","href":"/docs/do-you-support-virtualbox"},{"title":"Do you support PHP sessions?","href":"/docs/do-you-support-php-sessions"},{"title":"Do you support HIPAA-compliant hosting?","href":"/docs/do-you-support-hipaa-compliant-hosting"},{"title":"Do you support the GD graphics library for PHP?","href":"/docs/do-you-support-the-gd-graphics-library-for-php"},{"title":"Do you support SSAE 16-compliant hosting?","href":"/docs/do-you-support-ssae-16-compliant-hosting"},{"title":"Do you support headless browsing, Selenium, or Puppeteer?","href":"/docs/do-you-support-headless-browsing-selenium-or-puppeteer"},{"title":"Do you support virtualenv and pip for Python?","href":"/docs/do-you-support-virtualenv-and-pip-for-python"},{"title":"Do you support SQLite?","href":"/docs/do-you-support-sqlite"},{"title":"Do you support PL/pgSQL?","href":"/docs/do-you-support-pl-pgsql"},{"title":"Do you support IRC?","href":"/docs/do-you-support-irc"},{"title":"Do you support XCache for PHP?","href":"/docs/do-you-support-xcache-for-php"},{"title":"Do you support FastAPI?","href":"/docs/do-you-support-fastapi"},{"title":"Do you support IPv6?","href":"/docs/do-you-support-ipv6"},{"title":"Do you support PDFlib with PHP?","href":"/docs/do-you-support-pdflib-with-php"},{"title":"Do you support GDPR compliance?","href":"/docs/do-you-support-gdpr-compliance"},{"title":"Do you support Zend Optimizer?","href":"/docs/do-you-support-zend-optimizer"},{"title":"Do you support lighttpd?","href":"/docs/do-you-support-lighttpd"},{"title":"Do you support HTMLDoc with PHP?","href":"/docs/do-you-support-htmldoc-with-php"},{"title":"Do you support sending bulk mail?","href":"/docs/do-you-support-sending-bulk-mail"},{"title":"Do you support Zip files with PHP?","href":"/docs/do-you-support-zip-files-with-php"},{"title":"Do you support mod_perl?","href":"/docs/do-you-support-mod-perl"},{"title":"Do you support Plexum?","href":"/docs/do-you-support-plexum"},{"title":"Do you comply with US Treasury embargo restrictions and sanctions?","href":"/docs/do-you-comply-with-us-treasury-embargo-restrictions"},{"title":"Do you support wildcard DNS?","href":"/docs/do-you-support-wildcard-dns"},{"title":"Do you support different PostgreSQL character encoding sets?","href":"/docs/do-you-support-different-character-encoding-sets-for-postgresql"},{"title":"Do you support Memcached hosting?","href":"/docs/do-you-support-memcached-hosting"},{"title":"Do you support Redis?","href":"/docs/do-you-support-redis"},{"title":"Do you support PostGIS?","href":"/docs/do-you-support-postgis"},{"title":"Do you support resource-intensive applications?","href":"/docs/do-you-support-resource-intensive-applications"},{"title":"Do you support the mod_pagespeed module?","href":"/docs/do-you-support-the-mod-pagespeed-module"},{"title":"Do you support the tsearch2 module?","href":"/docs/do-you-support-the-tsearch2-module"},{"title":"Do you support Varnish?","href":"/docs/do-you-support-varnish"},{"title":"Do you support SRS (Sender Rewriting Scheme)?","href":"/docs/do-you-support-srs-sender-rewriting-scheme"},{"title":"Do you support disk upgrades on unmanaged servers?","href":"/docs/do-you-support-disk-upgrades-on-unmanaged-servers"},{"title":"Dropmysite","href":"/docs/dropmysite"},{"title":"Backing up your data using Dropmysite","href":"/docs/backing-up-data-with-dropmysite"},{"title":"Restoring your data using Dropmysite","href":"/docs/restoring-data-with-dropmysite"},{"title":"Maximizing Dropmysite backup storage space","href":"/docs/maximizing-dropmysite-backup-storage-space"},{"title":"Monitoring blacklisted sites using Dropmysite","href":"/docs/blacklist-monitoring-with-dropmysite"},{"title":"How to Manage DNS zones","href":"/docs/copy-of-how-to-manage-dns-zones"},{"title":"QUIC (Quick UDP Internet Connections)","href":"/docs/quic-quick-udp-internet-connections"},{"title":"Turbo Web Hosting","href":"/docs/turbo-web-hosting"},{"title":"Setting up e-mail on Windows Phone","href":"/docs/setting-up-e-mail-on-windows-phone"},{"title":"Setting up the Opera Mail client","href":"/docs/setting-up-opera-mail"},{"title":"Setting up the Postbox e-mail client","href":"/docs/setting-up-postbox"},{"title":"Setting up the Windows Mail app","sidebarTitle":"Windows Mail app","href":"/docs/setting-up-microsoft-mail"},{"title":"Setting up Mailspring on Windows","href":"/docs/setting-up-mailspring-on-windows"},{"title":"Setting up Mailspring on macOS","href":"/docs/setting-up-mailspring-on-macos"},{"title":"Setting up Aqua Mail on Android","href":"/docs/setting-up-aqua-mail-on-android"},{"title":"Setting up Aqua Mail on Apple iOS","href":"/docs/setting-up-aqua-mail-on-apple-ios"},{"title":"Setting up BlueMail on Apple iOS","href":"/docs/setting-up-bluemail-on-apple-ios"},{"title":"Setting up BlueMail on Android","href":"/docs/setting-up-bluemail-on-android"},{"title":"Setting up Edison Mail on iOS","href":"/docs/setting-up-edison-mail-on-ios"},{"title":"Setting up Edison Mail on Android","href":"/docs/setting-up-edison-mail-on-android"},{"title":"Setting up the eM Client","href":"/docs/setting-up-em-client"},{"title":"Setting up the Mailbird e-mail client","href":"/docs/setting-up-mailbird"},{"title":"Setting up the Spike email client on macOS","href":"/docs/setting-up-spike-on-macos"},{"title":"Setting up the Spike email client on Android","href":"/docs/setting-up-spike-on-android"},{"title":"Setting up the Spike email client on Windows","href":"/docs/setting-up-spike-on-windows"},{"title":"Setting up the Spike email client on iOS","href":"/docs/setting-up-spike-on-ios"},{"title":"Setting up Spark Mail on Apple iOS","href":"/docs/setting-up-spark-mail-on-apple-ios"},{"title":"Setting up Spark Mail on Android","href":"/docs/setting-up-spark-mail-on-android"},{"title":"Setting up Spark Mail on Windows","href":"/docs/setting-up-spark-mail-on-windows"},{"title":"Setting up Spark Mail on macOS","href":"/docs/setting-up-spark-mail-on-macos"},{"title":"Setting up Airmail on macOS","href":"/docs/setting-up-airmail"},{"title":"Setting up Airmail on Apple iOS","href":"/docs/setting-up-airmail-on-apple-ios"},{"title":"Set up email in any app","sidebarTitle":"Set up email in any app","href":"/docs/e-mail-client-application-setup"},{"title":"Accessing e-mail accounts with client applications","href":"/docs/accessing-e-mail-accounts-with-client-applications"},{"title":"E-mail messages do not forward to Outlook.com (Hotmail) accounts","href":"/docs/e-mail-messages-do-not-forward-to-hotmail-outlook-com-accounts"}]}]},"title":"How to create a staging site on hosting.com Managed WordPress - hosting.com","buildId":"dpl_37ZDLJcyt8yhrTVF6LiYvX7LvmXB","deploymentId":"dpl_37ZDLJcyt8yhrTVF6LiYvX7LvmXB","dynamics":["a74be98ba7"],"chunks":["zoom-image-lightbox-BwiTMkfx.js","PlusIcon-DJ4_zRc8.js","lightbox-handle-r17bVUz3.js"]}
.jpg?fit=max&auto=format&n=E2LlsT5gBITvo732&q=85&s=ec11e1673894bdf46663a5d73602eb87)