.jpg?fit=max&auto=format&n=E2LlsT5gBITvo732&q=85&s=ec11e1673894bdf46663a5d73602eb87)
Creating and configuring a multisite network
The following procedure assumes that you have at least one WordPress installation already configured and running. To create and configure a multisite network, follow these steps:- In the directory where you installed WordPress, use your preferred text editor to open the wp-config.php file.
- Just above the / “That’s all, stop editing! Happy publishing./ line near the end of the file, paste the following text:
- Save your changes to the wp-config.php file.
- Log in to WordPress as the administrator.
- Before you can enable multisite, you must temporarily deactivate all of the site’s plugins. On the left sidebar, click Plugins, and then click Installed Plugins:\
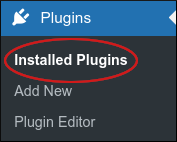
- To select all of the plugins, select the checkbox next to the Plugin heading.
- In the Bulk actions list box select Deactivate, and then click Apply.
- On the left sidebar, click Tools, and then click Network Setup:\
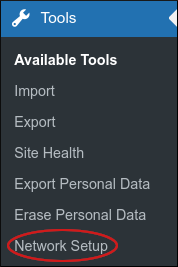
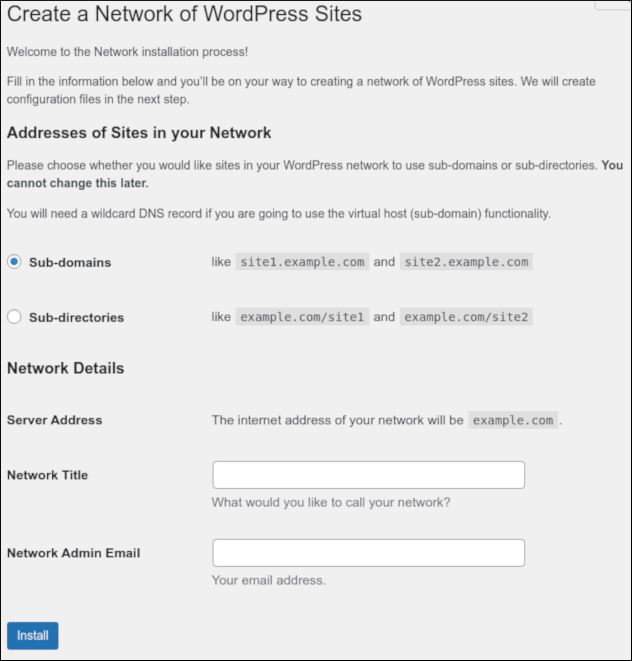
- Under Addresses of Sites in your Network, select Sub-domains or Sub-directories.
- In the Network Title text box, type a name for the WordPress network.
- In the Network Admin Email text box, type a valid e-mail address for the WordPress network administrator.
- Click Install. WordPress generates custom code for your installation to enable the network.
- You are now ready to enable the network, but before you do this, you should create a backup of the following files:
- wp-config.php
- .htaccess
- To enable the network, copy the custom code blocks into the wp-config.php and .htaccess files.
- Save your changes to the wp-config.php and .htaccess files.
- Log out and then log in again as the WordPress administrator. The new My Sites menu option appears in the top menu bar:\

- Dashboard: This option provides an overview of the network.
- Sites: This option shows each site in your network and enables you to manage them.
- Users: This option enables you to manage users for the network.
- Themes: This option enables you to manage themes for the network.
- Plugins: This option enables you to manage plugins for the network.
🚧 Important Remember that you disabled all of the plugins in step 7 above during network creation. Make sure you re-enable the plugins that you want to use on the network.
- Settings: This option enables you to change general settings for the network.
For detailed information about all of these options, please visit https://developer.wordpress.org/advanced-administration/multisite/admin/.👍 TipTo disable the multisite network at any time, follow these steps:
- Use your preferred text editor to open the wp-config.php file, and then remove the text you added in steps 2 and 14.
- Restore the backed up copy of the .htaccess file that you created in step 13.
Disabling a multisite network
To revert a WordPress multisite installation back to a single site, follow these steps:- In the directory where you installed WordPress, use your preferred text editor to open the wp-config.php file.
- Locate the multisite section in the wp-config.php file:
- Change the first two lines in the multisite section to false:
- Comment out or delete the remaining lines in the multisite section:
- Save your changes to the wp-config.php file. WordPress multisite is now disabled.
More information
- For more information about how to create a multisite network in WordPress, please visit https://developer.wordpress.org/advanced-administration/multisite/create-network/.
- For more information about network administration in WordPress, please visit https://developer.wordpress.org/advanced-administration/multisite/admin/.