Using Server Rewind to restore files and databases
Learn the ins and outs of restoring files and databases via Server Rewind with this helpful guide that breaks down the process with step-by-step instructions.
This article describes how to use the Server Rewind feature in cPanel to restore files and databases on your web site. Using Server Rewind, you can restore a file, a set of files, or a database with just a few clicks. For example, you might accidentally delete a file on your web site. If you have backups enabled on your web site, you can use Server Rewind to restore the previous version of the file.
ImportantMany accounts now use JetBackup instead of Server Rewind for backup and restore management. If you do not see the Server Rewind icon in cPanel, look for the JetBackup 5 icon instead. For information about how to use JetBackup to restore files and databases, please see this article.
Note
Server Rewind is not available on managed VPS accounts with root access.
Please note that Server Rewind is not available on the Takeoff 4, Takeoff 8, Takeoff 16, Soar 8, Soar 16, or Soar 32 VPS plans. For emergency restorative services, please contact the support team.
ImportantFor server performance and stability reasons, Server Rewind is unavailable from 3:00 AM to 5:00 AM in the local time zone of the server.
For accounts hosted at the Amsterdam data center, Server Rewind is unavailable between 3:00 AM and 5:00 AM Central European Time or Central European Summer Time, when applicable.
For accounts hosted at the Arizona data center, Server rewind is unavailable between 3:00 AM and 5:00 AM Mountain Standard Time.
For accounts hosted at the Michigan data center, Server Rewind is unavailable daily between 3:00 AM and 5:00 AM Eastern Standard Time or Eastern Daylight Time, when applicable.
For accounts hosted at the Singapore data center, Server Rewind is unavailable daily between 3:00 AM and 5:00 AM Singapore Time.
Backups and Server Rewind
All hosting.com servers have redundant hard drives for real-time RAID 1 mirrored backups. We also provide off-server backups. These server backups are stored for the last 30 days on a best-effort basis. To do a restore from one of these backups, use the Server Rewind feature in cPanel.
If you require assistance from our Support team in retrieving backups, please open a support ticket at https://my.hosting.com. In the ticket, please specify what you want to restore, and we will make a best effort to restore your data.
NoteWe recommend that you maintain your backups as well. If you create full or partial backups using the
cPanel Backup feature, however, please do not save multiple copies of backups on your hosting account. For more information, please see our Terms of Service.
Restoring files with Server Rewind
To restore files using Server Rewind, follow these steps:
-
Log in to cPanel.
NoteIf you do not know how to log in to your cPanel account, please see this article.
-
On the Tools page, in the Files section, click Server Rewind:

-
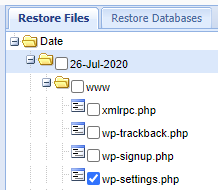
Select the date that contains the version of the file or files that you want to restore. To expand a date, click the + icon.
WarningIt is crucial to Server Rewind’s success that only the necessary files are selected for restoration. Selecting a whole day instead of a specific file (or directory) or attempting to restore the /public_html file that hosts multiple sites will often cause Server Rewind to stall or crash. Restoring one site at a time and only the files necessary is the best way to guarantee a successful restoration.
-
Navigate to the file or files that you want to restore. To expand a directory, click the + icon. You can select an entire directory or specific files to restore. Click the checkbox next to each file you would like to restore, like in the example below:
If no files have been selected, the following prompt will appear (you will then have to go back and select the files you want to restore):
-
Under Options, select the Overwrite existing files checkbox to overwrite existing files with the restored files.
-
Optionally, if you want to restore the files to a different location, in the Restore into this location in my home directory text box, type the location for the restored files.
ImportantIf you are restoring an account that has been compromised, make sure that you restore the files to an empty directory. Server Rewind does not delete malicious files that were uploaded after the restore date you selected.
-
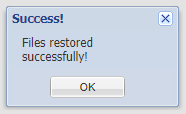
Click Restore!
 Note
NoteThe length of time to complete the restore process depends on directory size, the number and size of the files, and so on.
Restoring databases with Server Rewind
Important
For database restores, Server Rewind does not currently support usernames longer than eight (8) characters.
If you have any deleted MySQL databases that you want to restore, you must re-create them in cPanel before you run Server Rewind. For information about how to create MySQL databases in cPanel, please see this article. If you do not re-create a database and then restore it using Server Rewind, the database will not be visible in cPanel. If you receive an error message in cPanel when trying to re-create a database, please open a support ticket at https://my.hosting.comso we can resolve the issue.
Because of how PostgreSQL stores database data, Server Rewind cannot restore PostgreSQL databases. We strongly recommend that you create your own backups of PostgreSQL databases on a regular basis.
To restore databases using Server Rewind, follow these steps:
-
Log in to cPanel.
NoteIf you do not know how to log in to your cPanel account, please see this article.
-
On the Tools page, in the Files section, click Server Rewind:
-
Click the Restore Databases tab.
-
Select the date that contains the database version that you want to restore. To expand a date, click the + icon.
-
Select the database that you want to restore.
-
Under Options, select the Overwrite existing database checkbox to overwrite the existing database.
-
In the Write SQL into this location in my home directory text box, type the location for the restored database.
-
Click Restore.