Publishing your web pages with Google Web Designer
Follow our step-by-step guide to publish web pages designed in Google Web Designer to your web hosting server! It couldn't be easier!
This article describes how to publish web pages designed in Google Web Designer to a hosting.com server.
NoteThis article assumes that you have already created web pages using Google Web Designer, and you are ready to publish them to a hosting.com web server. For general information about how to use Google Web Designer to create web pages, please visit http://www.google.com/webdesigner.
Publishing Google Web Designer web pages to a hosting.com server
After you create web pages in Google Web Designer, you can publish them to the hosting.com server associated with your account. To do this, follow these steps:
-
In Google Web Designer, click the
 icon.Note
Alternatively, click File , and then click Publish .
-
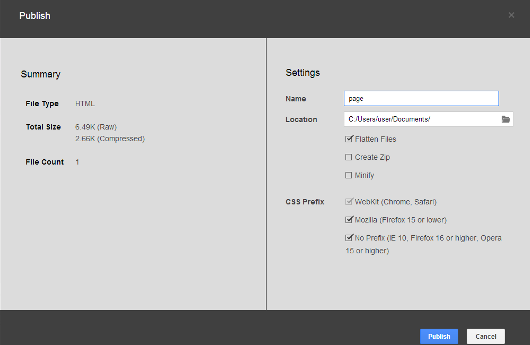
The Publish dialog appears:
-
Under Settings in the Name text box, type the folder name for the file and any supporting files.
-
In the Location text box, type the path where you want to store the file and any supporting files. Alternatively, click the folder icon to navigate to the folder location.
-
Select the Flatten Files check box.
-
If you want to compress the HTML markup, select the Minify check box.
-
Click Publish. Google Web Designer creates the folder you specified in step 3 in the location you specified in step 4.
-
Transfer the files from the location you specified on the local computer to your hosting.com account's public_html directory. You can use the cPanel File Manager to do this, but if there is a large number of files to upload, a dedicated FTP client is much more convenient. For detailed instructions about how to use an FTP client to upload files to your account, please see this article.
More information
For more information about Google Web Designer, please visit http://www.google.com/webdesigner.