Managing the cache
To manage the LiteSpeed Cache, follow these steps:-
Log in to cPanel.
📘 Note If you do not know how to log in to your cPanel account, please see this article.
-
In the ADVANCED section of the cPanel home screen, click LiteSpeed Web Cache Manager:

- Under LiteSpeed Cache Management, click the application you want to manage. For example, click WordPress Cache.
-
Click Scan to locate all installations of the selected application. LiteSpeed Web Cache Manager lists the discovered applications:
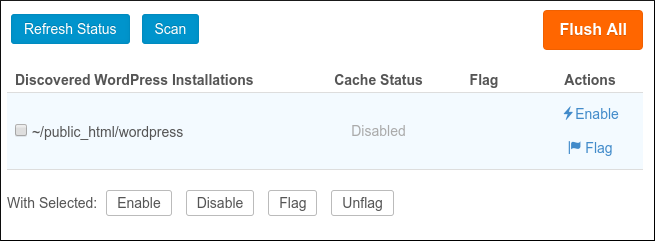
- Select one of the following options:
- To enable LiteSpeed Cache for the application, under Actions, click Enable.
- To disable LiteSpeed Cache for the application, under Actions, click Disable.
-
To flush the LiteSpeed Cache for all of your applications at the same time, click Flush All.
👍 Tip For an alternate method of flushing the entire cache, see the following section.
-
To flag an installation, under Actions, click Flag.
📘 Note When you flag an application, it is unaffected by all future mass enable or disable operations.
- To unflag an installation, under Actions, click Unflag.
- To do a mass operation on multiple applications at once, select the check boxes for the applications, and then next to With Selected: click the operation you want to do.
Flushing the cache
To flush the LiteSpeed Cache for all of your applications at the same time, follow these steps:-
Log in to cPanel.
📘 Note If you do not know how to log in to your cPanel account, please see this article.
-
In the ADVANCED section of the cPanel home screen, click LiteSpeed Web Cache Manager:
- Under Flush LSCache, click Flush All.
- Click OK to confirm. LiteSpeed Web Cache Manager flushes the cache.
Setting the log level
You can change the log level for LiteSpeed Web Cache Manager. To do this, follow these steps:-
Log in to cPanel.
📘 Note If you do not know how to log in to your cPanel account, please see this article.
-
In the ADVANCED section of the cPanel home screen, click LiteSpeed Web Cache Manager:
- Scroll to the bottom of the page, and then click Settings.
- In the Log File Level list box, select the logging level that you want.
- Click Save.
LiteSpeed Web Cache Manager stores log data in the /home/username/lscmData/ls_webcachemgr.log file, where username represents your account username.