Using Imunify Email
This article discusses how to use Imunify Email to help manage spam for your hosting account.
This article discusses how to use Imunify Email to help manage spam for your hosting account.
About Imunify Email
Imunify Email scans all outgoing email messages from your account for potential spam content. If Imunify Email determines that a message likely contains spam, it places it in quarantine. You can view these quarantined messages, and release them for sending if they were incorrectly flagged.
Using Imunify Email
You access and manage Imunify Email from the cPanel interface. To do this, follow these steps:
-
Log in to cPanel.
NoteIf you do not know how to log in to your cPanel account, please see this article.
-
On the Tools page, in the Security section, click Imunify360:

-
Click the Email tab:

-
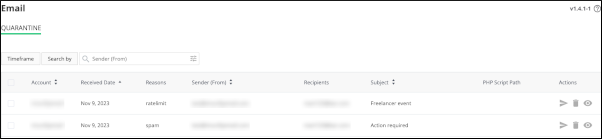
In the QUARANTINE section a list of any quarantined messages appears:
-
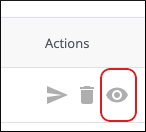
To view a quarantined message, in the Actions column, click the eye icon:
-
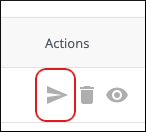
To release a message from quarantine and send it, in the Actions column, click the arrow icon, and then click YES, RELEASE FROM QUARANTINE to confirm:
-
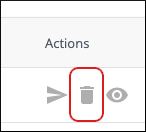
To delete a message, in the Actions column, click the trash can icon, and then click YES, DELETE to confirm:
-
Contacting Support
If your messages are still not arriving at their destination after releasing them from quarantine, please open a support ticket at https://my.hosting.com so we can assist you.
More information
-
For general information about Imunify Email, please visit https://www.imunify360.com/imunifyemail/.
-
To view Imunify's documentation, please visit https://docs.imunify360.com/email/.