The procedures in this article are a general guide to configuring email access on Apple iOS devices. Due to the large number of possible configurations, we provide support for email configuration on a “best effort” basis.
- Make sure you have already created at least one e-mail account for your domain. If you have not done this, please see this article to learn how to create an e-mail account using cPanel.
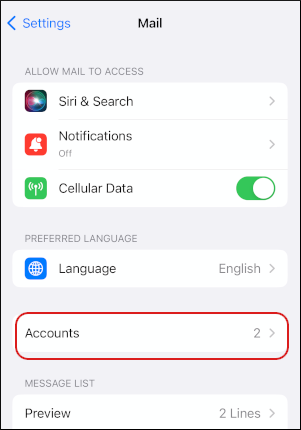
- On the home screen, tap Settings, and then tap Mail.
-
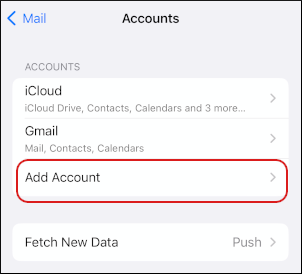
Tap Accounts, and then tap Add Account:
📘 Note The user interface displayed in these images may differ slightly from the version you have installed.
-
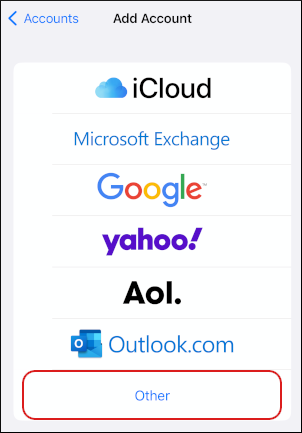
Tap Other:
-
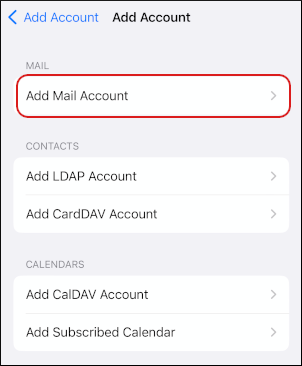
Under Mail, tap Add Mail Account:
-
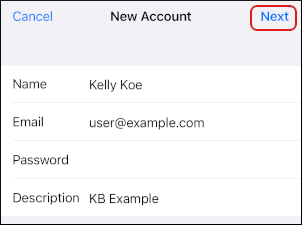
In the Name text box, type the display name that you want to appear on messages you send:

- In the Email text box, type the e-mail address of the account that you created in cPanel (for example, user@example.com ).
- In the Password text box, type the password for the e-mail account that you created in cPanel.
- In the Description text box, type a description for the account.
-
Tap Next:
-
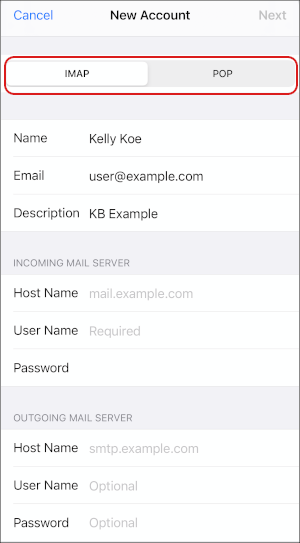
Select the type of incoming mail server that you want to use:
- If you want to use IMAP, tap IMAP.
-
If you want to use POP, tap POP.
-
Under Incoming Mail Server, in the Host Name text box, type either the full hosting.com server name for your account (for example, mi3-ss4.a2hosting.com ), or mail.example.com, whereexample.com represents your site’s domain name.
📘 Note For information about how to determine your account’s server name, please see this article.
👍 Tip To avoid receiving possible SSL/TLS warning messages, we recommend you use the full hosting.com server name instead of your site’s domain name.
- In the User Name text box, type the e-mail address of the account that you created in cPanel (for example, user@example.com ).
- In the Password text box, type the password for the e-mail account that you created in cPanel.
-
Under Outgoing Mail Server, type the same values that you used for the incoming mail server in steps 12 to 14.
🚧 Important Although iOS lists the outgoing mail server’s User Name and Password values as Optional , they are not optional. If you do not specify your username and password for the outgoing mail server, you will be unable to send messages.
-
Tap Next. iOS verifies the mail server settings. This process can take several minutes.
📘 Note If you specified mail.example.com as the server host name, you may receive a Cannot Verify Server Identity warning message. Tap Continue to continue the setup process.
-
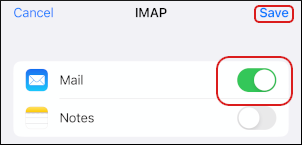
Confirm that Mail is set to ON, and then tap Save:
 iOS adds the account.
-
On the home screen, tap Mail. iOS downloads the messages in the account.
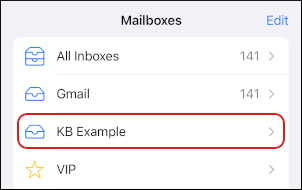
📘 Note If you already had another e-mail account configured before you added the hosting.com account, tap Mail, and then tap the account name in the top left corner of the screen to view the Mailboxes page. Under Mailboxes, tap the account description that you specified in step 9. iOS downloads and displays the messages in the account:
Configuring iOS to delete messages when using IMAP
If you set up iOS to access an e-mail account using IMAP, you may receive the following error message when you try to delete an e-mail message:- On the home screen, tap Settings, and then tap Mail.
-
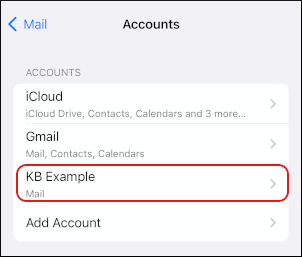
Tap Accounts, and then tap the account that you want to modify:
-
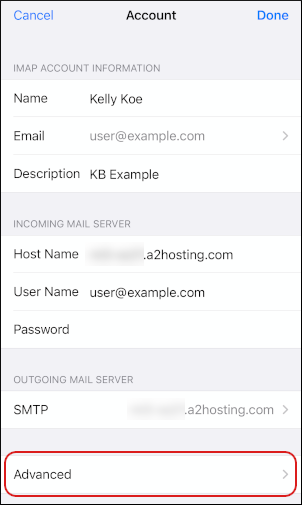
Under IMAP, tap the account name:

-
At the bottom of the page, tap Advanced:
-
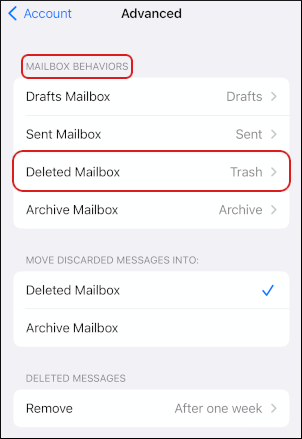
Under Mailbox Behaviors, tap Deleted Mailbox:
-
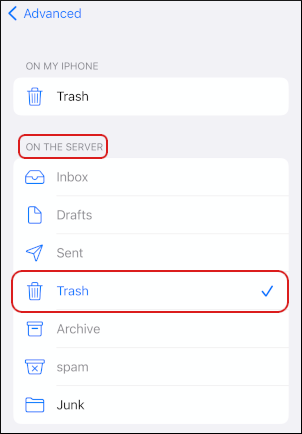
Under On the Server, confirm there is a check mark next to Trash. If there is not a check box next to Trash, tap Trash:
- On the top menu bar, tap Advanced, tap Account, and then tap Done. Any messages that you delete on iOS are now also deleted on the mail server.