Website blacklist monitor
Google Safe Browsing scans sites for malware and phishing content, and several web browsers use Google’s site blacklists to warn visitors of potentially unsafe sites. Dropmysite includes a Google blacklist monitoring feature. If the blacklist monitor detects that your site is blacklisted by Google Safe Browsing, it sends you an e-mail alert so you can take immediate corrective actions.The blacklist monitor is not enabled by default, but you can enable it for any domain hosted at hosting.com.
Adding a blacklist monitor
To add a blacklist monitor for your website, follow these steps:-
Log in to cPanel.
📘 Note If you do not know how to log in to your cPanel account, please see this article.
-
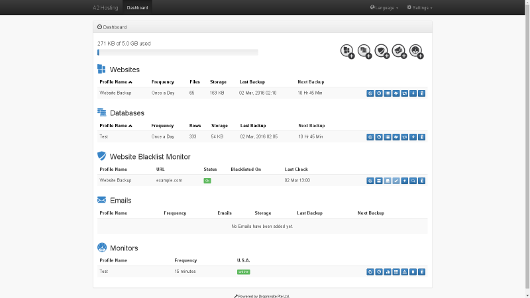
On the Tools page, in the Software section, click Dropmysite:
 The Dropmysite dashboard appears:
-
Click the Add Website Blacklist Monitor
 icon.
icon.
-
On the Website Blacklist Monitor page, specify the settings you want:
- In the Website list box, select the website profile that you want to monitor.
-
In the Url text box, type the URL that you want to monitor.
🚧 Important You must include an http:// or https:// prefix with the URL.
- In the Database list box, you can optionally select a database to monitor.
- In the Alert email text box, type the e-mail address where you want to receive notifications.
- To prevent Dropmysite from making any backups of your site when malware or phishing is detected, select the Stop backup after malware or phishing alert detected check box.
- Select the I agree to the Terms and Conditions of Website Blacklist Monitor check box.
- Click Save. The blacklist monitor is now configured and active.
Managing a website blacklist monitor
After you create a blacklist monitor, you can manage it. To do this, follow these steps:-
Log in to cPanel.
📘 Note If you do not know how to log in to your cPanel account, please see this article.
-
On the Tools page, in the Software section, click Dropmysite:
The Dropmysite dashboard appears:
-
Under Website Blacklist Monitor, locate the blacklist monitor you want to manage, and then select one of the following options:
-
To edit the settings for the monitor, click the Edit Details (
 ) icon.
-
To view the website backup history, click the Website Backup History (
 ) icon.
-
To view the database backup history, click the Database Backup History (
 ) icon.
-
When Dropmysite detects that your site has been blacklisted, it sends you a notification e-mail. This message contains a URL that you can click to acknowledge receipt. Alternatively, you can click the Acknowledge (
 ) icon.
-
To check right now if your website has been blacklisted, click the Check Now (
 ) icon.
-
To start the Google Safe Browsing Site Status tool for the site, click the Google Diagnostic (
 ) icon.
-
To delete the blacklist monitor profile, click the Delete (
 ) icon.
-
To edit the settings for the monitor, click the Edit Details (