ImportantWP Rocket is included with eligible hosting.com Managed WordPress plans but is not available on the Small plan.For higher-tier plans, WP Rocket can be installed on up to three websites per account.
Installing WP Rocket
To install WP Rocket on your Managed WordPress site, follow these steps:- Log in to the Hosting Panel at https://my.hosting.com.
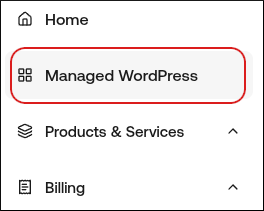
- In the left sidebar, click Managed WordPress:
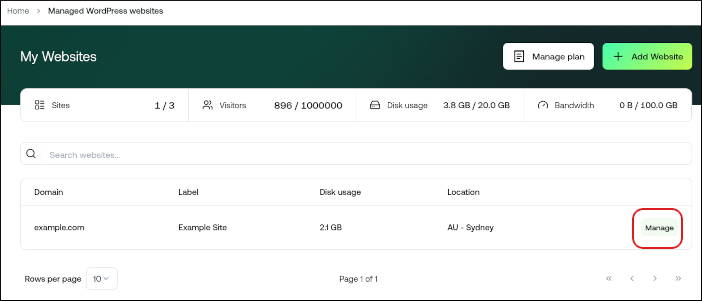
- On the My Websites page, locate the site you created in the previous procedure, and then click Manage:
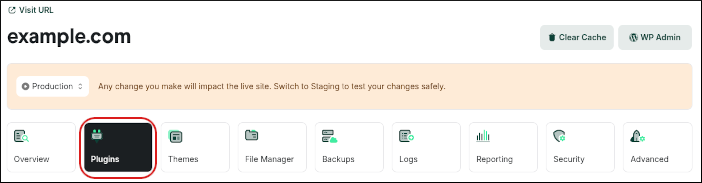
- The hosting.com Dashboard appears. Click the Plugins icon:
- In the Featured Plugin section, click Install Plugin:

- Managed WordPress installs and activates WP Rocket.
Configuring WP Rocket
By default, WP Rocket automatically applies 80% of web performance best practices, so you should notice better performance for your site immediately. To configure WP Rocket further and help your site run even better, follow these steps:- Log in to the Hosting Panel at https://my.hosting.com.
- In the left sidebar, click Managed WordPress:
- On the My Websites page, locate your site, and then click Manage:
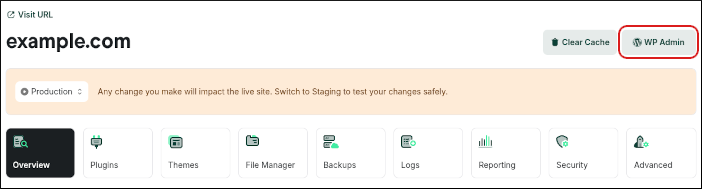
- The hosting.com Dashboard appears. To log in to the WordPress admin dashboard directly, click WP Admin:
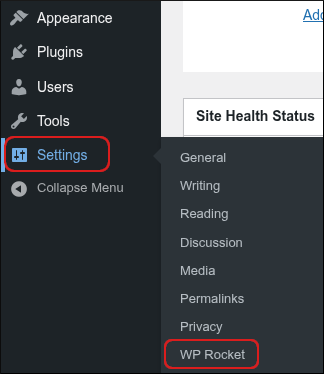
- On the WordPress dashboard, in the left sidebar, click Settings, and then click WP Rocket:
- The WP Rocket dashboard appears. In the left sidebar are several options:
- File Optimization On the File Optimization page, we recommend enabling the Minify CSS files and Optimize CSS delivery options. The Remove unused CSS option is stable and works better for most sites, but if it fails for you, the Load CSS asynchronously option should work. In the JavaScript Files section, we recommend enabling the Minify JavaScript files and Load JavaScript deferred options. The Delay JavaScript execution option is critical if you want better PageSpeed scores. You should delay any script that is not essential for the site loading. Keep in mind that anything delayed loads only after on-screen interaction (such as moving the mouse, for example).
- Media On the Media page, we recommend enabling all of the options.
- Preload
We don’t recommend preloading. The difference on site speed is minimal, and it greatly increases resource usage, such as bandwidth and CPU.
🚧 Important Additionally, preloading on WP Rocket does not work properly with Cloudflare’s Enterprise CDN. If you enable preloading, you may see extremely high bandwidth use and excessive CPU use.
- Advanced Rules On the Advanced Rules page, you can specify pages that shouldn’t be cached, and you can also set a time to make the cache expire automatically. Unless you experience caching issues, the option of 0 (unlimited) is fine. That avoids unnecessary cache purges and increases performance.
- Database On the Database page, we recommend enabling the options in the Comments Cleanup, Transients Cleanup, Database Cleanup, and Automatic Cleanup sections. Those settings should help keep your database fast and lightweight. There is also a Post Cleanup section where you can delete draft and revision posts — feel free to enable those options if you don’t need to retain post revisions or drafts.
- CDN You can skip the options in the CDN section, as our CDN is enabled by default on your account.
- Heartbeat On the Heartbeat page, we recommend enabling the Control Heartbeat option.
- Add-ons
Most of the options on the Add-ons page are incompatible with Managed WordPress. If you have an LMS system, the only option that might be interesting is the User Cache option. It allows WP Rocket to cache the backend as much as possible to provide a faster experience when your users are logged in.
🚧 Important Keep in mind that enabling the user cache may significantly increase disk usage.